
Ready to transform your photos from simple snapshots into compelling, professional-quality images? Moving beyond just pointing and shooting requires understanding the art of composition: the deliberate arrangement of elements within your frame. This guide provides essential photography composition tips, but with a crucial difference. We focus on practical, step-by-step instructions that go beyond basic definitions.
You'll learn not just what each rule is, but exactly how to apply it in real-world scenarios, complete with actionable tutorials and specific camera settings to try. This article is built to give you a repeatable framework for creating images that capture attention and tell a powerful story. Whether you're framing a landscape, shooting a portrait, or capturing street scenes, these techniques will help you develop a more intentional and impactful creative eye. Mastering these foundational skills is key to stunning visuals across all types of photography. For those looking to take their skills to new heights, exploring top drone photography tips can further elevate your overall shots with a unique perspective. By mastering composition on the ground and in the air, you build a versatile skill set for any creative challenge.
1. Master the Rule of Thirds with a Step-by-Step Tutorial
The rule of thirds is perhaps the most well-known of all photography composition tips, and for good reason. It’s a powerful, easy-to-implement technique for creating more engaging and balanced photos. The principle involves mentally dividing your frame into nine equal rectangles using two horizontal and two vertical lines. Instead of placing your subject dead center, you position key elements along these lines or at the points where they intersect, often called "power points."
This simple shift from a centered subject creates a more dynamic visual journey. An off-center subject encourages the viewer's eye to move around the entire frame, making the image feel more alive and interesting. It introduces a sense of harmony and visual flow that is often missing in centered, static shots.
How to Apply the Rule of Thirds: A Practical Guide
Most modern cameras, including those on smartphones, have a grid overlay feature that makes applying this rule incredibly simple.
- Step 1: Enable Your Grid. Go into your camera or phone's settings and turn on the "Grid" or "Gridlines" feature. This will display a 3x3 grid directly on your screen, removing any guesswork.
- Step 2: Identify Your Key Elements. Before you shoot, decide what the most important subject or focal point is in your scene. Is it a person's eyes in a portrait? A lone tree in a landscape? The setting sun?
- Step 3: Position Your Subject. Compose your shot by placing your key element on one of the four intersection points. For landscapes, a common practice is to align the horizon with either the top or bottom horizontal line, rather than splitting the photo in half.
- Step 4: Consider Direction. If your subject is moving or looking in a particular direction (e.g., a person looking to the left), place them on a vertical line that gives them "looking room" or "breathing space" within the frame. For a person looking left, you would place them on the right vertical line.
Pro Tip: While the rule of thirds is a foundational guideline, remember it's not an unbreakable law. Learning when to deliberately break it for creative effect is the mark of an advanced photographer. But first, master its application to build a strong compositional foundation.
2. Utilize Leading Lines to Guide the Viewer's Eye
Leading lines are one of the most effective photography composition tips for creating a powerful sense of depth and direction. These are natural or man-made lines within your scene that act as visual pathways, drawing the viewer’s eye through the photograph and often directly to your main subject. Using them effectively transforms a flat, two-dimensional image into a more immersive, three-dimensional experience.
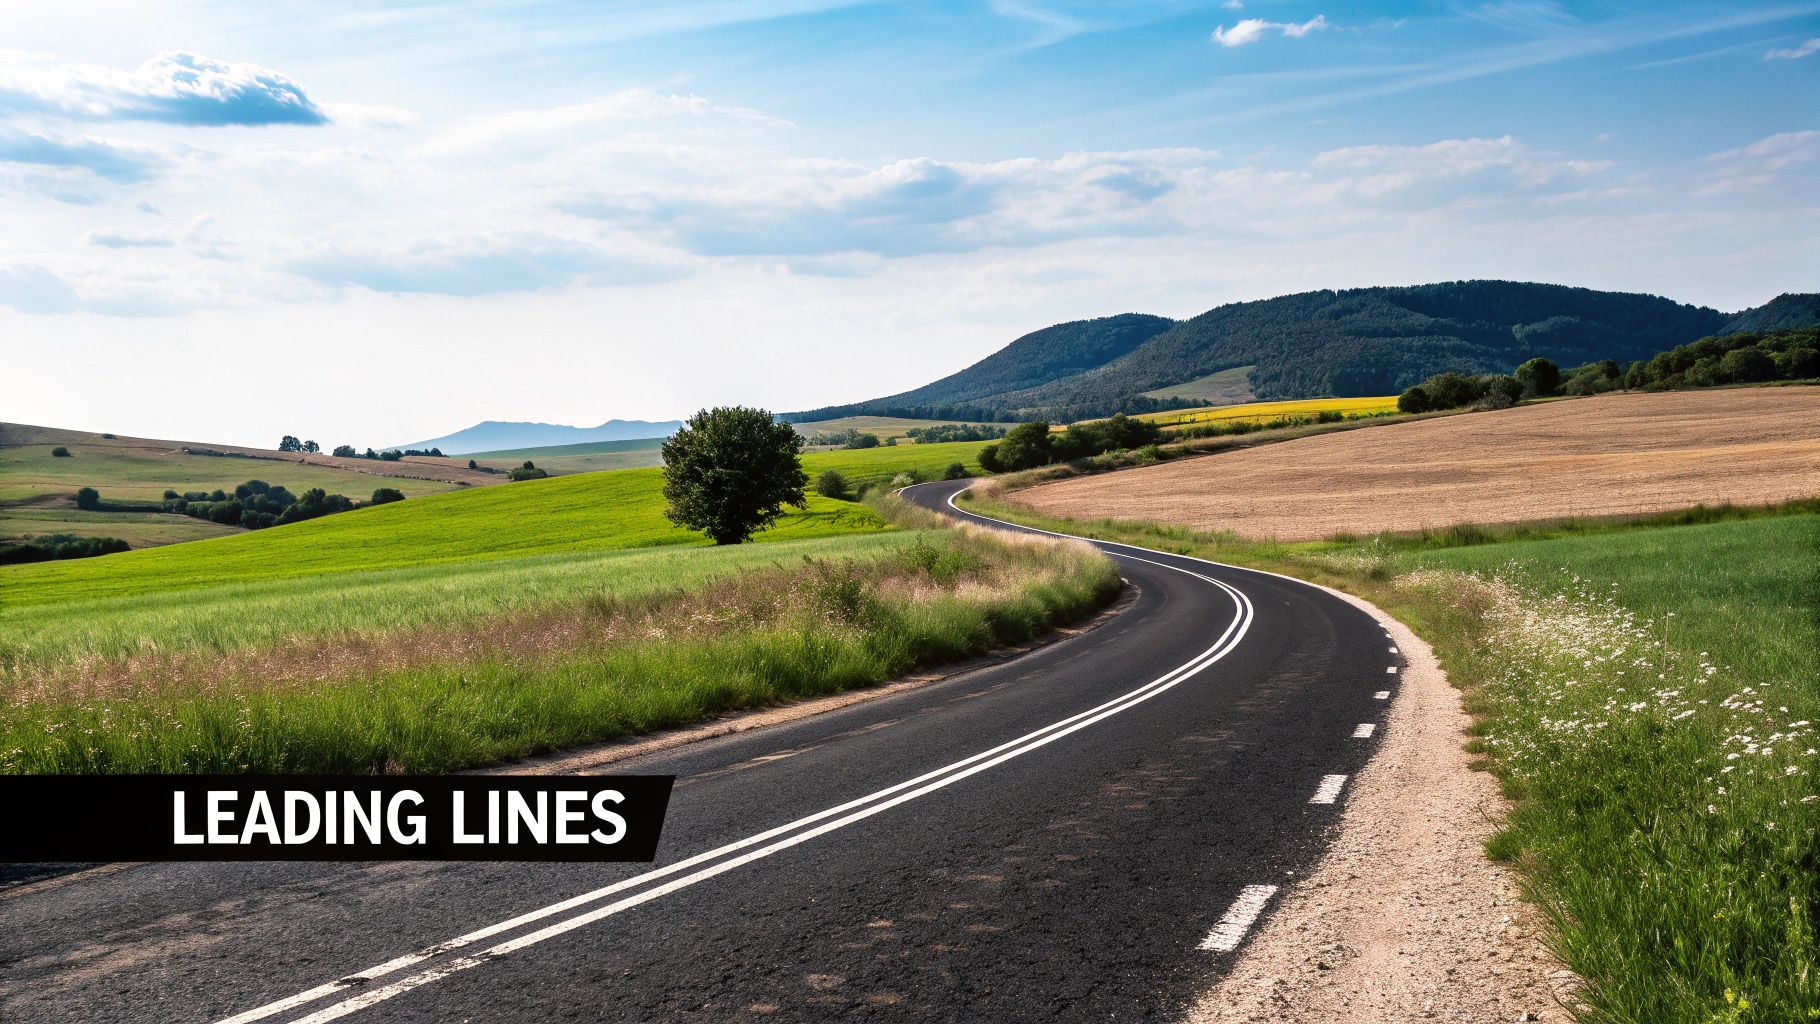
These lines can be anything: winding roads, railway tracks, fences, rivers, or architectural features. By strategically composing your shot around these elements, you tell the viewer exactly where to look, creating a narrative flow that strengthens the impact of your subject and holds the viewer's attention for longer. This technique adds structure and a compelling journey to the visual story.
How to Use Leading Lines: A Practical Guide
Finding and using leading lines is a skill you can develop by actively looking for them in any environment. Once you start seeing them, you’ll find them everywhere.
- Step 1: Scan Your Scene for Lines. Before you raise your camera, take a moment to identify potential leading lines. Look for roads, paths, shorelines, bridges, or even shadows. Ask yourself: "Is there a line here that can guide me to something interesting?"
- Step 2: Position Your Subject. The most powerful use of leading lines is when they point directly to your focal point. Place your subject, whether it’s a person, a building, or a distant mountain, at the end of the line to give it maximum emphasis. This creates a clear visual payoff for the viewer.
- Step 3: Adjust Your Perspective. Your physical position dramatically changes how the lines appear. Getting low to the ground can make lines like roads or train tracks seem to converge more dramatically, a technique often enhanced with a wide-angle lens. Experiment by moving left, right, up, or down to see how it alters the line’s path and strength.
- Step 4: Compose for Flow. The line should ideally enter the frame from a corner or the bottom edge and travel inwards. This invites the viewer into the image. S-curves, like a winding river or path, are particularly graceful and create a gentle, pleasing visual journey through the frame.
Pro Tip: Leading lines don’t have to be perfectly straight. Curved, diagonal, and zigzag lines are often more dynamic and interesting. The key is that they must lead somewhere important. A line that guides the viewer's eye out of the frame without a purpose can weaken your composition.
3. Utilize Framing for Added Depth and Context
Framing is a powerful photography composition tip that involves using elements within your scene to create a natural "frame within a frame" around your main subject. This technique immediately directs the viewer's eye to the most important part of the image, adding a sense of depth and context while cleverly obscuring distracting background or foreground elements. It creates a more immersive and intimate viewing experience.
This compositional tool can be found everywhere. Think of shooting a landscape through an old window, using overhanging tree branches to frame a portrait, or capturing a bustling street scene through an architectural archway. These natural frames not only add visual interest but also help to tell a richer story about your subject and their environment.

How to Apply Framing: A Practical Guide
Applying this technique requires you to actively look for framing opportunities in your environment. Once you start searching for them, you'll see potential frames everywhere.
- Step 1: Identify Your Subject First. Before you look for a frame, know what your primary subject is. This ensures the frame serves its purpose of enhancing the subject, not becoming the subject itself.
- Step 2: Find Your Frame. Scan the environment for elements you can shoot through, under, or around. Look for doorways, windows, tunnels, tree branches, arches, or even gaps between people in a crowd.
- Step 3: Position Yourself Correctly. Move around to align the subject perfectly within your chosen frame. This might mean crouching down, moving left or right, or changing your distance from the framing element. The goal is to create a clear relationship between the frame and the subject.
- Step 4: Balance Your Exposure. Often, the framing element (like a dark doorway) will be much darker or brighter than your subject. Use your camera's exposure compensation or spot metering mode to ensure your main subject is properly lit, even if it means the frame becomes a silhouette or is slightly overexposed.
Pro Tip: Pay attention to your aperture. A wide aperture (like f/1.8) will blur the frame and make your subject pop, while a narrow aperture (like f/11) will keep both the frame and the subject in sharp focus. Choose based on the creative effect you want to achieve.
4. Create Harmony with Symmetry and Patterns
Harnessing symmetry and patterns is a powerful photography composition tip that taps into our innate appreciation for order and balance. This technique involves creating compositions with mirror-like reflections or repeating elements, which results in images that feel inherently pleasing and structured. Whether found in the precise geometry of architecture or the organic repetitions in nature, these elements provide a strong visual anchor that guides the viewer's eye.
Using symmetry often creates a sense of calm, stability, and formality. Patterns, on the other hand, build rhythm and texture, making an image visually engaging. The work of filmmakers like Wes Anderson, known for his obsession with perfect symmetry, and photographers like Andreas Gursky, who captures vast, overwhelming patterns, demonstrates the compelling impact of this compositional tool.

How to Capture Striking Symmetry and Patterns
Finding and framing these elements effectively requires a deliberate approach and a keen eye for detail. Unlike more fluid rules, this one often demands precision.
- Step 1: Find Your Centerline. For symmetrical shots, the most crucial step is to identify the axis of symmetry. This could be a road, the corner of a building, or a reflection line in water. Position yourself so this line runs directly through the center of your frame. A tripod is highly recommended to maintain perfect alignment.
- Step 2: Hunt for Repetition. Train your eye to spot patterns everywhere: the repeating arches of a bridge, a grid of windows on a skyscraper, a field of flowers, or the intricate design of a seashell. Use these repeating elements to fill your frame and create a sense of scale and rhythm.
- Step 3: Frame with Precision. Use your camera's gridlines to ensure your symmetrical lines are perfectly vertical or horizontal. Even a slight tilt can disrupt the effect, so take your time to get the alignment just right. For patterns, decide whether you want to fill the entire frame or use the pattern as a textured background.
- Step 4: Break the Pattern (Intentionally). Once you understand how to create perfect symmetry or patterns, try breaking them. Place a single, unique element within the repeating pattern, like one open window among many closed ones. This creates a powerful focal point and adds a narrative layer to your image.
Pro Tip: Don't limit yourself to one perspective. Get low to the ground to emphasize reflections or use a wide-angle lens to capture the grand scale of an architectural pattern. Conversely, a macro lens can reveal the hidden symmetries in the smallest natural objects.
5. Control Depth of Field to Guide the Viewer's Eye
Depth of field (DOF) is one of the most powerful photography composition tips for creating professional-looking images. It refers to the zone of acceptable sharpness within a photo, from the nearest to the farthest point. By controlling this zone, you can strategically guide the viewer's attention, make your subject pop, and add a three-dimensional feel to a two-dimensional medium.
Mastering DOF allows you to either isolate a single subject with a creamy, blurred background (a shallow depth of field) or keep an entire scene from foreground to background in sharp focus (a deep depth of field). This control is fundamental in everything from portraiture, where it separates the person from their surroundings, to landscape photography, where it captures sweeping, detailed vistas.
How to Control Depth of Field: A Practical Guide
Achieving the desired depth of field involves manipulating your camera's aperture settings. A wider aperture (a smaller f-stop number like f/1.8) creates a shallow DOF, while a smaller aperture (a larger f-stop number like f/16) creates a deep DOF.
- Step 1: Switch to Aperture Priority Mode. Set your camera dial to "A" or "Av." This mode lets you choose the aperture (f-stop), and the camera will automatically set the correct shutter speed for a proper exposure. This is the fastest way to control DOF without worrying about other settings.
- Step 2: Choose Your Desired Effect. For a blurred background (shallow DOF), select the widest aperture your lens allows (e.g., f/1.4, f/1.8, f/2.8). For a sharp landscape (deep DOF), choose a narrow aperture (e.g., f/11, f/16).
- Step 3: Position Yourself and Focus. The distance between your camera, your subject, and the background also impacts DOF. To increase background blur, move closer to your subject or ensure there is significant distance between your subject and the background. Place your focus point precisely on the most critical part of the subject, like the eyes in a portrait.
- Step 4: Use the DOF Preview Button. Many DSLRs and mirrorless cameras have a depth of field preview button. Pressing it will stop down the lens to your selected aperture, showing you exactly what will be in focus in the final shot before you even take the picture.
Pro Tip: While aperture is the primary control, remember that focal length matters too. Telephoto lenses naturally produce a shallower depth of field compared to wide-angle lenses at the same aperture and distance. For those looking to refine focus and clarity in post-production, it's possible to learn more about AI-driven image enhancement to sharpen key areas.
6. Utilize Color Theory to Create Harmony
Color is one of the most powerful tools in a photographer's arsenal, capable of evoking emotion, creating mood, and guiding the viewer's eye. Understanding color theory allows you to move beyond simply capturing a scene and start intentionally crafting a visual narrative. This photography composition tip involves using established color relationships, like complementary or analogous schemes, to build photos that feel cohesive, balanced, and impactful.
By strategically composing with color, you can make your subject pop, create a sense of calm or tension, and add a professional layer of polish to your work. A well-executed color palette separates a simple snapshot from a compelling piece of art, as demonstrated by masters like William Eggleston and Saul Leiter who used color as a primary compositional element. It’s about seeing the world not just in terms of light and shadow, but in hues and tones.
How to Apply Color Theory: A Practical Guide
Applying color theory starts with observation and can be enhanced significantly in post-processing. It's about recognizing and creating color relationships within your frame.
- Step 1: Learn the Color Wheel. Familiarize yourself with basic color relationships. Complementary colors (like blue and orange, or red and green) sit opposite each other on the wheel and create high contrast. Analogous colors (like green, yellow-green, and yellow) sit next to each other and create a serene, harmonious feel.
- Step 2: Identify a Dominant Color Scheme. When scouting a location, look for existing color schemes. Does a sunset offer a classic blue-and-orange complementary palette? Does a forest provide a lush, analogous green scheme? Frame your shot to emphasize these natural relationships.
- Step 3: Isolate Your Colors. To make a color scheme stronger, try to eliminate distracting colors from your composition. You can do this by changing your angle, getting closer to your subject, or using a shallow depth of field to blur a busy, multi-colored background.
- Step 4: Enhance in Post-Processing. Use your editing software to refine your color story. A practical tutorial: Open your image in a program like Lightroom and go to the HSL/Color panel. If you shot a subject in a red coat against green foliage, you can increase the saturation and luminance of just the red and green channels while slightly decreasing the saturation of other distracting colors (like blue in the sky). This strengthens your complementary color scheme. For advanced techniques, you can explore how AI-powered tools can apply specific color styles to your images on aiphotohq.com.
Pro Tip: Don't just think in terms of bright, saturated colors. Muted and desaturated color palettes can be just as powerful. A monochromatic scheme, using different tones and shades of a single color, can create a sophisticated and moody photograph that is incredibly unified.
7. Fill the Frame for Maximum Impact
Filling the frame is a powerful photography composition tip that forces a direct, intimate connection between the viewer and the subject. This technique involves getting physically close or using a longer focal length to eliminate distracting background elements and negative space. By doing so, you focus all the attention on your subject's details, textures, and emotions, creating a bold and compelling statement.
This approach is the opposite of showing a subject within its environment. It isolates the subject, making it the undeniable hero of the image. From dramatic close-up portraits revealing every wrinkle and emotion to macro shots that turn a tiny insect into a magnificent creature, filling the frame helps reveal a world that is often overlooked in wider, more conventional compositions.
How to Apply the Fill the Frame Technique: A Practical Guide
This method requires a conscious decision to exclude the unnecessary. It’s about focusing on the essence of your subject rather than its context.
- Step 1: Identify Your Core Subject. What is the most compelling part of your scene? In a portrait, it might be the eyes or the expression. For an object, it could be a unique texture, pattern, or detail. Decide what story you want that single element to tell.
- Step 2: Get Closer. The best way to fill the frame is often to physically move closer to your subject. This maintains perspective and creates a greater sense of intimacy than simply zooming in. If moving closer isn't possible, use a telephoto lens to optically compress the scene and isolate your subject.
- Step 3: Compose with Intention. As you fill the frame, pay close attention to the edges. What are you cutting off? Cropping a person at the joints (like elbows or knees) can look awkward. Instead, aim to crop mid-limb or create an intentional headshot. Ensure no distracting slivers of background sneak in at the corners.
- Step 4: Focus on Detail. Since the subject is so prominent, sharp focus is critical. In a close-up portrait, use your camera's single-point AF mode to place the focus point directly on the eye closest to the camera. In macro photography, focus on the most intricate part of the subject, like the pollen on a flower's stamen. This technique magnifies details, so make them count.
Pro Tip: Filling the frame is not just for close-ups. In sports or wildlife photography, it’s used to capture the raw emotion on an athlete’s face or the intense gaze of an animal. Use it to create a series of detail shots that, when paired with a wider establishing shot, tell a richer, more complete story.
7 Key Photography Composition Tips Comparison
| Technique | Implementation Complexity 🔄 | Resource Requirements 🔄 | Expected Outcomes 📊 | Ideal Use Cases 💡 | Key Advantages ⭐ |
|---|---|---|---|---|---|
| Rule of Thirds | Low - Easy to learn and apply | Minimal - Only grid overlay needed | Balanced, harmonious, dynamic images | Any genre (landscape, portrait, street) | Simple, universally applicable |
| Leading Lines | Medium - Requires careful positioning | Moderate - May use varied scenes | Enhanced depth, movement, visual flow | Landscapes, architecture, street photography | Guides viewer eye, adds dimension |
| Framing | Medium - Needs thoughtful composition | Moderate - Requires scene elements | Focused subject, added depth & context | Documentary, street, architectural photography | Draws attention, blocks distractions |
| Symmetry and Patterns | High - Requires precise alignment | Moderate to High - Tripods, patience | Harmonious, striking, orderly images | Architecture, abstract, nature photography | Creates strong visual impact, balance |
| Depth of Field Control | High - Technical camera knowledge | Moderate - Lenses with aperture control | Subject isolation, 3D effect | Portrait, macro, landscape, street photography | Professional look, guides attention |
| Color Theory and Harmony | Medium - Knowledge of color principles | Minimal to Moderate - Color tools/software | Emotional impact, cohesive visuals | Fashion, street, landscape, art photography | Enhances mood, visual unity |
| Fill the Frame | Low to Medium - Close proximity/composition care | Minimal - Zoom or physical approach | Intimate, detailed, impactful images | Portrait, macro, sports, abstract photography | Eliminates distractions, reveals detail |
Putting It All Together: Your Path to Better Composition
We've journeyed through seven foundational photography composition tips, from the classic Rule of Thirds to the bold statement of Filling the Frame. Each technique, whether it's harnessing the power of Leading Lines, creating depth with Framing, or leveraging the emotional impact of Color Theory, is a distinct tool designed to transform an ordinary snapshot into a captivating image. The true art of photography, however, isn't just knowing these rules; it's about developing the creative intuition to know when to use them, when to combine them, and even when to break them for greater effect.
Think of these principles not as rigid constraints but as a visual language. They are the grammar and vocabulary that allow you to communicate your vision clearly and compellingly. By understanding how to guide a viewer's eye, create balance, and evoke emotion, you move beyond simply documenting a scene and begin to interpret it. Your photographs will stop being passive observations and start becoming active, intentional stories.
Your Action Plan for Mastering Composition
Knowledge without action remains abstract. To truly internalize these photography composition tips and make them a natural part of your creative process, you must practice them deliberately. Here’s a structured, one-month challenge to get you started:
Week 1: Focus on Lines and Thirds. For the next seven days, every single photo you take must consciously apply either the Rule of Thirds or Leading Lines. Before pressing the shutter, ask yourself: Is my subject on an intersection point? Where are the lines in this scene, and how can they guide the viewer to my subject? This focused practice will build muscle memory.
Week 2: Master Framing and Depth. Now, shift your attention to creating a sense of three-dimensionality. Actively search for natural frames like doorways, arches, or foliage. Simultaneously, experiment with your aperture to control Depth of Field, consciously deciding what should be in sharp focus and what should be artistically blurred.
Week 3: Explore Patterns, Symmetry, and Color. This week is about visual harmony. Hunt for repeating patterns and perfect symmetry in both nature and architecture. Pay close attention to your color palette. Use a color wheel app to identify complementary or analogous colors in your environment and build your composition around them.
Week 4: Combine and Experiment. In the final week, your mission is to combine at least two compositional techniques in every shot. Frame a subject using the Rule of Thirds. Use Leading Lines that are also part of a repeating pattern. This is where your unique style will begin to emerge as you learn how different principles interact.
This deliberate, step-by-step approach moves you from simply knowing about these powerful photography composition tips to truly understanding them. Your eye will become more discerning, your creative choices more confident, and the quality of your images will speak for itself. Your camera is a tool, but composition is your voice. Now, go and create something that is uniquely yours.
Ready to perfect your shots after the fact? AI Photo HQ offers powerful AI-driven tools to enhance, upscale, and even restore your favorite photos, allowing you to fine-tune your compositions with incredible precision. Elevate your best work and see what's possible at AI Photo HQ.

