
Remember when editing photos felt like a chore? It often meant wrestling with complicated software for hours, trying to master skills that took forever to learn. Well, those days are over. AI tools for photo editing have stepped in, acting like a personal editing assistant that does the heavy lifting for you. They automate the tough stuff, letting anyone create professional-looking images in a fraction of the time.
The New Reality of AI-Powered Photo Editing
Tackling a complex photo edit used to feel like climbing a steep mountain. You needed specialized gear—think advanced Photoshop skills—and a whole lot of patience just to get a decent result. The process was packed with manual, painstaking steps that could scare off beginners and eat up a professional's entire day.
AI photo editing tools have basically flattened that mountain. They’ve become the expert guide that automates the trickiest parts of the job.
Let's look at a practical example: removing an unwanted object.
- The Old Way: You'd have to carefully trace the object with the Clone Stamp or Patch tool, meticulously sampling pixels from nearby areas to paint over it. A single mistake could create a blurry, unnatural mess.
- The AI Way (A Step-by-Step Guide):
- Select: Open your image and choose the "Object Removal" tool.
- Paint: Roughly paint over the person or object you want to erase. You don't need to be precise; the AI will understand your intent.
- Apply: Click "Apply" or "Erase." The AI analyzes the surrounding pixels and intelligently fills in the gap, matching the texture, lighting, and patterns of the background for a seamless result.
Beyond Minor Upgrades
We're not just talking about small tweaks here; this is a totally new way of thinking about image enhancement. AI can now analyze a photo’s context, lighting, and textures to make smart decisions that used to require a seasoned expert’s eye.
For example, some tools can breathe new life into old, faded photographs, restoring precious memories you thought were lost. To see just how powerful this can be, you can check out our complete guide on enhancing old photographs.
The goal is to remove the mundane and let you focus on what you love—creating. AI handles the technical side, so you can focus on the artistic vision.
This shift puts incredibly powerful tools into everyone's hands. It’s not about replacing creativity, but about unlocking it by tearing down the technical barriers that used to stand in the way.
How AI Is Completely Changing Creative Workflows

So, how does this AI magic actually work? It’s not just a fancy filter. Think of a true AI editor as a master artist who instantly understands every part of your photo—the light, the textures, the subject, and the background. This deep understanding lets it pull off complex edits in seconds that used to take hours of painstaking work.
When you ask an AI to remove something from your picture, it's not just deleting pixels and leaving a blurry mess. It intelligently rebuilds what should have been behind the object. The AI analyzes the surrounding area and generates brand-new, context-aware pixels that blend in perfectly. The goal is a final image that looks like it was shot that way from the start.
The Power of Smart Enhancement
One of the biggest shifts is how AI tools for photo editing are moving beyond simple, one-size-fits-all filters. Instead, they offer smart, context-aware adjustments. This means features like automatic cropping, real-time color correction, and intelligent object removal are now handling the grunt work, making professional-level results accessible to everyone.
Let's break down the difference with a practical tutorial: enhancing a subject's eyes.
- Before AI: The Manual Process
- Create a new adjustment layer.
- Use a fine brush to carefully create a layer mask over just the irises.
- Individually adjust brightness, contrast, and saturation sliders.
- Manually add a small white dot for a catchlight. (Time: 5-10 minutes)
- After AI: The One-Click Process
- Upload your photo.
- Find and click the "Enhance Eyes" or "Face AI" button.
- The AI automatically detects the eyes, brightens the irises, sharpens the lashes, and adds a natural catchlight. (Time: 5 seconds)
This is about more than just saving a few minutes. It fundamentally changes the creative process. The AI takes care of the technical heavy lifting, which frees you up to focus purely on your artistic vision and storytelling.
As AI continues to find its footing across different industries, its role in creative fields is becoming more and more central. You can see this reflected in broader industry trends, like the growing AI integration in creative workflows.
What’s truly exciting is how these tools empower creators at every skill level. A total beginner can now take a cluttered, poorly lit photo and get a clean, professional-looking shot in seconds. That’s a task that, not long ago, would have required years of experience and expensive software. This is what makes the current generation of AI editors so special.
Enhancing Portraits with AI in 3 Simple Steps
Ready to see just how fast modern AI photo editors can be? Let's walk through one of the most common jobs out there: perfecting a portrait. Forget about the old, time-sucking methods like manual dodging and burning or frequency separation. Those days are over.
This simple process shows how AI handles all the tedious work, letting you get a professional result in just a few minutes. Most photographers will tell you this is the most mind-numbing part of the job, so letting a machine handle it is a huge relief.
Step 1: Upload and Analyze
First things first—and it's the easiest part. Just drag and drop your portrait into your chosen AI editor. As soon as it's uploaded, the software's AI engine gets right to work.
It immediately scans the image to identify all the key facial features: the eyes, nose, mouth, skin, and even hair. This isn't just a blind process; it’s building an intelligent map of the face that the tool will use to make incredibly precise adjustments.
Step 2: Use the One-Click Enhancement
Now for the fun part. Look for a button that says something like "Portrait Enhance" or "Auto Retouch." With a single click, the AI applies a whole series of sophisticated corrections based on its initial scan.
In that one moment, it's doing several things at once:
- Balancing Lighting: It subtly smooths out any harsh shadows and tones down overly bright highlights on the face.
- Sharpening Key Features: The AI is smart enough to add a touch of sharpness just to the eyes and eyebrows, making them pop.
- Correcting Skin Tone: It automatically neutralizes weird color casts and evens out the overall skin complexion for a clean, natural look.
This isn't just slapping on a generic filter. The AI makes specific, localized changes that respect the character of the original photo. Think of it as creating a perfect, professional foundation for your final creative touches.
Step 3: Fine-Tune with AI Sliders
The one-click button does most of the heavy lifting, but the best AI tools for photo editing always give you the final say. This is where you use dedicated AI sliders to dial in the exact look you want.
For instance, you can play with the "Skin Smoothing" slider to gently reduce blemishes and wrinkles. The trick is finding that sweet spot where the skin looks polished but still completely natural and human. You'll likely also find sliders for "Eye Brightening" or "Teeth Whitening" for that last little bit of polish. A few minor tweaks here and there are all it takes to finalize your professional-grade portrait.
Alright, we've talked about touching up portraits, which is a fantastic way to save time. But what if you want to go beyond perfecting what’s already there and create something totally new?
This is where Generative Fill comes in, and it's easily one of the most exciting features in modern AI photo editing tools. It gives you the power to expand your creative canvas, literally pushing past the original boundaries of your photo.
Ever taken a great shot, only to wish it wasn't so tightly cropped? Generative Fill is the answer. It can intelligently build out the background, transforming a decent photo into a breathtaking, wide-angle masterpiece. The best part? It's incredibly simple to use.
This kind of power is quickly becoming a must-have feature in top-tier software. It's a big reason why the photo editing software market is expected to jump from USD 2.37 billion in 2025 to a massive USD 3.29 billion by 2032. That's a huge sign of just how much AI is changing the game. You can dig into more data on this market expansion to see what's driving the growth.
How to Use Generative Fill: A Quick Walkthrough
Let's walk through extending an image. The steps are designed to be fast, putting creative control in your hands without a massive learning curve.
Create Some Space: First, expand your canvas to create empty areas around your original photo. This is where the magic will happen. Use your selection tool to highlight this new blank space.
Write a Simple Prompt: Now, tell the AI what you want to see. Just type a clear, descriptive prompt. For instance, if you're working with a beach photo, you might write, "continue the beach with calm ocean waves and a clear blue sky."
Pick Your Favorite: The AI will then generate a few different options based on your prompt. Just browse through them and pick the one that best fits what you had in mind.
You can see it in action in the screenshot below. A simple text prompt is all it takes to add a yellow lane line to a road, and the AI makes it look completely natural.
Notice how seamlessly the AI blends the new elements into the picture, perfectly matching the lighting, shadows, and texture.
Pro Tip: Specificity is your best friend. Instead of just "add water," try something like "add a reflective puddle on the asphalt after a rainstorm." The more detail you feed the AI, the closer the result will be to what you’re picturing. This gives you incredible power to build entirely new scenes from your existing photos.
So, with all the ai tools for photo editing flooding the market, how do you pick the right one? It's easy to get overwhelmed. The secret is to tune out the marketing noise and get crystal clear on what you actually want to achieve.
Let’s walk through how to build a simple checklist to find the perfect tool for your creative work, without the headache.
First things first, what are you primarily editing? Your main goal is the most important filter. Are you a portrait photographer who spends hours on skin retouching, or a landscape enthusiast focused on making colors pop and details sing? The answer will instantly narrow down your options.
A tool that’s brilliant at generative fill for fantastical scenes might be clumsy when it comes to the subtle adjustments a professional headshot demands. Matching the tool to your task is everything.
Building Your Decision Checklist
Instead of drowning in endless feature lists, just ask yourself a few direct questions:
- What's my main goal? Am I looking for one-click fixes for social media, or do I need serious control with layers for commercial projects?
- What's my skill level? Am I a total beginner who needs a simple, friendly interface, or a seasoned pro who wants complex masking and manual controls?
- Where will I be editing? Does a beefy desktop app like Adobe Photoshop or Luminar Neo make sense, or would a flexible web-based editor like AI Photo HQ fit my workflow better?
- What's my budget? Is a monthly subscription okay, or do I prefer a one-time purchase? Don't get suckered into paying for bells and whistles you’ll never touch.
This isn't a niche problem anymore. The global AI image editing market was valued at USD 5.12 billion in 2025 and is on track to hit a staggering USD 39.7 billion by 2030. That growth shows just how essential these tools are becoming for everyone.
This handy visual breaks down how the type of photo you're working on should guide your choice of AI feature.
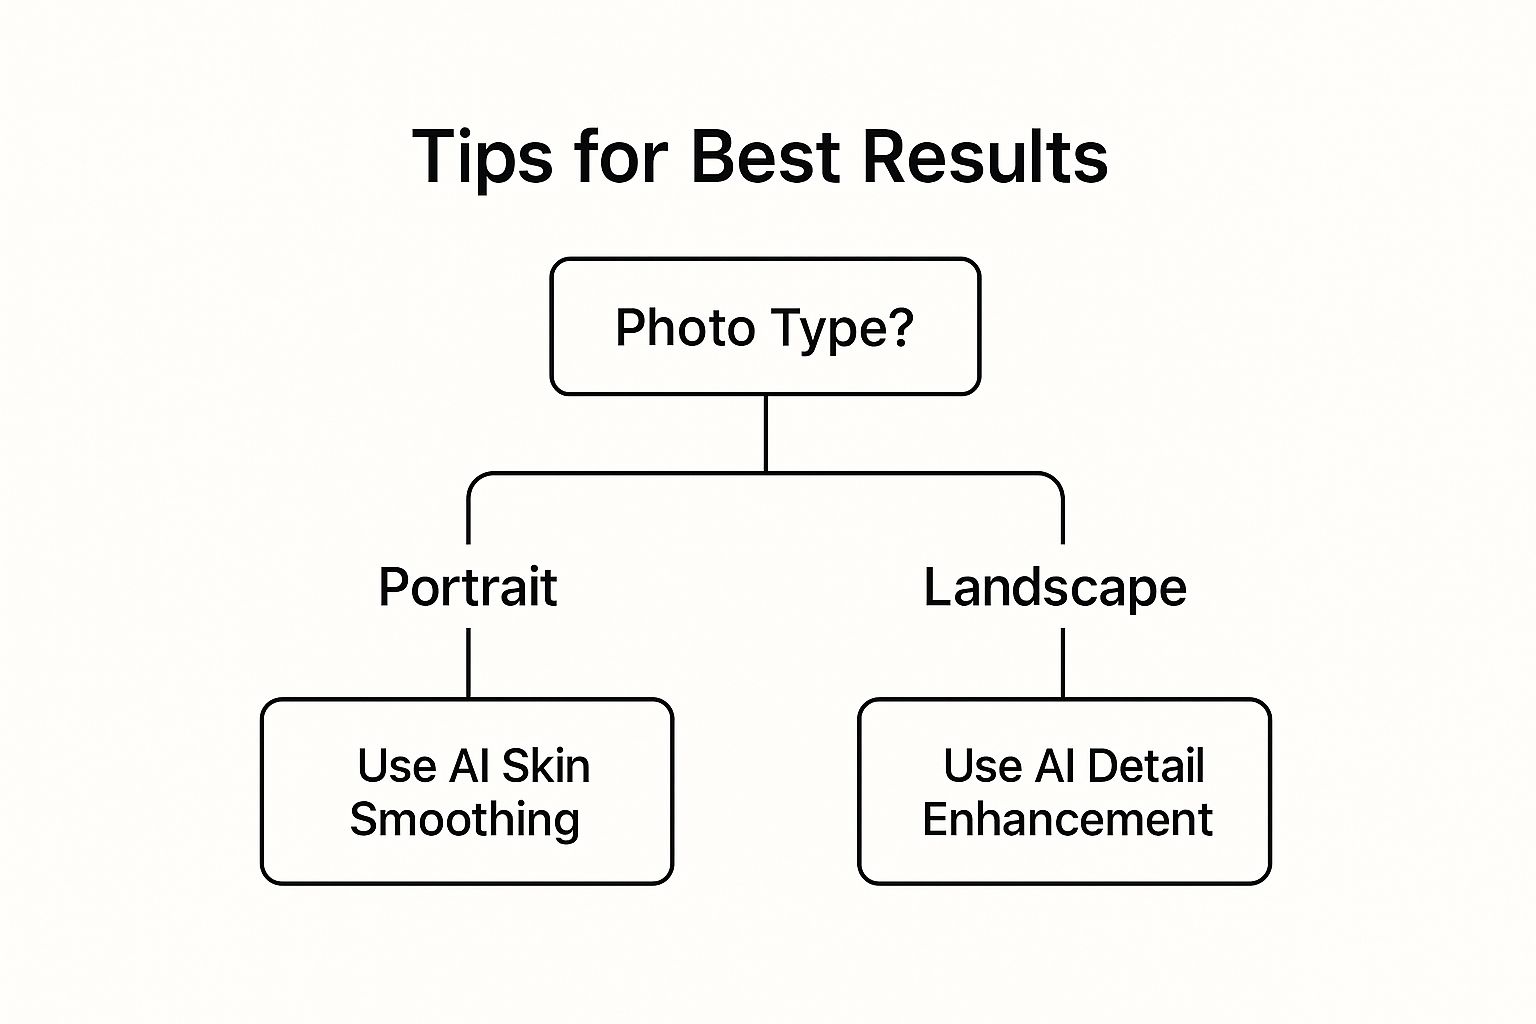
As you can see, starting with your final image in mind—whether it's a perfect portrait or a breathtaking landscape—is the quickest path to the right tool. For instance, if you're frequently working with old, damaged photos, you’ll need a tool with specialized restoration features. You can see how powerful this can be in our guide to old photo restoration.
By lining up what you need with what a tool does best, you'll find the right software with confidence and avoid wasting money.
Got Questions About AI Photo Editing? We Have Answers.
As you start dipping your toes into the world of AI tools for photo editing, it's totally normal for questions to pop up. Let's walk through some of the most common ones so you can feel confident diving in and seeing what you can create.
Can AI Really Edit Photos Better Than a Human?
For a lot of the grunt work? Absolutely. AI is a beast when it comes to tedious, technically precise jobs. Think of things like perfectly masking a person out of a busy background, zapping away every last blemish, or doing a quick, balanced color grade. An AI can nail these tasks with a speed and accuracy that most people just can't match by hand.
Now, a talented human artist will always win when it comes to the final creative vision and those subtle, artistic choices that make an image special. But the AI is the ultimate assistant. It takes care of the boring stuff, freeing you up to focus on the fun, creative part. For the average person, an AI tool will often deliver a cleaner, more professional-looking photo, and do it in a fraction of the time.
Think of it this way: AI is your tireless technical assistant, perfectly executing the tedious tasks so you, the artist, can focus on the bigger picture and final creative polish.
Do I Need a Super-Powerful Computer for This?
Not anymore, and this is a huge deal. While hefty desktop programs like Adobe Photoshop still love a beefy computer, many of the best new AI editors are cloud-based. This just means all the intense calculations happen on the company's powerful servers, not on your machine.
This shift has been a game-changer, opening up high-end editing to pretty much everyone. If you have a decent internet connection and a standard web browser, you can use powerful AI tools for photo editing on a basic laptop, a tablet, or even just your phone. We break down how this technology works in our guide to AI image enhancement.
This whole approach completely removes the need for expensive, specialized hardware, which used to be a major barrier for a lot of people.
Ready to skip the learning curve and jump straight to creating stunning images? AI Photo HQ offers a powerful, web-based platform that puts professional-grade AI tools right at your fingertips. From one-click enhancements to full-on generative art, start transforming your photos in seconds. Explore what you can create with AI Photo HQ today!

