
The world of photo editing is being transformed by artificial intelligence. Gone are the days of tedious manual adjustments and repetitive tasks. Today's tools offer one-click enhancements, intelligent object removal, and even full scene generation, making professional-grade results accessible to everyone from seasoned photographers to social media influencers. But with a flood of powerful options available, how do you determine which is the best AI photo editing software for your specific creative or professional needs?
This guide cuts directly through the noise to help you decide. We move beyond simple feature lists to provide a side-by-side comparison of the leading platforms. For each tool, we offer practical, step-by-step instructions to demonstrate exactly how to achieve stunning results, from restoring old family photos to creating captivating marketing images. You'll see precisely how each software's AI works in real-world scenarios, complete with screenshots and direct links to get you started.
Whether you're a digital artist experimenting with AI, a blogger needing high-quality visuals, or an agency requiring bulk image processing, you'll find a solution tailored to your workflow. Let's find the perfect software to unlock your creative vision and show you how to master its most powerful AI features instantly.
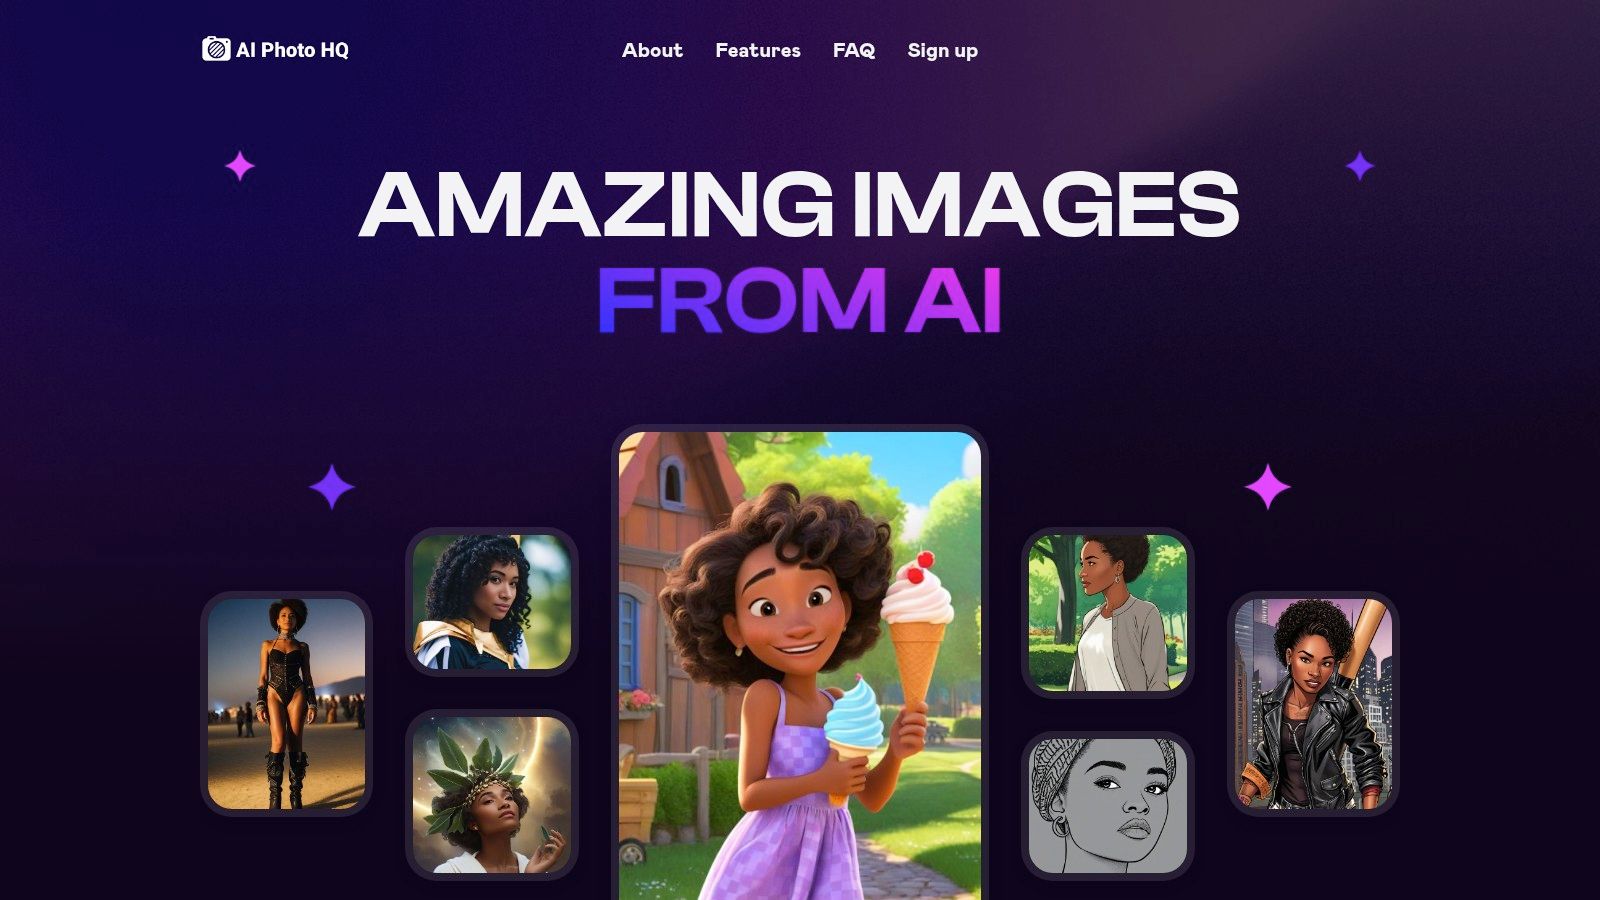
1. AI Photo HQ
AI Photo HQ establishes itself as a premier contender for the best ai photo editing software by offering a powerful, streamlined, and versatile platform built on the advanced Stable Diffusion XL engine. It expertly bridges the gap between professional-grade image generation and user-friendly accessibility, making it an exceptional choice for a wide spectrum of users, from social media influencers to enterprise-level marketing teams. Its core strength lies in its ability to produce high-quality, customized visuals almost instantaneously, eliminating the frustrating wait times common with other AI tools.
This platform is more than just a simple image generator; it's a comprehensive creative suite. Whether you're aiming to craft a hyper-realistic digital portrait, restore a faded family photograph to its former glory, or generate a batch of on-brand social media assets, AI Photo HQ provides a robust and intuitive environment to bring your vision to life.
Key Features & Capabilities
AI Photo HQ excels with a feature set designed for both creativity and efficiency. Its most compelling offerings include:
- Diverse Artistic Styles: The platform boasts a rich library of pre-configured styles and "fun packs" optimized for social media. Users can instantly generate images in styles like comic book, anime, neon punk, and fantasy art, perfect for creating engaging content for Instagram or TikTok.
- Professional Photo Restoration: Go beyond simple edits. The AI can analyze old, damaged, or low-resolution photos and intelligently restore them, sharpening details, correcting colors, and repairing imperfections with remarkable clarity.
- AI Video Generation: A unique differentiator is the ability to create short, five-second AI videos. This feature adds dynamic motion effects to still images, providing a quick and easy way to produce eye-catching video content without complex software.
- Custom Character Creation: Higher-tier plans unlock unlimited custom characters, allowing users to train the AI on specific faces or subjects to maintain consistency across a series of images, a crucial feature for branding and storytelling.
Step-by-Step Tutorial: Creating a Custom Avatar
To showcase its power, here’s how a digital artist could create a unique "neon punk" avatar for their online profiles in under a minute:
- Select a Base Image: Start by uploading a clear headshot or a detailed description of the desired character. For this tutorial, upload a forward-facing portrait.
- Choose the Style: Navigate to the style library and select the "Neon Punk" template. This instantly applies a set of parameters optimized for that aesthetic—glowing neons, futuristic clothing, and a high-contrast look.
- Refine with Prompts: Add specific text prompts to customize the output. In the prompt box, type: "wearing futuristic holographic glasses, with glowing blue cybernetic tattoos on one side of the face, cityscape in the background".
- Generate & Iterate: Click "Generate." Within seconds, AI Photo HQ will produce several variations. You can then select the best one or refine your prompts to iterate further until you achieve the perfect result.
Pricing and Access
AI Photo HQ operates on a subscription model, with no free tier. The plans are structured to scale with user needs, ensuring you only pay for the capacity you require.
| Plan Tier | Monthly Price | Image Quota | Key Features |
|---|---|---|---|
| Starter | $29 | 1,000 | Access to all styles, standard support |
| Pro | $79 | 5,000 | Unlimited custom characters, priority support |
| Guru | $269 | 25,000 | Agency-level access, custom feature requests, top-tier support |
Pros:
- Extremely fast image generation powered by the Stable Diffusion XL engine.
- Wide variety of high-quality styles optimized for social media platforms.
- Scalable plans suitable for individuals, agencies, and enterprise clients.
- Includes valuable extra features like photo restoration and AI video creation.
- Guarantees enterprise-grade privacy and indefinite hosting for creations.
Cons:
- No free tier or trial is available to test the platform before committing.
- The most powerful features, like unlimited custom characters and the highest image quotas, are reserved for the more expensive plans.
For those serious about integrating AI into their creative workflow, AI Photo HQ offers a robust, fast, and feature-rich solution that stands out in the crowded market.
Website: https://aiphotohq.com
2. Adobe (Photoshop + Lightroom, Firefly AI)
Adobe remains the undisputed industry standard, and its integration of the Firefly generative AI model directly into Photoshop and Lightroom has transformed it into one of the best AI photo editing software ecosystems available. This isn't just about adding a few AI features; it's a complete, end-to-end workflow designed for professionals and serious hobbyists who demand precision and power.
The synergy between Photoshop's generative tools and Lightroom's AI-powered enhancements is where Adobe truly shines. You can perform foundational edits in Lightroom, using its AI Denoise on a high-ISO shot or creating a complex mask for the sky with a single click, and then seamlessly move to Photoshop for transformative changes.
Step-by-Step Tutorial: Professional Portrait Enhancement
Imagine you have a great portrait, but the background is distracting, and you want to expand the frame for a better composition. Here’s a typical workflow:
- Start in Lightroom for Base Edits: Open your RAW file. Go to the "Masking" panel and click "Subject." The AI will instantly create a precise mask. Now you can increase the exposure and clarity on just the person without affecting the background.
- Move to Photoshop for AI Magic: Right-click the image and choose "Edit In > Adobe Photoshop." Once open, select the "Rectangular Marquee Tool." Draw a box around a distracting object in the background (like a sign or a random person).
- Use Generative Fill: With the selection active, the "Generative Fill" toolbar will appear. Leave the text prompt blank and click "Generate." Firefly AI will analyze the surrounding pixels and seamlessly remove the object.
- Expand the Scene with Generative Expand: Select the "Crop Tool" (C). Drag the handles outward to extend the canvas on any side. This creates empty space. Click the "Generate" button in the Crop toolbar to have Firefly build out the scene in a contextually aware manner, giving your subject more breathing room.
This combination of precise, non-destructive editing in Lightroom and powerful generative capabilities in Photoshop is unmatched. For a deeper dive into how these specific tools operate, you can learn more about AI tools for photo editing and their practical applications.
| Feature | Best For |
|---|---|
| Generative Fill | Removing complex objects, adding elements, or changing parts of an image. |
| AI Denoise | Cleaning up noisy, low-light photos while preserving detail. |
| AI Subject/Sky Mask | Creating precise selections for targeted adjustments in seconds. |
| Cloud Sync | Starting an edit on your desktop and finishing it on your tablet or phone. |
Website: https://www.adobe.com/creativecloud/photography/compare-plans.html
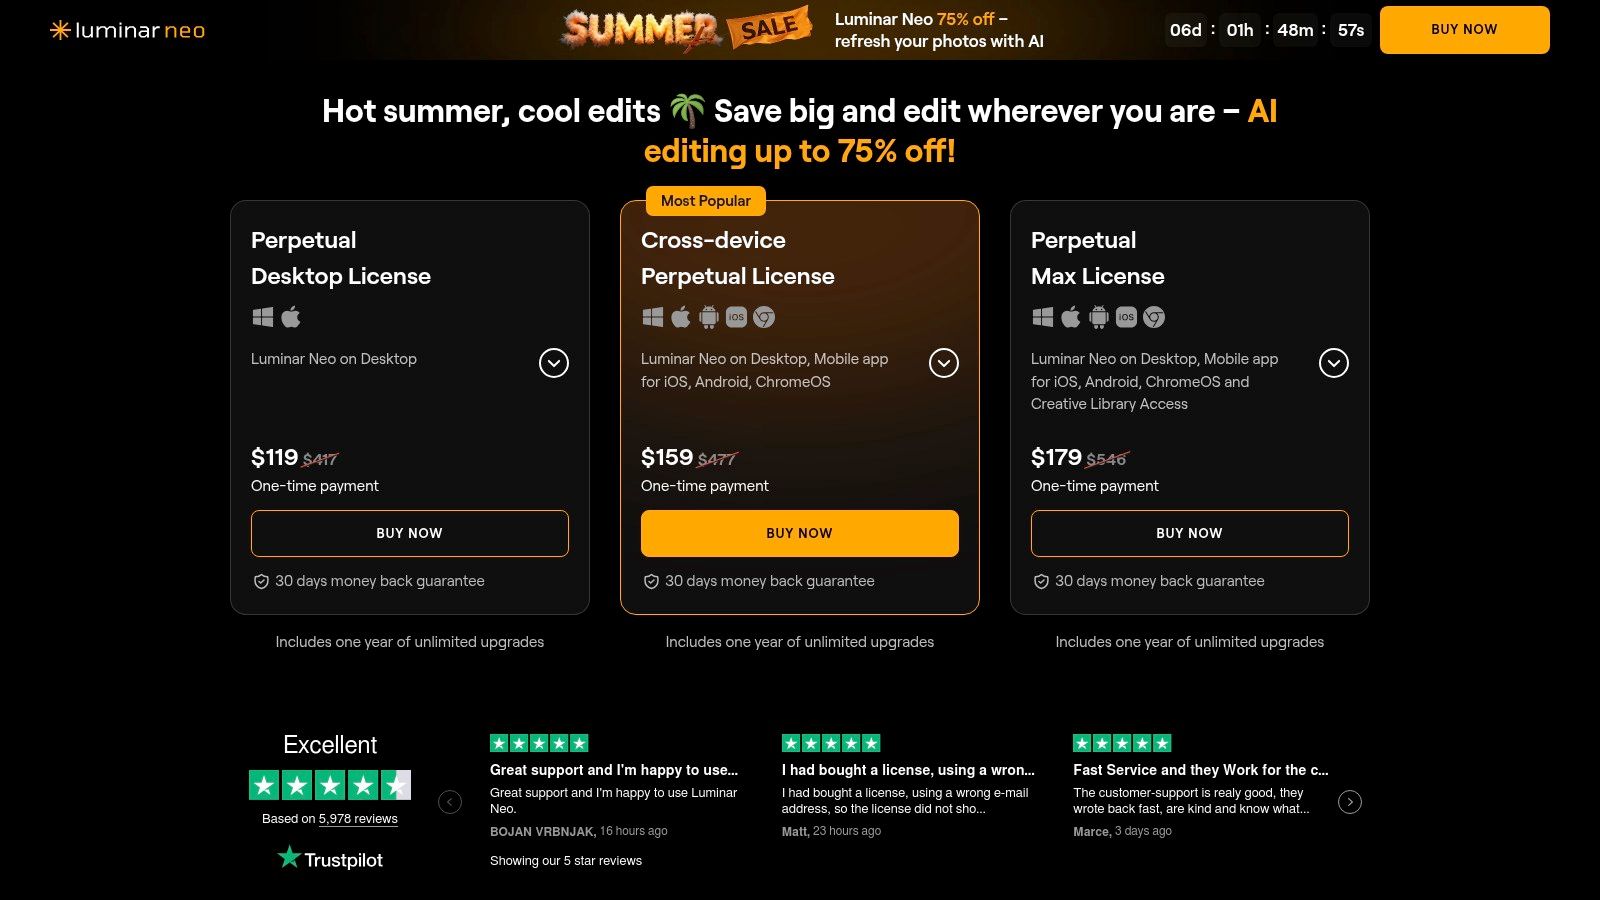
3. Skylum Luminar Neo
Skylum Luminar Neo has carved out a unique space as a powerful yet intuitive editor, making it one of the best AI photo editing software choices for enthusiasts who want professional results without a steep learning curve. It excels at delivering dramatic, one-click enhancements through a suite of AI tools designed for speed and impact, operating as a standalone app or as a plugin for Adobe software.
Unlike the complex, multi-app ecosystems of its competitors, Luminar Neo centralizes its powerful AI features into a single, streamlined interface. Its strength lies in specialized tools that simplify time-consuming tasks like sky replacement and portrait retouching into simple slider adjustments, making advanced editing highly accessible.
Step-by-Step Tutorial: Transforming a Dull Landscape
Let's say you have a flat, uninspired landscape photo with a dull, overcast sky and a soft foreground. Luminar Neo can transform it in under two minutes.
- Apply an Instant AI Fix: Open the image in Luminar Neo. In the "Edit" panel, find the "Enhance AI" tool. Drag the single "Accent AI" slider to the right. The software will intelligently analyze and improve shadows, highlights, contrast, and color across the entire image.
- Replace the Sky with One Click: Next, navigate to the "Sky AI" tool. Click on the "Sky Selection" dropdown. Choose a new, more dynamic sky from its built-in library (e.g., "Blue Sky 4"). The tool automatically masks the old sky and relights the entire scene, including reflections in water, to match the colors and brightness of the new one.
- Add Realistic Sun Rays: To complete the effect, go to the "Sunrays" tool. Click "Place Sun Center" and drag the sun icon to a logical position in your new sky. Adjust the "Amount" and "Warmth" sliders to cast beautiful, realistic light beams across your landscape.
This rapid, results-driven workflow is Luminar Neo's signature. It also offers generative AI tools for erasing objects or expanding scenes, often processed locally for speed. For users who want to own their software outright, its perpetual license option is a major draw.
| Feature | Best For |
|---|---|
| Sky AI | Instantly replacing dull skies with realistic, automatically relit alternatives. |
| Enhance AI | Applying a comprehensive, balanced photo enhancement with a single slider. |
| Portrait Bokeh AI | Creating a creamy, blurred background behind a subject without manual masking. |
| Perpetual License | Owning the software outright, avoiding recurring subscription fees. |
Website: https://skylum.com/luminar/pricing-s
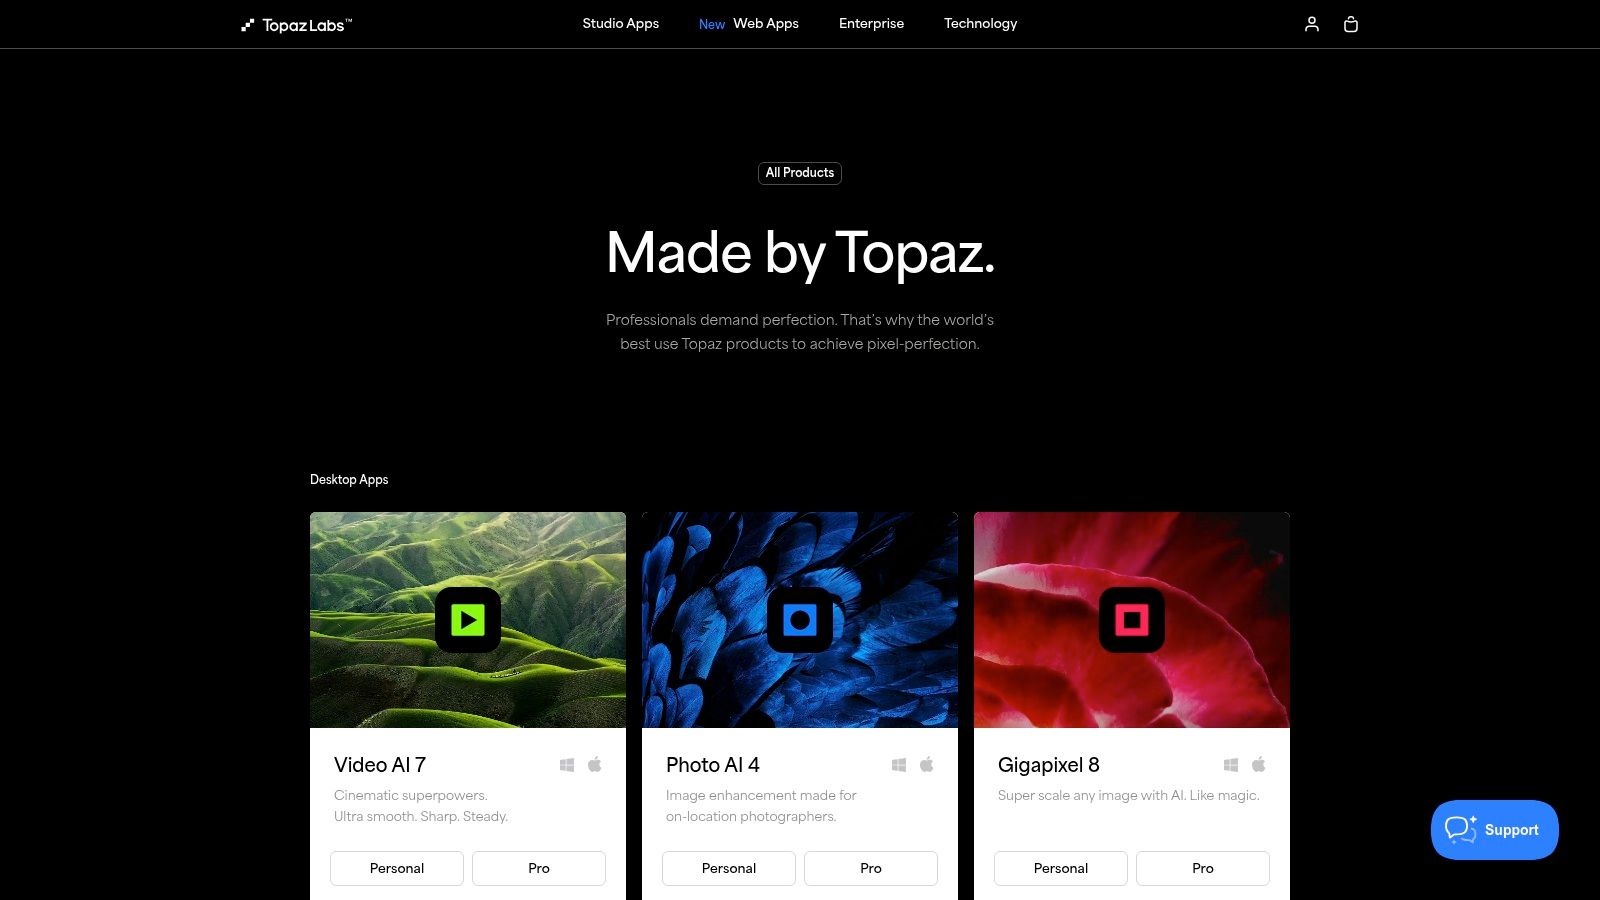
4. Topaz Labs (Topaz Photo AI)
While many platforms focus on generative AI, Topaz Photo AI has carved out a niche as the ultimate rescue and enhancement tool. It stands as one of the best AI photo editing software options specifically for photographers who need to recover seemingly unusable images. Instead of creating new content, Topaz leverages its powerful, locally-processed AI models to fix common technical flaws like noise, softness, and low resolution with astonishing precision.
Its strength lies in its singular focus: taking a flawed photo and making it technically perfect. This makes it an indispensable plugin for event photographers shooting in low light, wildlife photographers needing to crop heavily, or anyone restoring old, scanned images. Topaz Photo AI isn't a replacement for a full editor like Lightroom; it’s a specialized tool that does its job better than anyone else.
Step-by-Step Tutorial: Rescuing a Noisy, Blurry Photo
Imagine you captured a perfect moment of a fast-moving bird, but the low light forced a high ISO, resulting in heavy noise and a slight motion blur. Here's how to save it.
- Load and Autopilot Analysis: Drag the RAW or JPEG file directly into Topaz Photo AI (or use the plugin from Lightroom). Its Autopilot feature will instantly analyze the image, detect the high noise and motion blur, and automatically enable the "Remove Noise" and "Sharpen" modules with recommended settings.
- Fine-Tune Noise Reduction: In the right-hand panel, click on the "Remove Noise" module. Autopilot may have chosen a "Strength" of 50 and "Detail" of 45. Zoom in to a 200% view. Drag the "Strength" slider up or down while watching the live preview to eliminate all grain without making the image look plastic.
- Correct Motion Blur: Now click the "Sharpen" module. Autopilot likely selected the "Motion Blur" model. Adjust the "Strength" slider to increase sharpness and the "Clarity" slider to add micro-contrast, making the feather details pop. The key is to find a balance where the image is crisp but not over-sharpened.
- Export as a DNG: Once satisfied, click "Save Image." Choose the DNG file format to preserve all the recovered detail as a new RAW file, ready for final color grading in Lightroom or your primary editor.
This focused workflow turns a potential reject into a portfolio-worthy shot. For a deeper understanding of how these powerful upscaling and cleaning tools function, you can explore more about AI image enhancement and its impact on modern photography.
| Feature | Best For |
|---|---|
| AI Denoise | Cleaning up extreme noise from high-ISO or underexposed photos. |
| AI Sharpen/Deblur | Correcting motion blur, missed focus, and general softness. |
| AI Upscale | Increasing image resolution by up to 6x for large prints or heavy crops. |
| Batch Processing | Applying consistent enhancements to an entire folder of images at once. |
Website: https://www.topazlabs.com/shop/
5. ON1 Photo RAW 2025
ON1 Photo RAW 2025 has carved out a strong position as a powerful, all-in-one alternative to the Adobe ecosystem, making it one of the best AI photo editing software choices for those who prefer a single application for their entire workflow. It combines a robust RAW processor, layered editor, and effects module with newly integrated generative AI, all under one roof. Its key differentiator is the option of a perpetual license, appealing to photographers who dislike subscription models.
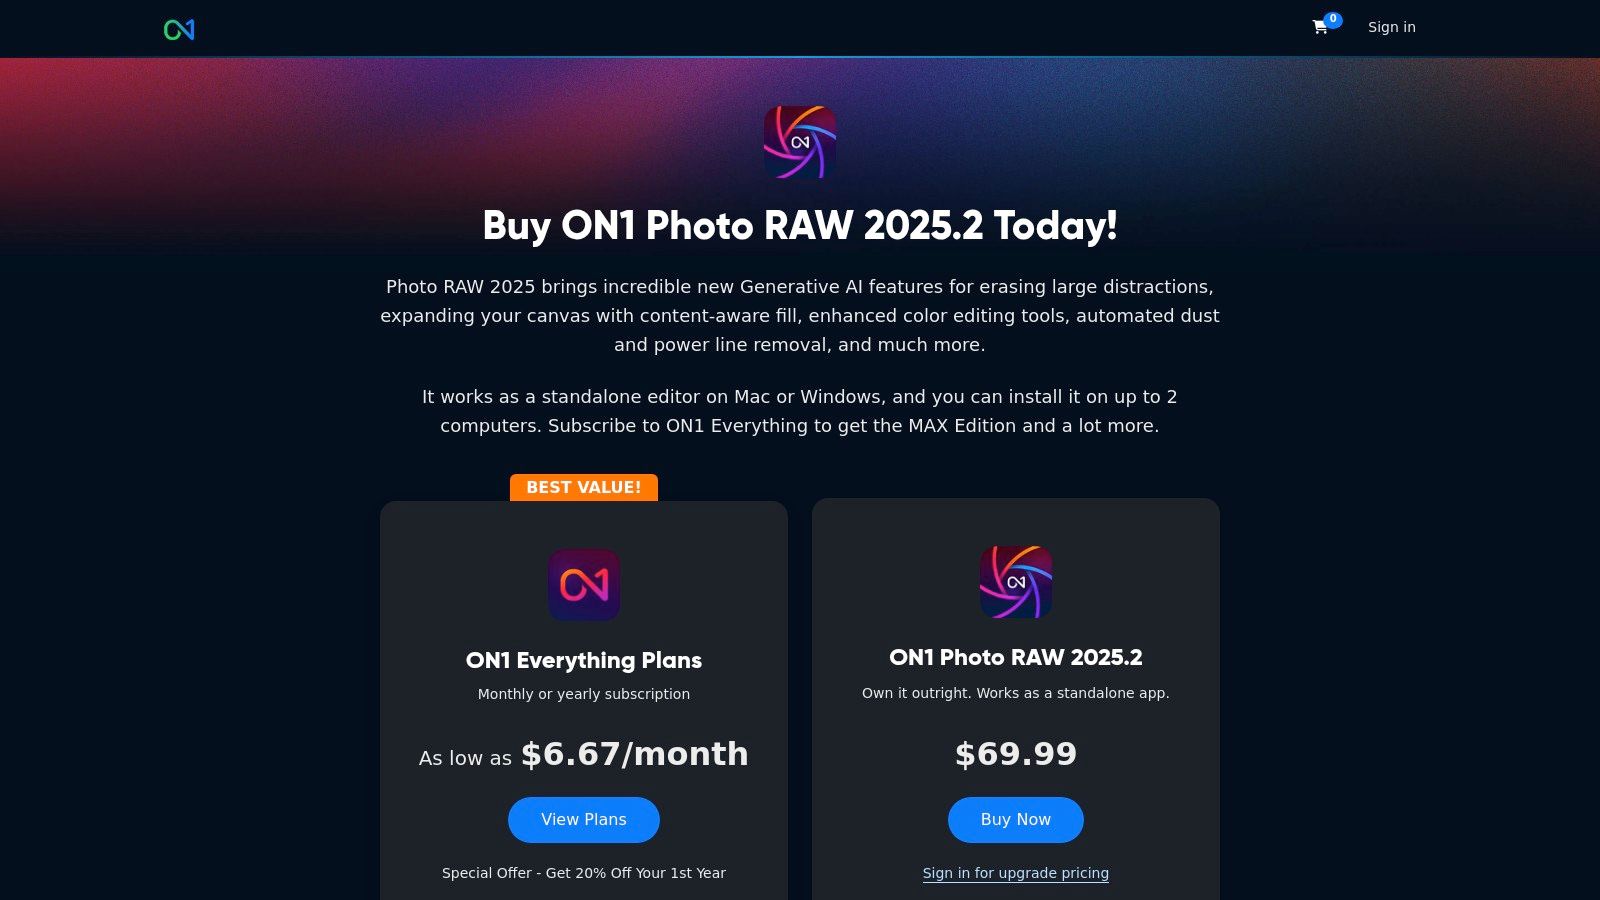
What makes ON1 compelling is its seamless environment where you can browse, cull, edit, and export without ever leaving the application. The generative AI tools are designed to complement this workflow, focusing on practical enhancements rather than just creative novelties. It offers a complete package that rivals more expensive competitors, particularly for users seeking ownership and value.
Step-by-Step Tutorial: Advanced Landscape Retouching
Imagine you have a landscape photo where a fence post is ruining the foreground, and you want to give the sky more dramatic presence. Here’s how you could handle it in ON1 Photo RAW:
- Remove Distractions with Generative Erase: Open the image in the Edit module. On the left-hand toolbar, select the "Retouch" brush group and choose the "Perfect Eraser." Simply paint over the distracting fence post. The generative AI will intelligently remove it and rebuild the grass and dirt textures that were behind it.
- Apply Targeted Contrast with AI Depth Masking: Navigate to the Effects tab on the right and click "Add Filter." Select "Dynamic Contrast." By default, this applies to the whole image. To apply it only to the foreground, click the Masking icon next to the filter, select the "AI" option, and choose "Depth." The AI generates a depth map, allowing you to click "Foreground" to apply the effect precisely to the closest elements.
- Improve Composition with Generative Expand: Switch to the Crop tool from the left toolbar. Drag the top handle of the crop box upwards to add more sky. Check the "Generative Expand" option in the tool settings bar at the top, and then click the blue "Apply" button. The AI will analyze the existing clouds and horizon to create a natural-looking extension of the sky.
This integrated approach means you can perform complex, multi-step edits without switching between different programs, saving significant time and streamlining your creative process.
| Feature | Best For |
|---|---|
| Generative Erase | Removing complex objects and distractions with context-aware fill. |
| Generative Expand | Extending the canvas of an image to improve composition or change aspect ratio. |
| AI Depth Masking | Creating sophisticated masks based on distance for targeted adjustments. |
| Perpetual License | Photographers who want to own their software outright without subscriptions. |
Website: https://www.on1.com/raw25inprod/
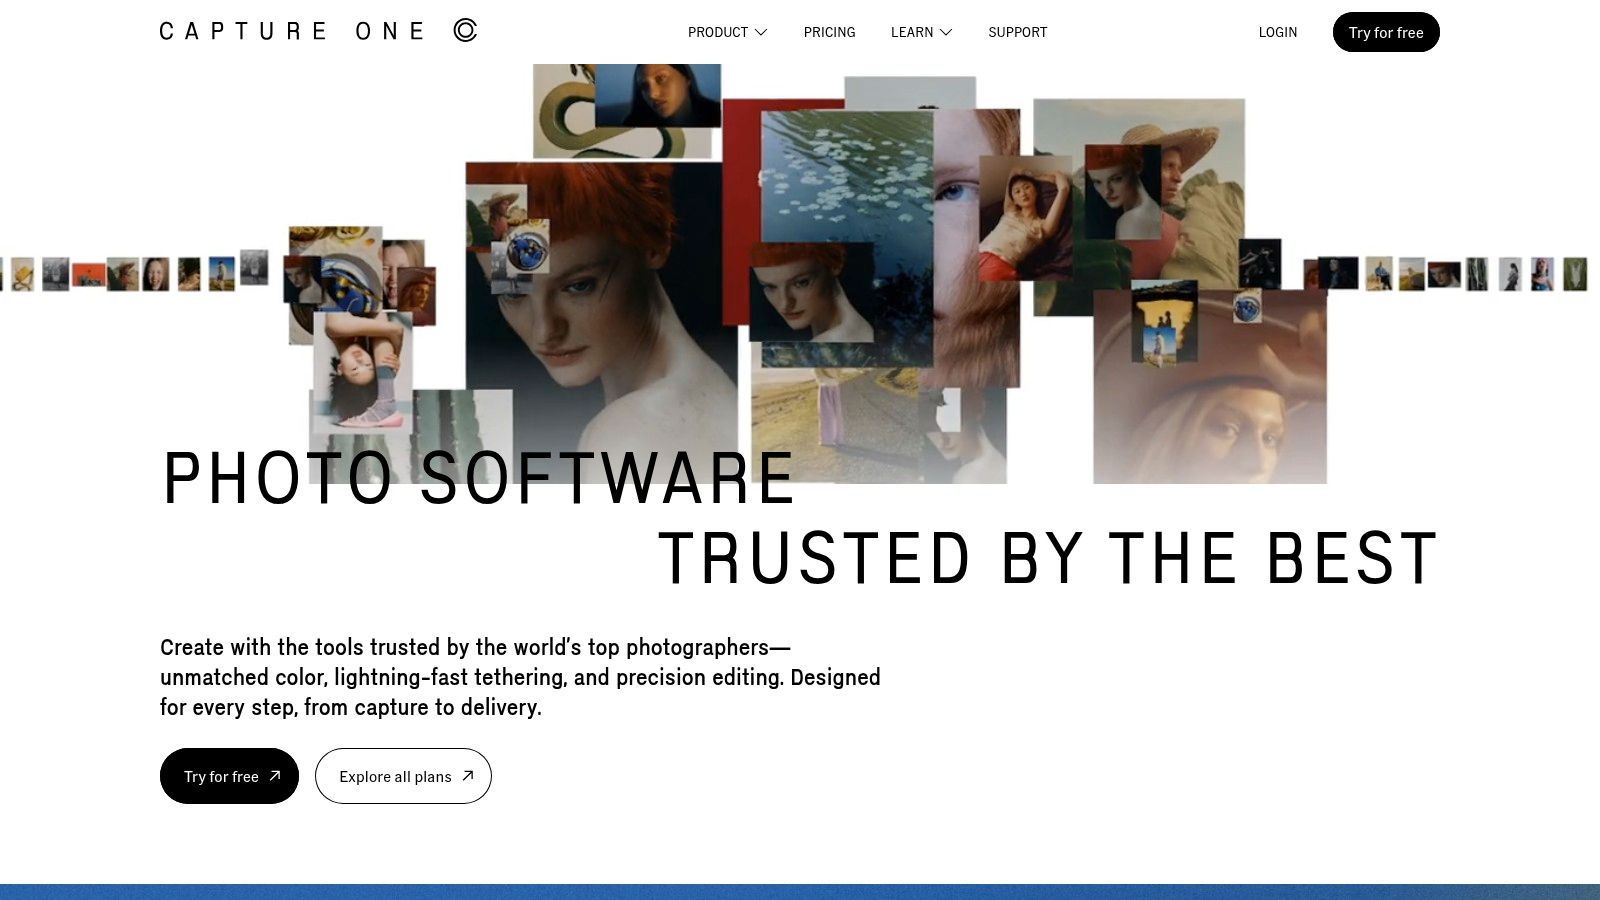
6. Capture One (Capture One Pro)
Capture One Pro has long been a favorite among professional studio photographers for its industry-leading tethered shooting capabilities and exceptional color rendering. While not a generative AI tool like others on this list, it has integrated key AI features that make it a powerful contender for the best AI photo editing software for professionals who prioritize workflow efficiency and image quality above all else. Its strength lies in using AI to accelerate the most time-consuming parts of a professional shoot.
The platform’s AI isn't for creating fantasy scenes; it’s a pragmatic tool designed to enhance a photographer's control. Features like AI-powered culling analyze entire shoots to group similar images and automatically identify which shots have the best focus and composition, saving hours of manual review. This, combined with its sophisticated layer and masking system, makes complex edits faster and more precise than ever.
Step-by-Step Tutorial: High-Volume Studio Workflow
Imagine you've just finished a large studio portrait session with hundreds of images. The goal is to quickly find the best shots and apply consistent edits.
- Cull an Entire Shoot with AI: Import your session into Capture One. In the "Cull" view, click the "Group Overview" button. The AI will analyze all the photos and group similar shots together. Then, click the "AI" icon to have it automatically star-rate the images within each group based on focus sharpness and whether the subject's eyes are open. You can now filter by 5-star images to see the best shots instantly.
- Create an AI Mask on the Best Image: Select your favorite photo from the culled results. Go to the "Layers" tool and click the "AI Select" magic wand icon. Choose "Subject." A perfect mask is created around your model. Now, create a new filled layer and use the Color Editor to adjust their skin tones without affecting the backdrop.
- Apply AI Masks Across Multiple Photos: Once you’ve perfected the look on one image, select that photo, then hold Shift and select all other photos you want to edit. In the "Adjustments" menu, ensure "Copy from Primary" is selected. Capture One will intelligently re-calculate the AI subject mask for each unique photo and apply your skin tone adjustments perfectly to every single one. This is a game-changer when you need to learn more about batch editing photos with precision and speed.
| Feature | Best For |
|---|---|
| AI-Assisted Culling | Rapidly sorting through large volumes of photos to find the optimal shots. |
| AI Masking | Creating highly accurate masks for subjects or backgrounds for targeted edits. |
| Advanced Color Editor | Achieving precise, nuanced color grading with unparalleled control. |
| Tethered Shooting | Instantly viewing and adjusting images live during a studio photoshoot. |
Website: https://captureone.com
7. Amazon (Marketplace for boxed/activation codes)
While not a software developer itself, Amazon serves as a critical marketplace for users seeking the best AI photo editing software without a recurring subscription. It's the go-to platform for purchasing perpetual licenses and boxed versions of powerful, consumer-focused editors like Adobe Photoshop Elements, Corel PaintShop Pro, and others that integrate AI features for one-time-payment convenience.
Amazon’s value lies in its aggregation of user reviews, frequent discounts, and the simplicity of its purchasing process. For those who prefer owning their software outright, it offers a trusted environment to compare options, read real-world feedback, and often find better deals than on the publisher's own site, especially during sales events like Prime Day or Black Friday.
Step-by-Step Tutorial: Buying and Using an AI Editor
Imagine you want a powerful, non-subscription editor for family photos. You decide on Adobe Photoshop Elements 2025, which has strong AI capabilities. Here’s a typical workflow using Amazon:
- Purchase and Get Your Code: Search for "Adobe Photoshop Elements 2025" on Amazon. Select the "PC/Mac Download" option. After purchase, the activation code is sent to your email and stored in your Amazon account under "Your Digital Items."
- Download and Install: Go to Adobe's website to download the Photoshop Elements installer. During the installation process, you will be prompted to sign in with an Adobe ID and enter the activation key you received from Amazon. This unlocks the full version of the software.
- Perform a One-Click AI Edit: Open a family photo in your newly installed software. Switch to "Guided" mode at the top. Find the "Perfect Portrait" guided edit. The software will walk you through a series of automated AI steps, such as "Smooth Skin," "Enhance Eyes," and "Whiten Teeth," using simple sliders and buttons to achieve a professional-looking result without any technical knowledge.
This straightforward process makes Amazon an excellent choice for users who value ownership, simplicity, and the ability to leverage community feedback before committing to a purchase. It provides access to sophisticated AI tools without the long-term financial commitment of a subscription.
| Feature | Best For |
|---|---|
| Perpetual Licenses | Users who want to buy software once and own it forever, avoiding monthly fees. |
| Aggregated User Reviews | Gaining insights from a large community of users before making a purchase decision. |
| Digital & Physical Delivery | Choosing between instant access via activation code or a traditional boxed copy. |
| Frequent Sales & Prime Deals | Acquiring popular AI photo editors at a significant discount during sales events. |
Website: https://www.amazon.com/
AI Photo Editing Software Comparison Table
| Product | 🔄 Implementation Complexity | ⚡ Resource Requirements | 📊 Expected Outcomes | 💡 Ideal Use Cases | ⭐ Key Advantages |
|---|---|---|---|---|---|
| AI Photo HQ | Low - Intuitive web interface | Moderate - Cloud-based, subscription | High-quality AI photos & restoration | Influencers, digital artists, marketers | Fast generation, social media styles, privacy |
| Adobe (Photoshop + Lightroom) | High - Professional tools, steep learning curve | High - Requires powerful hardware | Industry-standard editing & RAW support | Serious photographers & pros | Comprehensive workflow, tutorials, cloud sync |
| Skylum Luminar Neo | Medium - User-friendly, easier learning | Moderate - Standalone or plugin | Strong one-click enhancements | Hobbyists & enthusiasts | Perpetual licenses, simple generative tools |
| Topaz Labs (Topaz Photo AI) | Medium - Simple UI, plugin compatible | Moderate - Local/cloud processing | Exceptional noise reduction & upscaling | Enhancing low-quality images | Quality recovery, batch processing, one-time license |
| ON1 Photo RAW 2025 | Medium-High - All-in-one workflow | Moderate to High - GPU dependency | Full-featured editing alternative | Prosumers seeking Adobe alternative | Competitive pricing, generative AI tools |
| Capture One Pro | High - Steeper learning curve | High - Studio grade performance | Superior color rendering & tethering | Studio photographers & professionals | Reliable tethering, advanced color tools |
| Amazon (Marketplace for codes) | Low - Purchasing platform only | Low - Depends on chosen product | Access to consumer photo editors | Users preferring boxed/non-subscription | Fast delivery, wide selection, easy returns |
Choosing Your AI-Powered Creative Partner
Navigating the landscape of AI-powered photo editing can feel overwhelming, but as we've explored, the diversity of tools available today means there is a perfect solution for every type of creator. The search for the best AI photo editing software isn't about finding a single winner; it's about identifying the creative partner that seamlessly integrates into your unique workflow and empowers you to achieve your specific artistic vision. Your final choice hinges on a clear understanding of your primary needs, from technical correction to pure creative generation.
Recapping our findings, we see distinct strengths across the board. The Adobe Creative Cloud suite, with Photoshop and Lightroom powered by Firefly AI, remains the industry standard for professionals who require a comprehensive ecosystem and granular, layer-based control. For photographers who prioritize speed and stunning one-click enhancements without a subscription, Skylum Luminar Neo offers an intuitive and powerful alternative.
Meanwhile, specialist tools have carved out essential niches. Topaz Photo AI is the undisputed champion for technical rescue missions, sharpening blurry images, and eliminating noise with a precision that can salvage otherwise unusable shots. For photographers who need a robust RAW processor with integrated AI features and flexible ownership options, ON1 Photo RAW 2025 and Capture One Pro present compelling, high-performance packages.
Your Action Plan for Selecting the Right AI Tool
To move from comparison to decision, you need a hands-on strategy. Don't just rely on feature lists; put these tools to the test with your own creative challenges.
Define Your Primary Use Case: Are you a blogger needing to generate 50 unique blog post images this month? A portrait photographer looking to speed up skin retouching? A digital artist wanting to blend photographic elements with AI-generated fantasy scenes? Write down your top three most common editing tasks. This clarity will be your guide.
Take Advantage of Free Trials: Nearly every tool we’ve covered offers a free trial or a limited free version. This is your most valuable evaluation resource. Download two or three top contenders and perform the exact same edit on the same set of photos in each program.
- Example Test: Take a slightly soft, noisy low-light portrait. In Adobe, Topaz, and Luminar, run their respective sharpening and noise reduction AI. Which result looks most natural? Which one was fastest?
Evaluate Workflow Integration: The best software feels like an extension of your creative process, not a roadblock. How many clicks does it take to get your desired result? Does it work as a plugin for your primary editor, like Photoshop? For marketers and influencers, the key question is speed: how quickly can you go from an idea to a high-quality, ready-to-post image? A tool like AI Photo HQ excels here, prioritizing generative speed and creative variety over micro-level pixel adjustments.
The true power of AI in photo editing is its ability to remove technical friction, freeing you to focus on what truly matters: your creative expression. Whether you are restoring a cherished family photo, crafting the perfect hero image for a marketing campaign, or exploring new frontiers of digital art, the right AI partner will not just save you time-it will unlock new possibilities.
Ready to experience the future of image creation, where your ideas come to life in seconds? For influencers, marketers, and bloggers who need to generate a high volume of stunning, original visuals without the steep learning curve of traditional software, AI Photo HQ is the ultimate solution. Explore our powerful AI image generation tools and start creating breathtaking visuals today at AI Photo HQ.

