Ever wonder why some photos grab your attention and don't let go? It's not just about expensive gear or a lucky moment; it's about composition. The deliberate arrangement of elements within your frame is the single most powerful skill you can develop to transform your snapshots into stunning photographs. A strong understanding of the core composition rules for photography is what separates a simple picture from a compelling, memorable image.
This guide breaks down the essential principles, not as rigid laws, but as practical tools to guide your eye and tell powerful visual stories. We will move beyond abstract theory and dive directly into actionable, step-by-step instructions for each fundamental rule. You will learn precisely how to see and apply concepts like the Rule of Thirds, Leading Lines, and Framing in real-world scenarios, turning mundane scenes into dynamic compositions. For businesses seeking to apply these principles to commercial imagery, investing in professional product photography services can significantly enhance visual appeal and brand perception.
Whether you're a social media influencer aiming for a more polished feed, a hobbyist eager to improve, or a marketer creating visual content, mastering these techniques is crucial. Get ready to elevate your craft by learning how to purposefully arrange every element in your shot. This list provides the foundational knowledge needed to stop simply taking pictures and start creating truly impactful art.
1. Rule of Thirds
The Rule of Thirds is arguably the most fundamental of all composition rules for photography, making it an essential starting point for any photographer. The concept involves mentally overlaying a 3x3 grid onto your frame, creating nine equal rectangles. The core principle is to position key elements of your scene along these gridlines or, for maximum impact, at the four points where the lines intersect. These intersection points are often called "power points."
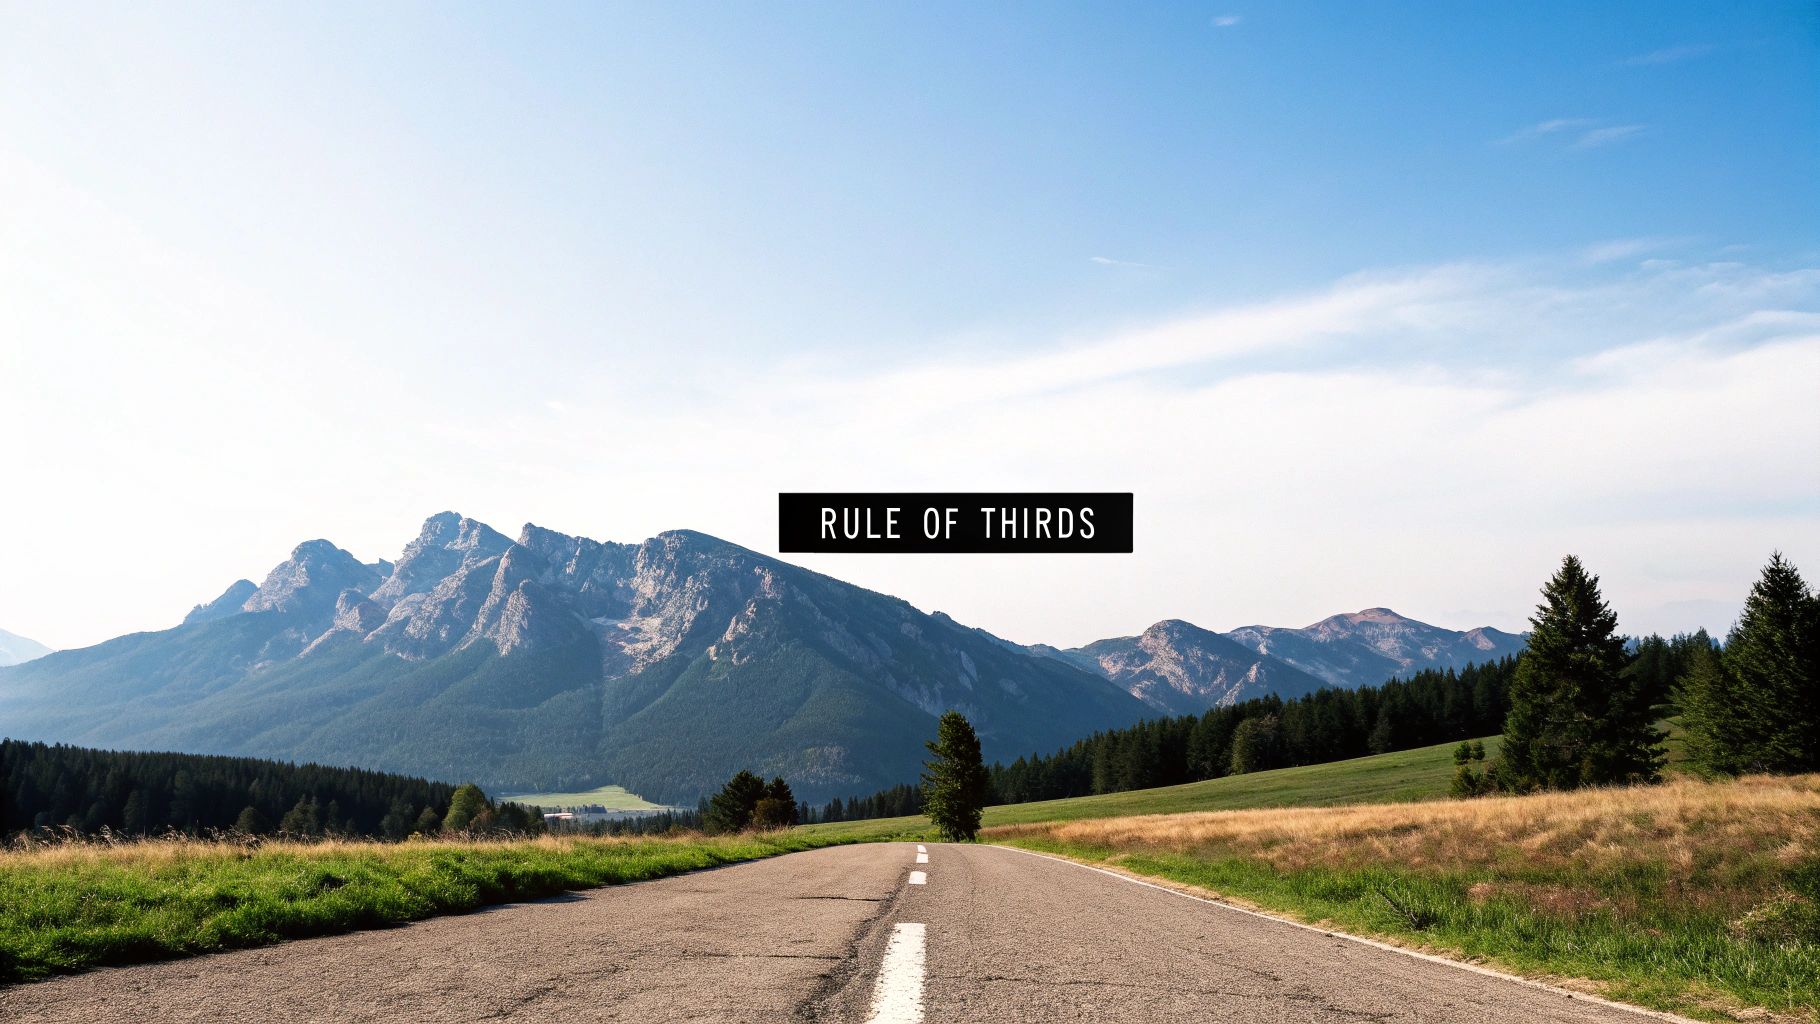
Positioning your subject off-center according to this rule creates a more engaging and dynamic image. A centered subject can feel static and predictable, whereas an off-center placement encourages the viewer's eye to move around the frame, exploring the entire scene. This technique, first documented by John Thomas Smith in 1797, adds balance and visual interest that a simple centered shot often lacks.
How to Apply the Rule of Thirds: A Practical Guide
Most modern digital cameras and smartphone apps have a built-in grid overlay feature. Activating this is the easiest way to start practicing.
- Activate Your Grid: Go into your camera’s menu (or your phone’s camera settings) and find the option for "Grid," "Grid Lines," or "Rule of Thirds Overlay." Turn it on.
- Position Your Subject: As you frame your shot, consciously place your primary subject on one of the four intersection points. For example, in a portrait, align the subject's dominant eye with an upper power point.
- Align Horizons and Lines: For landscape photography, avoid placing the horizon in the dead center. Instead, align it with the top horizontal line to emphasize the foreground or the bottom horizontal line to emphasize a dramatic sky. This creates a more balanced 1/3 to 2/3 ratio.
Actionable Tips for Mastery
- Portraits: Place the subject's eyes along the upper horizontal line. This draws the viewer directly to the most expressive part of the face.
- Landscapes: Decide what's more interesting, the sky or the land. If it's a dramatic sunset, put the horizon on the lower third line. If it's a field of flowers, place the horizon on the upper third line.
- Moving Subjects: When photographing a subject in motion, like a car or a runner, place them on a vertical third line and leave negative space in the direction they are moving into. This creates a sense of anticipation and direction.
- Post-Processing: Don't worry if you miss the composition in-camera. Use the crop tool in software like Adobe Lightroom or Photoshop, which almost always includes a Rule of Thirds overlay, to reframe your image for a stronger composition.
2. Leading Lines
Leading lines are one of the most powerful and intuitive composition rules for photography. They are visual elements within an image, like paths, roads, or fences, that act as natural guides, pulling the viewer's eye through the scene and directing it towards a specific focal point. By creating a clear visual pathway, these lines add a compelling sense of depth, perspective, and movement to an otherwise two-dimensional image.

This technique effectively tells the viewer where to look. Whether the lines are straight, curved, or diagonal, their primary function is to create a journey within the frame. Masters like Ansel Adams used the natural curves of rivers and mountains, while Henri Cartier-Bresson expertly employed urban architectural lines to structure his street photography. Using leading lines transforms a simple snapshot into a carefully constructed narrative that engages the audience on a deeper level.
How to Apply Leading Lines: A Practical Guide
Finding and utilizing leading lines is about training your eye to see the pathways that already exist in the world around you. They are abundant in both natural and man-made environments.
- Identify Potential Lines: Before you shoot, scan your environment for any strong linear elements. Look for roads, railway tracks, sidewalks, shorelines, riverbanks, staircases, or even the edges of buildings.
- Compose Your Shot: Position yourself so these lines start near the bottom corner or edge of your frame. This creates an inviting entry point for the viewer's eye.
- Place Your Subject: Ensure the lines lead directly to your main subject, not away from it or past it. The subject should be positioned at or near the end of the line to provide a satisfying visual destination. For instance, place a person at the end of a long pier or a building at the vanishing point of a street.
Actionable Tips for Mastery
- Dynamic Diagonals: Use diagonal lines, like a road starting in a bottom corner and moving toward the opposite top corner, to inject more energy and dynamism into your image compared to static horizontal or vertical lines.
- Curved for Calm: Employ S-curves, such as a winding river or a meandering path, to create a slower, more graceful, and calming journey for the eye. This works exceptionally well in landscape photography.
- Converging Lines: Use converging lines, like two sides of a road meeting in the distance, to create a powerful sense of depth and perspective. This is a classic technique to make a scene feel vast and three-dimensional.
- Get Low: Change your perspective. Shooting from a lower angle can often exaggerate the perspective of leading lines on the ground, making them appear more dramatic and impactful as they stretch into the distance.
3. Framing
Framing is a powerful composition rule for photography that involves using elements within the scene to create a natural border around your main subject. This "frame within a frame" technique immediately draws the viewer's eye to the point of interest, adding a sense of depth, context, and a compelling narrative layer to your image. By using elements like doorways, windows, or even tree branches, you can isolate your subject and make your composition more thoughtful and deliberate.
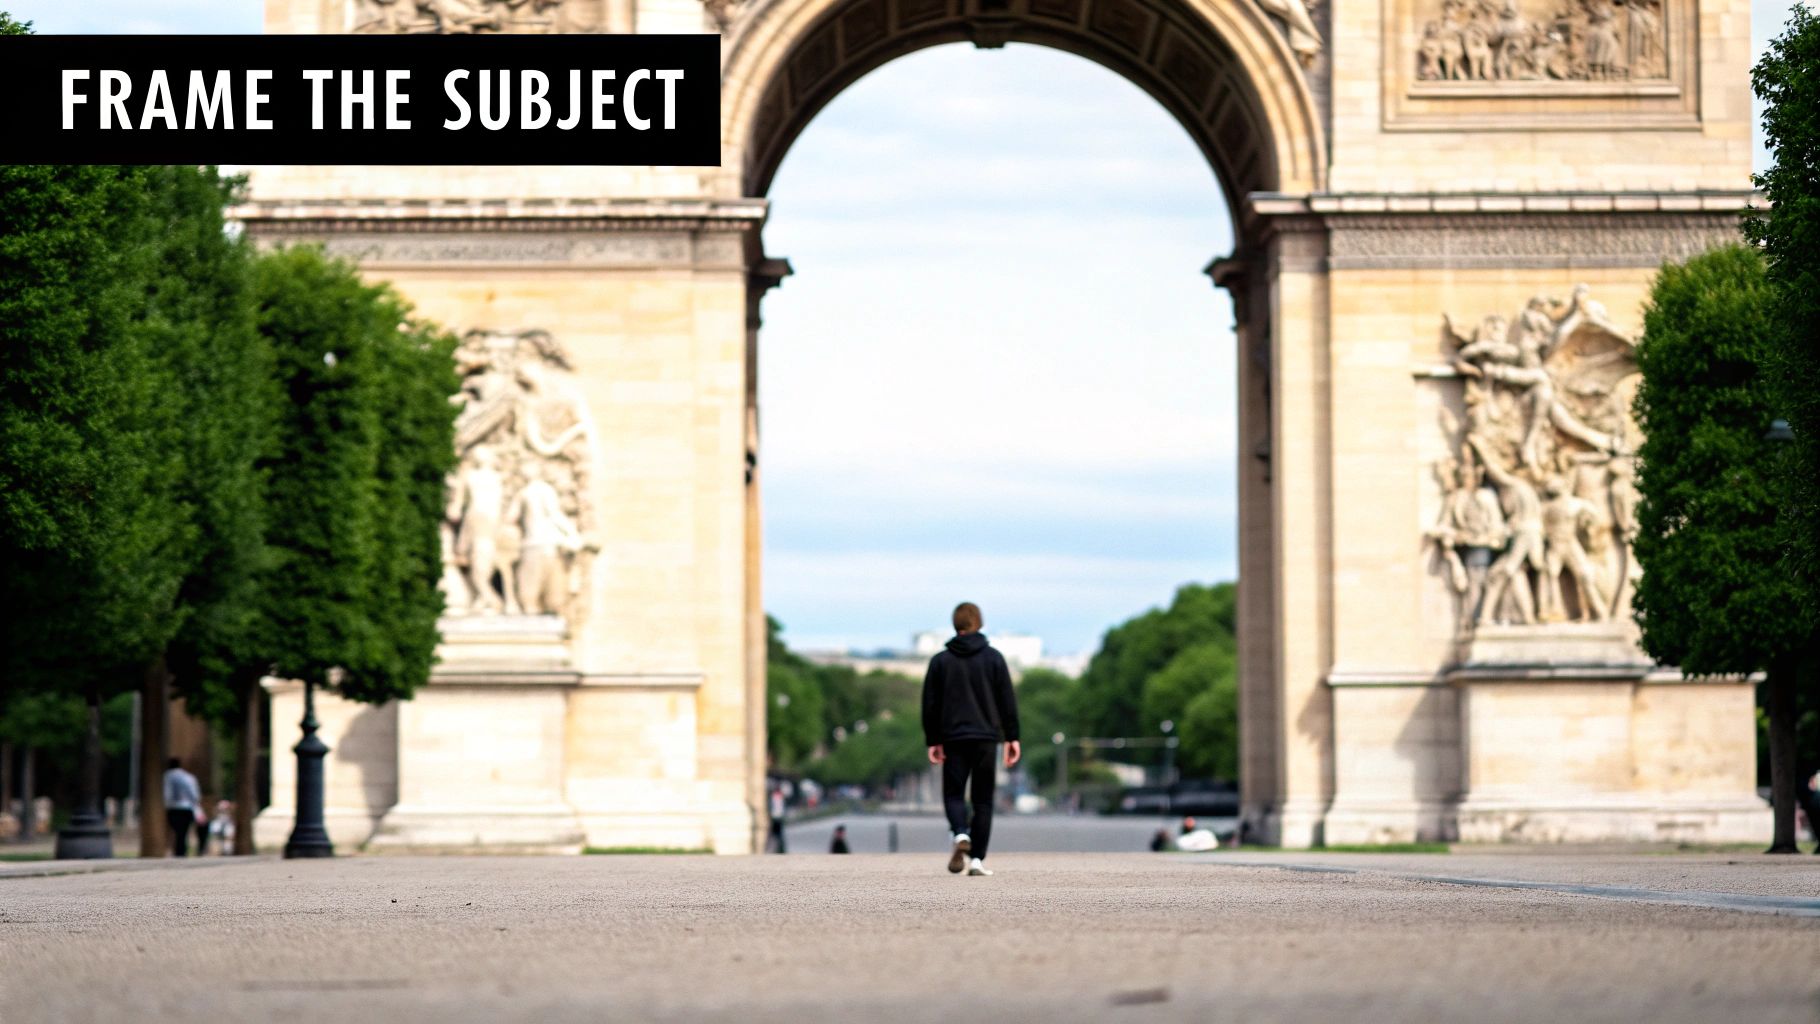
This technique transforms an ordinary scene into a layered story. Unlike a simple shot, a framed image guides the viewer's gaze directly where you want it to go. It adds a three-dimensional feel by placing objects in the foreground, middle ground, and background. Masters like Ansel Adams used natural elements to frame vast landscapes, while Steve McCurry often uses architectural features to frame his compelling portraits, demonstrating the versatility of this rule.
How to Apply Framing: A Practical Guide
Applying framing requires you to actively look for potential borders within your environment before you even raise your camera. It's about seeing the world in layers.
- Identify Your Frame: Scan your surroundings for natural or man-made elements that can serve as a border. Look for archways, tunnels, tree branches, window panes, or even gaps between people in a crowd.
- Position Yourself: Move your feet. Getting the right frame often means changing your perspective-crouching down, moving left or right, or stepping back to fit the frame around your subject perfectly.
- Expose for the Subject: Your camera's meter might get confused by a dark frame (like a cave entrance) and a bright subject (the landscape outside). Focus on your main subject and adjust the exposure to ensure it is well-lit, even if it means the frame itself becomes a dark silhouette or a bright blur.
Actionable Tips for Mastery
- Create Depth with Aperture: Use a wide aperture (like f/1.8 or f/2.8) to make the framing element soft and blurry. This separates your sharp subject from the foreground, creating a beautiful sense of depth.
- Balance the Frame: Ensure the frame enhances, not overpowers, your subject. It should be a supporting element. If the frame is too distracting or detailed, it will compete for attention.
- Look for Unconventional Frames: Don't limit yourself to just windows and doors. Use reflections, overhanging foliage, bridge structures, or even a person's arms or legs to create unique and creative frames.
- Combine with Other Rules: Framing works exceptionally well with the Rule of Thirds. Place your framed subject on one of the power points for an even more dynamic and balanced composition. To discover more about how to combine these techniques, you can explore additional photography composition tips.
4. Symmetry and Patterns
Harnessing symmetry and patterns is one of the most impactful composition rules for photography, capable of producing images with incredible balance, rhythm, and visual harmony. Symmetry involves creating a mirror image within your frame, where one half reflects the other. Patterns, on the other hand, use the repetition of shapes, lines, or colors to create a sense of order and texture. These techniques tap into the human brain's natural appreciation for order, resulting in compositions that are inherently satisfying and captivating.
Unlike the Rule of Thirds, which advocates for off-center placement, symmetry often thrives on a centered composition. This direct, head-on approach creates a powerful statement of stability and formality. Photographers like Andreas Gursky and Hiroshi Sugimoto have masterfully used these principles to turn everyday scenes, from architectural facades to serene seascapes, into profound artistic statements. The key is to train your eye to see the inherent order in the world around you.
How to Apply Symmetry and Patterns: A Practical Guide
Finding and capturing these elements requires a deliberate and precise approach. Precision is paramount, as even slight misalignment can disrupt the effect.
- Find Your Center Line: For symmetrical shots, identify the central axis of your subject. This could be the center of a building, a road disappearing into the distance, or a reflection line in still water.
- Position Yourself Perfectly: Place your camera directly on this center line. Use your camera's grid overlay to ensure the vertical and horizontal lines of your subject are perfectly straight and aligned with the grid. Any tilt can ruin the symmetrical balance.
- Frame for Repetition: When shooting patterns, fill the frame with the repeating element to emphasize its texture and rhythm. Look for repeating windows on a skyscraper, tiles on a floor, or petals on a flower. Get close to eliminate distracting elements.
Actionable Tips for Mastery
- Embrace Reflections: Still water is your best friend for creating natural symmetry. Position your camera low to the water's edge to capture a perfect mirror image of mountains, cityscapes, or trees.
- Architecture is Key: Buildings are a fantastic source of both symmetry and patterns. Look for grand entrances, rows of columns, or intricate window designs. A centered, straight-on shot often works best.
- Break the Pattern: One of the most powerful ways to use patterns is to intentionally break them. A single red apple in a crate of green ones or one open window on a facade of closed ones creates an immediate focal point and adds a layer of narrative to your image.
- Use Post-Processing: Perfect symmetry can be difficult to achieve in-camera. Use the Transform and Crop tools in Lightroom or Photoshop to fine-tune alignment, correct lens distortion, and crop the image to enhance the symmetrical or patterned effect.
5. Depth of Field
Depth of Field (DoF) is a powerful compositional tool that dictates the range of distance within a photograph that appears acceptably sharp. Unlike rules that guide where you place elements, DoF controls what the viewer focuses on. By manipulating your camera's aperture, you can either create a shallow depth of field to isolate your subject against a beautifully blurred background (an effect known as "bokeh") or a deep depth of field to ensure the entire scene, from the foreground to the distant mountains, is in sharp focus.
This control fundamentally alters how a viewer interacts with your image. A shallow DoF directs attention with surgical precision, making it perfect for portraits or macro shots where the subject is paramount. Conversely, a deep DoF invites exploration, ideal for vast landscapes. Mastering DoF is a key step in moving beyond simple snapshots to intentionally crafted photographs, a technique championed by photographers like Ansel Adams for his deep-focus landscapes and Annie Leibovitz for her expressive, selectively focused portraits.
How to Apply Depth of Field: A Practical Guide
Controlling DoF is primarily about managing your lens aperture, which is measured in f-stops (e.g., f/1.8, f/8, f/16). Most interchangeable lens cameras offer an "Aperture Priority" mode (A or Av on your dial), which is perfect for practicing this.
- Switch to Aperture Priority (A/Av) Mode: This mode lets you choose the aperture, and the camera will automatically set the correct shutter speed for a proper exposure.
- For a Blurry Background (Shallow DoF): Select a wide aperture, which means using a low f-stop number like f/1.4, f/1.8, or f/2.8. This shrinks the in-focus area, isolating your subject. Also, increase the distance between your subject and the background to maximize the blur.
- For an All-Sharp Scene (Deep DoF): Select a narrow aperture, which means using a high f-stop number like f/8, f/11, or f/16. This expands the in-focus area, making it ideal for landscapes where you want everything from the foreground flowers to the background mountains to be crisp.
Actionable Tips for Mastery
- Portraits: Use a wide aperture (low f-stop) and focus critically on the subject's eyes. This ensures the most important feature is sharp while the background melts away, making your subject pop.
- Landscapes: Use a narrow aperture (high f-stop) and a tripod to prevent camera shake from the slower shutter speeds. Focus about one-third of the way into the scene to maximize the overall sharpness.
- Street Photography: Use DoF to tell a story. A shallow DoF can isolate a single person in a crowd, while a deeper DoF can capture the bustling energy of the entire street.
- Lens Sweet Spot: Every lens has an aperture range where it is sharpest, often called the "sweet spot." This is typically between f/5.6 and f/8. Use this range for situations where maximum clarity across the frame is desired.
- Distance Matters: The closer you are to your subject, the shallower the depth of field will be at any given aperture. To enhance background blur, get closer to your subject and move them further from the background.
6. Fill the Frame
Filling the frame is a powerful composition rule that challenges photographers to get closer to their subject, making it the dominant element in the image. This technique involves composing your shot so that the primary subject occupies most or all of the frame, effectively eliminating distracting backgrounds and drawing the viewer’s immediate attention to important details. By removing clutter, you create a more intimate and impactful photograph that highlights textures, emotions, and character.
This approach is a direct counterpoint to compositions that prioritize negative space. Instead of showing the subject within its environment, you make the subject the environment. Photographers like Richard Avedon used this technique to create his signature intimate portraits, focusing entirely on the human expression. It's a fundamental tool in any photographer's arsenal for making bold, confident, and engaging images.
How to Apply the Fill the Frame Technique: A Practical Guide
Applying this rule is straightforward but requires a deliberate approach to what you include and, more importantly, what you exclude.
- Identify the Core Subject: Before shooting, determine the single most important element of your scene. Is it the emotion in a person's eyes, the intricate texture of a flower petal, or the focused intensity of an athlete?
- Move Closer Physically: The best way to fill the frame is to use your feet. Walk closer to your subject until it fills your viewfinder. This method, often called "zooming with your feet," almost always produces higher quality, sharper images than using digital zoom.
- Frame Deliberately: Pay close attention to the edges of your frame. What is being cut off? Sometimes, cropping a part of the subject (like the top of a head in a tight portrait) can create an even more intimate and compelling composition. Ensure you are not awkwardly cutting off key features.
Actionable Tips for Mastery
- Portraits: Get close enough to capture just the head and shoulders, or even just the face. This highlights expressions, eye contact, and fine details like freckles or wrinkles, creating a strong connection with the viewer.
- Macro Photography: This technique is the essence of macro. Fill the entire frame with a small subject like an insect or a water droplet to reveal a world that is typically unseen.
- Food Photography: Isolate a dish or even a specific part of it. Fill the frame with the texture of a flaky croissant or the glistening sauce on a steak to make the food look irresistible.
- Use the Right Lens: A longer focal length lens (like an 85mm or 135mm) allows you to fill the frame without physically intruding on your subject's personal space, which is especially useful for candid portraits or wildlife.
- Recompose with Cropping: If you can't get the perfect composition in-camera, use the crop tool in post-processing. This is an excellent way to experiment and find a tighter, more powerful version of your original shot.
7. Negative Space
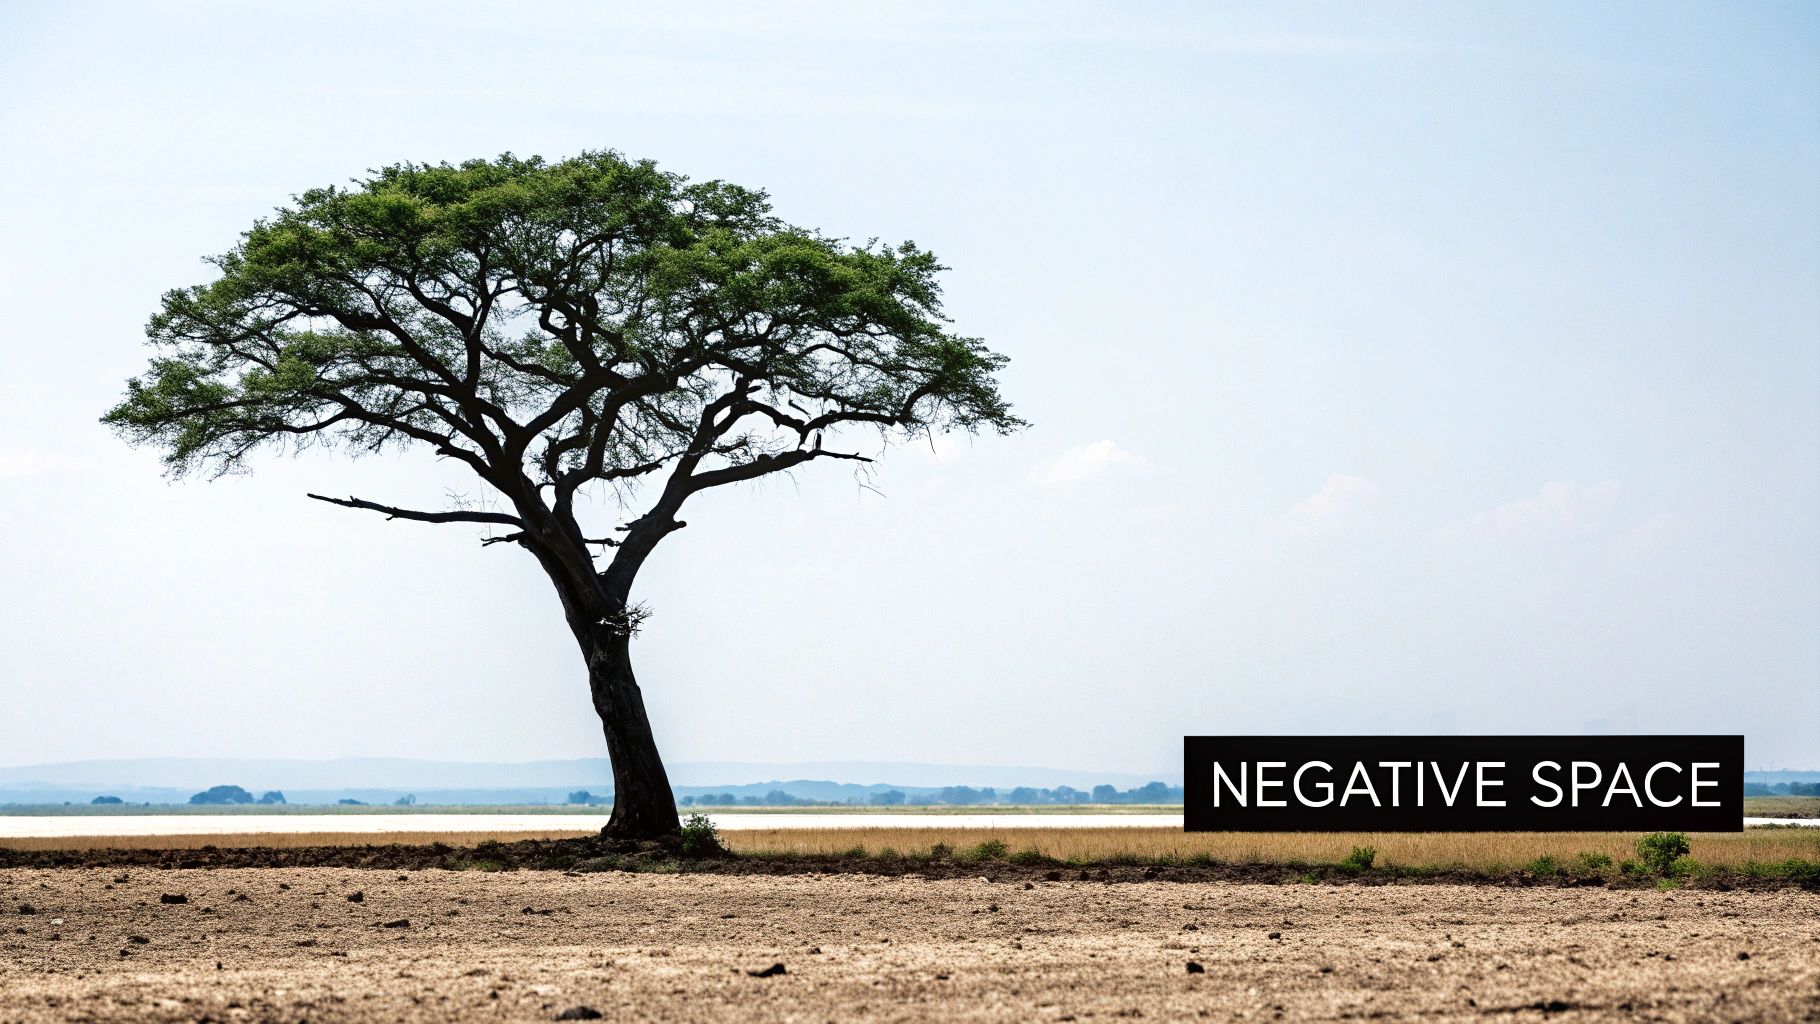
Negative space, also known as white space, is the empty or unoccupied area surrounding the main subject of an image. This powerful composition rule for photography is about what you choose to leave out of the frame. Instead of filling the scene with detail, this technique uses emptiness to isolate and emphasize your subject, creating a minimalist aesthetic and giving the viewer's eye a place to rest. This intentional simplicity can evoke strong emotions like peace, solitude, or freedom.
Using negative space elevates a subject from being just one element in a busy photo to being the undisputed hero of the frame. Photographers like Michael Kenna and Hiroshi Sugimoto have masterfully used this technique to create profound and impactful images. By simplifying the composition, you direct all attention to the focal point, enhancing its importance and giving it room to breathe. The result is often a more refined, elegant, and impactful photograph.
How to Apply Negative Space: A Practical Guide
Applying this technique requires you to see the empty areas as an active compositional element, not just a void.
- Identify a Strong Subject: Negative space only works if your main subject is interesting enough to hold the viewer's attention on its own. Look for a subject with a strong silhouette, a vibrant color, or a compelling form.
- Find a Simple Background: Scan your environment for large, uncluttered areas. This could be a clear blue sky, a plain wall, a calm body of water, or a foggy landscape. The background should complement the subject without competing with it.
- Position and Compose: Place your subject off-center, often following the Rule of Thirds, and let the negative space dominate the rest of the frame. Think about the balance between the "positive space" (your subject) and the "negative space" (the emptiness).
Actionable Tips for Mastery
- Emphasize Scale: Place a small subject against a vast expanse of negative space to create a dramatic sense of scale and isolation. Think of a lone person on a massive beach or a single boat on the open ocean.
- Convey Emotion: Use negative space to tell a story or evoke a mood. A large, dark, empty area can create a feeling of loneliness or mystery, while bright, open space can feel freeing and optimistic. For more on this, you can explore some visual storytelling techniques.
- Minimalist Portraits: For striking portraits, position your subject against a simple, single-color backdrop. This removes all distractions and focuses the viewer's attention entirely on the person's expression and features.
- Look Up, Look Down: Often, the best source of negative space is right above or below you. A clear sky or an interesting patch of ground can serve as the perfect clean canvas for your subject. Don't be afraid to change your shooting angle to find it.
8. Color Theory
Color theory is a powerful and often-overlooked composition rule for photography that uses the interplay of colors to evoke emotion, create visual harmony, and direct the viewer's gaze. Far more than just capturing bright hues, it's about understanding the relationships between different colors on the color wheel. This includes concepts like complementary colors (opposites that create high contrast), analogous colors (neighbors that create harmony), and monochromatic schemes (variations of a single color).
Pioneered in fine art by photographers like William Eggleston and Saul Leiter, the deliberate use of color can transform an ordinary scene into a compelling story. A warm, golden-hour portrait feels inviting and intimate, while a cool, blue-toned landscape can feel vast and lonely. By consciously choosing and arranging colors within your frame, you add another layer of meaning and aesthetic appeal to your images, making them more memorable and impactful.
How to Apply Color Theory: A Practical Guide
Applying color theory starts with learning to see the world in terms of color relationships, not just objects. It’s about training your eye to spot harmonies and contrasts.
- Identify Your Dominant Color: Before you shoot, look at the scene and identify the main color. Is it the green of a forest, the blue of the sky, or the red of a building?
- Find a Contrasting or Harmonious Color: Once you've identified the dominant color, search for a second color that either complements or harmonizes with it. For a blue sky (cool color), look for a subject wearing orange or yellow (warm colors) to make them pop. For a forest filled with greens, a subject in a different shade of green or a neighboring color like yellow-green can create a subtle, pleasing harmony.
- Control Saturation and Luminance: Pay attention to how bright and intense the colors are. You can make a single color the focal point by ensuring it is highly saturated while the surrounding colors are more muted. This is a common technique in street photography to isolate a subject from a busy background.
Actionable Tips for Mastery
- Complementary Colors: To create dynamic, high-impact shots, pair colors opposite each other on the color wheel. Think of a red umbrella against a green backdrop or the classic orange sunset over a deep blue ocean.
- Analogous Colors: For serene, harmonious images, frame subjects with colors that are next to each other on the color wheel. For example, photograph a field of yellow, orange, and red flowers for a warm, unified feel.
- Use Warm vs. Cool Tones: Remember that warm colors (reds, oranges, yellows) tend to advance toward the viewer and grab attention, while cool colors (blues, greens, purples) tend to recede. Place your key subject in a warm color to make it the natural focal point.
- Monochromatic Mood: Don't be afraid to build a composition around a single color. A foggy morning with varying shades of grey and white or a dense forest with different tones of green can create a powerful, immersive mood. For even more inspiration, explore a range of creative photo ideas on aiphotohq.com to see how color can define a shot.
Composition Rules Comparison of 8 Key Techniques
| Composition Technique | Implementation Complexity 🔄 | Resource Requirements ⚡ | Expected Outcomes 📊 | Ideal Use Cases 💡 | Key Advantages ⭐ |
|---|---|---|---|---|---|
| Rule of Thirds | Low - simple grid overlay, easy to apply | Minimal - typically built into cameras/software | Balanced, dynamic, natural eye movement | Landscapes, portraits, street photography | Easy to learn; creates dynamic, balanced compositions |
| Leading Lines | Medium - requires careful positioning | Moderate - attention to scene and angles | Strong guidance of viewer’s eye; adds depth and flow | Landscapes, architecture, urban scenes | Directs attention effectively; adds dimensionality |
| Framing | Medium - using environmental elements | Low to moderate - depends on scene | Focused attention; adds depth and context | Nature, architecture, environmental storytelling | Highlights subject; adds layers and intimacy |
| Symmetry and Patterns | Medium to High - precise alignment needed | Minimal to moderate - attention to scene details | Strong visual impact; order and harmony | Architecture, reflections, minimalist compositions | Creates pleasing balance; powerful aesthetic appeal |
| Depth of Field | High - technical camera settings understanding | Moderate to high - lenses, aperture control | Subject isolation; background blur or full focus | Portraits, macro, landscapes, street photography | Powerful focus control; adds depth and storytelling |
| Fill the Frame | Low to Medium - getting physically close | Minimal - no special gear required | Immediate visual impact; detail emphasis | Portraits, macro, wildlife, product photography | Eliminates distractions; engages viewers intimately |
| Negative Space | Low to Medium - relying on composition choices | Minimal - depends on environment availability | Calm, minimalist, strong subject emphasis | Minimalist, architectural, portrait, product photography | Creates mood; emphasizes subject; reduces clutter |
| Color Theory | Medium to High - needs color knowledge | Minimal to moderate - may require color control | Mood creation; guides attention; enhances storytelling | All genres, especially landscapes, street, and fine art | Influences mood and perception; adds harmony or tension |
From Rules to Instinct: Making Composition Your Own
You've just journeyed through eight of the most essential composition rules for photography, from the foundational Rule of Thirds to the emotional power of Color Theory. We've explored how Leading Lines can guide the eye, how Framing adds context and depth, and how the careful balance of Negative Space can make a subject truly stand out. Each technique is a powerful tool in your creative arsenal, designed not to restrict your vision but to provide a framework for creating more intentional, impactful, and professional-looking images.
The ultimate goal, however, is to move beyond a simple checklist. Think of these rules like learning musical scales. Initially, you practice them deliberately, note by note. But with time and repetition, they become second nature, allowing you to improvise and create beautiful melodies instinctively. The same principle applies to visual composition; the 'rules' are your scales, and your camera is your instrument. The true artistry emerges when you can effortlessly blend, bend, and even break these guidelines to serve your unique creative vision.
Putting Theory into Practice: Your Action Plan
Mastering composition is an active process. Reading about it is the first step, but true understanding comes from doing. Here is a practical, step-by-step plan to internalize these concepts and transform them from academic knowledge into creative instinct.
1. The "One Rule a Day" Challenge:
Don't try to master everything at once. Dedicate your next photo session, or even your entire day, to a single rule.
- Monday: Rule of Thirds. Turn on the grid display on your camera or smartphone. For every single shot you take today, force yourself to place your primary subject on an intersection or along a grid line. Notice how it instantly changes your perspective from simply centering everything.
- Tuesday: Leading Lines. Go on a "line hunt." Walk around your neighborhood, a park, or a city center specifically looking for lines: roads, fences, riverbanks, architectural details. Your only goal is to capture images where a line clearly leads the viewer's eye from one part of the frame to another.
2. The Re-Composition Exercise:
Go through your own photo library, especially photos you feel are "almost great." Open them in an editing app and use the crop tool.
- Apply the Rule of Thirds to a photo where the subject is centered. Does it become more dynamic?
- Try a tight crop to Fill the Frame on a shot where the subject feels distant. Does it gain impact?
- Crop to create Negative Space around a subject that feels cluttered. Does it feel more calming or powerful? This exercise trains your eye to see different compositional possibilities within a single scene.
3. The Depth and Framing Scavenger Hunt:
Combine two concepts into one practical outing. Your mission is to find and shoot scenes using both Framing and Depth of Field.
- Step 1: Find a "frame within the frame," like a doorway, a window, or an archway of trees.
- Step 2: Position your subject within that frame.
- Step 3: Use a wide aperture (a low f-stop number, like f/1.8 or f/2.8) to create a shallow Depth of Field, blurring the foreground frame and the background to isolate your subject. This teaches you how to layer elements for a three-dimensional effect.
By actively practicing in this structured way, you are building a powerful visual vocabulary. You'll soon stop seeing a scene as just "what's in front of you" and start seeing it as a collection of lines, shapes, colors, and layers. These composition rules for photography will become the foundation upon which you build your unique style, empowering you to create images that don't just show a moment, but tell a story and evoke a feeling.
Ready to rapidly experiment with composition and see these rules in action without picking up a camera? AI Photo HQ allows you to instantly generate stunning visuals by simply describing the composition you want. Test drive framing, leading lines, and color theory concepts with text prompts to accelerate your learning and inspire your next photoshoot with AI Photo HQ.

