It’s a gut-wrenching feeling. You capture a perfect moment—a genuine smile, a breathtaking landscape—only to find it’s a blurry mess. But don't throw in the towel just yet. Learning how to fix blurry pictures is more accessible than ever before.
You’ve got options. For a nearly instant fix, you can lean on one-click AI tools. If you need granular control and don't mind getting your hands dirty, powerful software like Adobe Photoshop is the way to go. And for quick edits right from your pocket, there are some surprisingly good mobile apps. This guide will walk you through each path so you can pick the one that's right for you.
Why Your Photos Are Blurry and How to Fix Them
Before jumping into a fix, it helps to play detective for a moment. Not all blur is the same, and understanding the why behind your fuzzy photo is the first step to choosing the right how. Most of the time, the culprit is something that happened right when you pressed the shutter button.
This chart breaks down the three usual suspects: camera shake, missed focus, and motion blur.
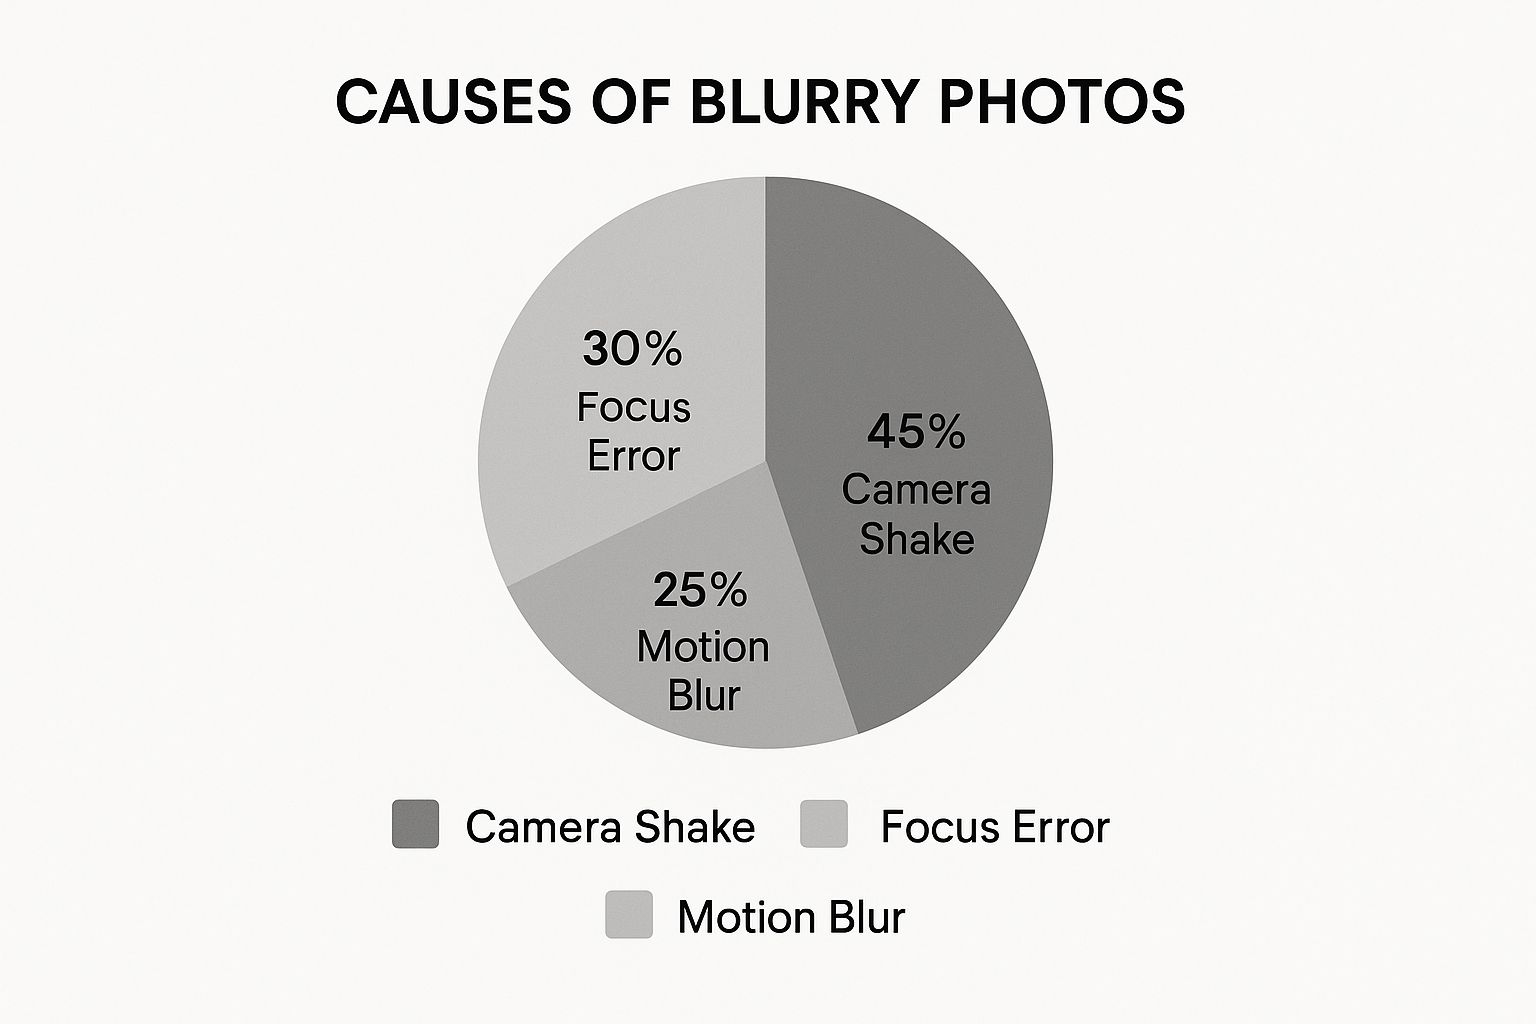
As you can see, a simple case of camera shake accounts for almost half of all blurry photos. It’s easily the most common issue photographers of all skill levels run into.
Blurry Photo Fix Methods at a Glance
A comparison of the primary methods for sharpening blurry images, helping you choose the best approach based on your skill level, budget, and desired outcome.
| Method | Best For | Skill Level | Typical Cost |
|---|---|---|---|
| AI Photo Enhancers | Quick, automatic fixes with minimal effort. | Beginner | Free to subscription-based |
| Desktop Software (Photoshop) | Precise, manual control over every detail. | Intermediate to Advanced | Subscription-based |
| Mobile Editing Apps | Convenient on-the-go edits and social sharing. | Beginner to Intermediate | Free with in-app purchases |
Each of these methods has its place, and the best one really just depends on the photo and what you're trying to achieve.
Understanding the Solutions
Once you’ve got a hunch about what caused the blur, you can zero in on the right tool for the job. Each approach offers a different balance of power and simplicity.
Here’s a quick rundown of the techniques we're about to dive into:
- AI Photo Enhancers: Think of these as your "easy button." They're fantastic for fast, automated corrections. The AI analyzes the blur and intelligently reconstructs lost detail with almost no input from you.
- Professional Desktop Software: This is your command center. Tools like Photoshop give you manual control for unmatched precision, making it the top choice when you need to sharpen specific areas while leaving others untouched.
- Mobile Editing Apps: Perfect for convenience. These apps pack powerful sharpening tools onto your phone, which is ideal for sprucing up a shot before you post it online.
The impact of artificial intelligence on photo editing has been massive. As of 2024, the AI image processing market is valued at a staggering $279 billion. It’s no surprise, considering about 58% of photographers now use AI for corrections. It saves a ton of time and the results can be fantastic. You can read more about these AI image statistics and see just how much it's shaking things up.
In the next few sections, we'll get practical with step-by-step tutorials for each of these methods. You'll have the skills you need to rescue those cherished memories from the blur.
Figuring Out Why Your Pictures Are Blurry
Before you can even think about fixing a blurry picture, you have to play detective. Pinpointing the type of blur is the single most important step. Why? Because each kind of blur has a different cause, and therefore, a different cure. Trying to fix an out-of-focus shot with a tool designed for motion blur will just make a mess.
Once you learn to spot the visual clues, you can confidently pick the right tool and technique from the get-go. Let’s break down the three most common culprits and how you can tell them apart just by looking.
Identifying Motion Blur
Motion blur is what happens when your subject zips across the frame while your camera's shutter is still open. The dead giveaway is the distinct, directional streaks or trails that follow the path of whatever was moving.
Imagine taking a photo of a friend running past. If their body looks like a smooth, stretched-out blur but the background—the trees, the buildings—is perfectly sharp, you're looking at classic motion blur. The key is the contrast: a sharp background with a blurred, streaky subject.
You see this all the time in sports photography or with any shot of kids and pets who just won't hold still. The blur itself literally shows you the direction of the movement.
Spotting Focus Blur
Focus blur, which some people call soft focus, happens when your camera lens just plain misses the mark. Instead of locking onto your subject, it focuses on something else, or nothing at all. The result is an image that appears uniformly soft and almost "dreamy." Unlike motion blur, you won't see any directional streaks.
Ever take a portrait where you meant to focus on the person's eyes, but the wall behind them is crystal clear while their face is fuzzy? That’s a missed focus. The blur is smooth and consistent, without any truly sharp edges where you want them.
Key Takeaway: With focus blur, all the details just kind of melt together, like you're looking through a foggy window. Nothing on the intended focal plane is sharp.
Recognizing Camera Shake
Camera shake is easily the most common offender. It's caused by your own hands moving—even slightly—during the exposure, which blurs the entire photograph. This creates a tell-tale "double image" or ghosting effect across the whole frame. Both your subject and the background will be equally unsharp.
It’s a huge problem, especially in low light. Historically, about 30% of blurry consumer photos were the direct result of unsteady hands. This is precisely what drove the development of optical image stabilization (OIS) in cameras. Fast forward to 2023, and over 80% of flagship smartphones now include OIS, which has slashed this type of blur by 50-70% in everyday photos. You can dig into more data on digital image processing trends to see just how big of an impact this tech has made.
If you zoom into your photo and see that every single element has that same slight, chaotic blur, you've got camera shake. It's the visual equivalent of a tiny earthquake being captured in a single frame. Knowing this is what lets you choose a deblurring tool specifically designed to counteract that jittery motion.
Using AI Tools for an Instant Fix
When you need to rescue a blurry photo without getting tangled in complex software, AI tools are your new best friend. They do all the heavy lifting, analyzing your image and intelligently rebuilding lost detail—all it usually takes is a click or two.
Think about it. We've all been there: you snap a once-in-a-lifetime shot on your phone, only to find it's just a little fuzzy. Or you're trying to save a precious old family photo that's gone soft over the years. Instead of spending hours wrestling with Photoshop, you can now get some pretty incredible results in minutes.
Let's walk through just how easy this can be.
A Step-by-Step AI Deblurring Tutorial
The real magic here is simplicity. Forget layers, masks, or a dozen confusing sliders. The whole process is designed to be completely intuitive, taking you from a blurry mess to a sharp memory in no time. The AI has been trained to spot different kinds of blur and automatically apply the right fix.
Here’s a simple step-by-step guide to fixing a blurry photo with a typical AI tool:
- Upload Your Image: Find the "Upload" or "Drag and Drop" area on the website and select your blurry photo from your computer or phone.
- Choose the Enhancement Model: You'll usually see a few choices. For general blurriness from camera shake or soft focus, a 'Standard' or 'Enhance' option is perfect. But if a face is the star of the shot, selecting a 'Face Enhance' model will pour all its energy into restoring facial features with stunning clarity.
- Adjust and Preview: The AI will process the image automatically. Many tools provide a before-and-after slider so you can see the difference immediately. Some may offer a single slider to control the intensity of the effect.
- Download Your Fixed Photo: Once you're happy with the result, just click the "Download" button to save your newly sharpened image.
Real-World Example: Restoring a Portrait
Let's say you have a portrait where a little camera shake made the person’s face indistinct. This is a classic problem.
You’d upload it and choose the 'Face Enhance' model. The AI immediately gets to work, identifying the eyes, mouth, nose, and hair. It then reconstructs these critical details, sharpening features without that fake, over-processed look you get from old-school sharpening filters. That’s a common pitfall that makes skin look plastic or overly textured.
The goal is a portrait that looks like it was captured perfectly in the first place. The AI isn't just applying a crude sharpening effect across the board; it’s rebuilding the photo because it understands what it's looking at.
For more complex jobs or when you need to increase the resolution of a small, blurry photo, you might also want to look into using a dedicated online image upscaler. These tools work hand-in-hand with deblurring technology.
Key Takeaway: The biggest advantage of using AI is how natural the results are. It skillfully avoids those ugly "halos" and gritty artifacts that are a dead giveaway of manual sharpening. It’s all about restoration, not just aggressive editing.
This AI-powered approach completely changes the game for anyone wondering how to fix blurry pictures without sinking hours into professional editing software. It gives you a direct path to a clear, high-quality photo, making it ideal for quick fixes and bringing your favorite memories back to life.
Fixing Blur with Precision in Photoshop
Sometimes, an AI tool gives you a great starting point, but you need more hands-on control to get the job done right. When you need surgical precision, Adobe Photoshop is the undisputed king of the hill. It might look intimidating, but a couple of smart, non-destructive techniques are all you need to fix blurry pictures with incredible accuracy.
This is about graduating from a one-click "sharpen" filter to professional-grade photo restoration. The whole game is about working smart, not hard. By using layers and masks, you can apply powerful sharpening effects only where they're needed, protecting the rest of your image from that crunchy, over-processed look. It's the difference between a quick patch and a true rescue.
Step-by-Step: The Smart Sharpen Tool
One of the most powerful tools in Photoshop's arsenal is Smart Sharpen. Forget basic sharpening filters that just add gritty noise; Smart Sharpen is built to intelligently analyze and fix specific types of blur. Here’s how to use it:
- Open your image in Photoshop and duplicate the layer by pressing
Ctrl+J(Windows) orCmd+J(Mac). This protects your original. - Go to the menu and select Filter > Sharpen > Smart Sharpen.
- In the dialog box, first look at the Remove dropdown. This is where your diagnosis matters. Choose
Lens Blurfor out-of-focus shots orMotion Blurif you see directional streaks. If you selectMotion Blur, you can even adjust theAngleto match the blur in your photo. - Adjust the sliders:
- Amount: Controls the overall strength. Start low (e.g., 50-70%) and increase slowly.
- Radius: Determines the size of the area around an edge that gets sharpened. Use a small radius (0.5-2 pixels) for fine details.
- Reduce Noise: Use this slider to smooth out any grain that appears. A value of 10-20% is often enough.
- Click OK to apply the filter.
Step-by-Step: The High Pass Filter Technique
For the absolute best non-destructive workflow, the High Pass filter is a long-time favorite among professional retouchers. This technique is brilliant because it isolates only the edges in your photo, letting you paint on sharpness with total control.
- Duplicate your image layer (
Ctrl/Cmd + J). This is non-negotiable—it keeps your original photo safe. - With the new layer selected, go to Filter > Other > High Pass. Your screen will turn gray.
- Slowly drag the Radius slider to the right until you can just make out the faint outlines of your subject. A value between 1.0 and 3.0 pixels is usually the sweet spot. Click OK.
- In the Layers panel, change the blend mode of this gray High Pass layer from
Normalto Overlay or Soft Light. You’ll see instant sharpness pop back into your image. - Refine with a Layer Mask (Optional but Recommended): With the High Pass layer still selected, click the
Add Layer Maskicon (a rectangle with a circle inside) at the bottom of the Layers panel. Select the Brush tool (B), choose a soft-edged brush, set the color to black, and paint over areas you want to remain soft, like skin or skies.
If you find your images need a bit more love than just sharpening, you can explore guides on AI image enhancement to discover other powerful restoration methods.
Pro Tip: When using a layer mask to apply sharpening, grab a soft-edged, white brush and set its opacity low (around 20-30%). Gently build up the effect on the areas you want to pop. This gives you a far more organic and believable result. It’s how you fix a blurry picture without screaming to the world that you fixed it.
Sharpening Photos on Your Phone
You don’t always need to fire up the desktop to save a blurry photo. The fix is often sitting right in your pocket. Modern smartphones are packed with incredible editing power, letting you sharpen images on the fly and turn a slightly soft shot into a crisp, memorable picture.
This is all about speed and convenience. It’s perfect for those moments when you notice the photo you just took at brunch is a little off and you want to clean it up before you share it. Let's walk through how to do this using free, powerful apps like Snapseed or Adobe Lightroom Mobile.
The demand for these quick fixes is huge, especially since over 6 billion people worldwide now use their phone as their primary camera. Mobile apps designed to fix blurry pictures are exploding in popularity. For instance, the 'Motion Blur Photo Effect' app pulls in around 9,000 downloads and nearly $12,590 in revenue every month. It’s a clear sign that people want simple, instant solutions for common photo problems. You can dig into more data on the growth of mobile photo editing apps if you're curious.
A Step-by-Step Guide Using Snapseed
Snapseed's 'Details' panel is a fantastic example of how to do it right, giving you control over both sharpness and texture. Here’s a simple tutorial:
- Open your photo in Snapseed and tap the Tools button at the bottom.
- Select the Details tool from the grid of options.
- You'll see two key sliders. Swipe your finger vertically on the screen to switch between them:
- Sharpening: This targets edge contrast. Swipe horizontally to adjust. A little goes a long way—push it too far, and you’ll get ugly digital artifacts. A value between +15 and +35 is usually the sweet spot.
- Structure: This enhances textures within the image. Be very careful with this on portraits, as it can make skin look unnatural. For portraits, I rarely go above +10.
- Zoom in by pinching the screen to check your work on important details.
- Tap and hold the before/after icon in the top right corner to compare your edit to the original.
- When you're happy, tap the checkmark to save your changes.
Finding the Right Balance
The secret sauce is using both sliders with a delicate touch. Your goal is to enhance, not obliterate.
Start by zooming in to 100% on an important part of your photo, like someone’s eyes or the text on a sign. Slowly nudge the Sharpening slider up until you see a clear improvement. Then, carefully adjust the Structure slider to give the photo more depth and presence.
Pro Tip: After you've made your adjustments, tap and hold the little "before/after" icon in the top corner. This lets you instantly toggle between your edit and the original file. It’s the single best way to check if you’ve gone too far and need to dial things back for a more natural result.
By getting a feel for these simple controls, you can confidently fix slightly blurry pictures just moments after taking them. Your best shots will always look their sharpest.
Common Questions About Fixing Blurry Pictures
Even when you've got the best tools at your fingertips, a few tricky questions always seem to pop up. Honestly, knowing how to fix blurry pictures is as much about understanding the why as it is about knowing the how. Let's tackle some of the most common questions I hear, so you can move past troubleshooting and start mastering the art of photo rescue.
Think of this as the final piece of the puzzle that separates a decent fix from a truly spectacular one.
Can a Very Blurry Photo Be Fixed Completely?
While today’s software can feel like magic, it does have its limits. Think of a deblurring tool like a detective trying to solve a case with most of the evidence missing. If a photo is just a total mess—completely out of focus or shaken into a streaky blur—the essential details are simply gone.
There’s nothing for the software to grab onto and reconstruct. The realistic goal is always significant improvement, and believe me, you can often turn an unusable shot into a photo you'll treasure. But expecting a perfectly crisp, tack-sharp image from something that was heavily blurred from the start just isn't in the cards.
Key Insight: You'll see the most jaw-dropping results on photos that are just slightly soft or have a bit of camera shake. The more original detail the software has to work with, the more amazing the final picture will be.
Now, if you're dealing with old, faded, or physically damaged prints, that’s a slightly different ballgame. For those heirloom images, you’ll want to look into the specifics of photo restoration online, which is a process that blends deblurring with color correction and fixing physical damage.
What Is the Difference Between Sharpening and Deblurring?
This is a fantastic question, and getting the answer right is crucial. People use these terms interchangeably all the time, but they are fundamentally different processes. Knowing which is which will help you choose the right tool for the job.
- Sharpening is all about boosting the contrast along edges that are already there. It creates the illusion of a crisper image by making outlines look more defined. Think of it as a final touch-up for a photo that's already in focus.
- Deblurring, especially with modern AI, is a whole different beast. It’s a reconstructive process. The AI analyzes the image to figure out how it got blurred—was it motion? was the focus missed?—and then works backward to intelligently rebuild the details that were lost.
In short, deblurring is about fixing a core problem, while sharpening is about enhancing an already good photo.
How Do I Avoid Over-Sharpening My Photos?
The golden rule here is simple: less is more. It is shockingly easy to get carried away and absolutely wreck a great photo with too much sharpening.
The most important habit to develop is to always view your image at 100% zoom when you’re making these adjustments. This is the only way to see the true effect of your edits. You're on the lookout for a few tell-tale signs that you've gone too far:
- Halos: These are nasty, unnatural-looking bright or dark lines that appear around the edges of objects.
- Grainy Textures: Areas that should be smooth, like a clear sky or someone's skin, suddenly look gritty and sandy.
- Plastic-like Skin: Over-sharpening is particularly unflattering on people, often making skin look artificial and waxy.
My pro-tip? Use layer masks in programs like Photoshop. This lets you be surgical with your sharpening. You can paint the effect only onto the parts that need it—like a person’s eyes or the intricate texture of fabric—while leaving smooth areas completely untouched.
Ready to put this into practice with a tool that sidesteps the steep learning curve? AI Photo HQ gives you powerful, one-click AI deblurring that produces natural, high-quality results. It’s all about restoring your cherished memories and making every shot look its best, without the hassle.

