The quickest way to fix a blurry photo is to use a modern AI-powered tool. These apps are smart enough to analyze and correct all sorts of blur, from motion streaks to focus problems, and they do it in just a few clicks. Honestly, the results often blow traditional, manual sharpening methods out of the water.
Understanding Why Your Photos Are Blurry
Before you can fix a blurry photo, you have to play detective. Not all blur is created equal, and figuring out what went wrong is the first step to choosing the right fix. You wouldn't use a tool designed for soft focus to fix a streaky motion blur; you just won't get the results you're after.
Think of it like being a photo investigator. The clues are right there in the image, and once you pinpoint what happened during the shot, you'll save yourself a ton of time and frustration in the editing room.
The Most Common Types of Blur
The blur you're seeing almost always falls into one of three buckets. Each one has its own tell-tale signs and is caused by a completely different problem when the picture was taken.
Here are the usual suspects:
- Motion Blur: This is what happens when your subject moves while the camera's shutter is still open. It creates those distinct streaks or "ghosting" effects you see when a moving car or a running dog looks smeared across the frame.
- Camera Shake: It looks similar to motion blur, but this time, the blame lies with the photographer's unsteady hands, not the subject. The entire image will lack that crisp sharpness. This is a classic problem in low-light situations that force you to use a slower shutter speed (anything below 1/100s is risky).
- Missed Focus: This is probably the most frustrating one. It happens when the camera decides to focus on the wrong thing—like the background behind your friend instead of their face. The person you wanted to capture looks soft and indistinct, while other parts of the image might be perfectly sharp.
The key takeaway here is that different types of blur need different solutions. Knowing if you're dealing with camera shake versus a simple focus error is the secret to knowing how to clear up a blurry picture the right way.
Once you’ve correctly identified the problem, you’re setting yourself up for success. You’ll be able to grab the perfect tool for that specific job and get a much better final result.
Choosing the Right Tool to Unblur Your Image
https://www.youtube.com/embed/Se1WzQLyldk
With so many apps and programs promising a quick fix for blurry photos, it's easy to get lost. The real trick is matching the tool to your specific problem and how much effort you're willing to put in. A program that’s brilliant at fixing a slightly soft portrait might not be your best bet for a photo with heavy motion blur from a shaky hand.
It really boils down to a classic trade-off: speed versus control. Do you need a one-click solution that gets the job done in seconds, or are you trying to rescue a more challenging image that needs a delicate touch? There’s no single “best” tool, only the right tool for the photo sitting in front of you.
Online AI Tools vs. Desktop Software
One-click AI deblurring apps are fantastic for sheer convenience. You upload your photo, an algorithm does its magic, and you get a sharpened version almost instantly. These are perfect for quickly touching up a slightly out-of-focus family photo you want to share on social media. They handle common focus and minor shake issues incredibly well with almost zero effort.
On the flip side, comprehensive editors like Adobe Photoshop offer a much deeper, more granular level of control. If you're wrestling with severe motion blur—say, a photo you snapped from a moving car—you’ll need specialized features. Photoshop's Shake Reduction filter, for instance, actually analyzes the specific path of the camera movement to correct the image with far more precision than a general sharpening tool ever could.
The right tool depends entirely on the blur's severity and what you want to achieve. For everyday fixes, an AI tool is fast and effective. For professional-level results or saving a photo you thought was a lost cause, a dedicated desktop editor is your best friend.
To give you a better idea of how different deblurring tools stack up, here’s a quick comparison.
Comparison of Photo Deblurring Tools
This table breaks down the key differences between modern AI-powered tools and traditional software like Photoshop, helping you decide which approach is right for your needs.
| Feature | AI-Powered Tools (e.g., Topaz Photo AI) | Traditional Software (e.g., Photoshop) |
|---|---|---|
| Ease of Use | One-click, automated analysis | Manual adjustments, steeper learning curve |
| Speed | Very fast, often a few seconds | Slower, requires manual filter application |
| Control Level | Limited, relies on AI | High, with precise manual controls |
| Best For | General focus, minor motion blur | Severe motion blur, complex corrections |
| Learning Curve | Minimal to none | Moderate to high |
Ultimately, while AI tools offer incredible speed and convenience for common problems, nothing beats the surgical precision of traditional software when you have a truly difficult image to salvage.
The chart below shows just how easily blur can happen. A simple change in a camera setting like shutter speed can drastically increase the risk of a blurry shot, which is a key factor when you're choosing your correction tool.
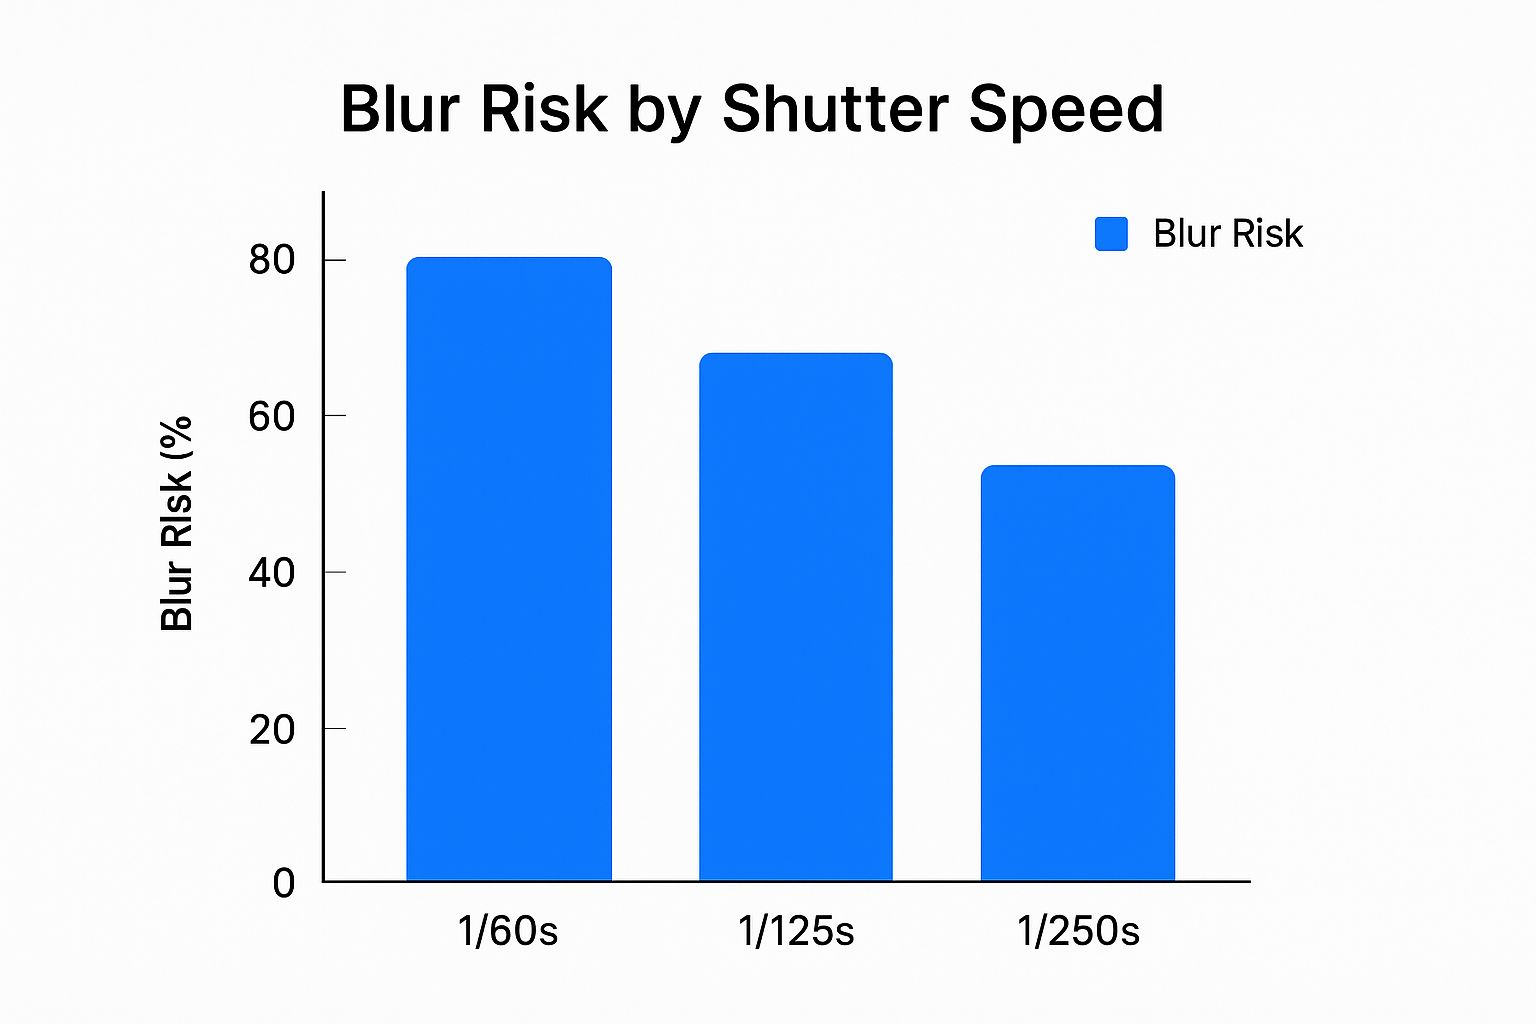
As you can see, just dropping your shutter speed from 1/250s to 1/60s massively increases the chance of blur from camera shake. That kind of blur often requires more powerful, specialized software to fix properly.
Unblurring Photos with AI: Let's Walk Through It
Using a tool like AI Photo HQ is incredibly straightforward. Here's a step-by-step guide to fixing a common problem: a portrait where the face is slightly out of focus.
Step-by-Step Guide to Using an AI Unblur Tool
- Upload Your Image: Start by dragging your blurry photo onto the website or clicking the "Upload" button. The tool will immediately start analyzing the picture.
- Choose the Right AI Model: This is the most important step. Don't just accept the default. Look for different processing models. For a portrait, you must select the Face Recovery or Face Enhance model. This tells the AI to prioritize fixing facial features with the highest detail. For a blurry landscape, a Standard or General model would be better.
- Adjust the Strength: The AI will apply a default level of sharpening. Find the "Strength" or "Clarity" slider. Instead of pushing it to 100%, start at around 70%.
- Use the Preview: Toggle the "Before/After" view. Zoom in on the eyes and hair. Do they look sharp and natural, or do they have a glowing, artificial "halo" around them?
- Fine-Tune and Export: If the image looks too harsh, reduce the strength. If it's still too soft, increase it slightly. A setting between 60-75% is usually the sweet spot for a natural look. Once you're happy, click "Download" or "Export" to save your crystal-clear photo.
A classic mistake is over-sharpening. This creates ugly, unnatural "halos" or glowing edges around your subject. Always use the before-and-after preview, toggling it on and off to make sure the result looks crisp, not artificial. A little goes a long way.
This kind of computational fix is the result of decades of progress in digital imaging. It all started with the invention of the charge-coupled device (CCD) way back in 1969, which first turned light into digital pixels. Fast forward to the 2010s, and AI methods were already blowing older software algorithms out of the water, showing clarity improvements of 20-40% on blurry photos.
For those who need to go beyond simple unblurring for business or advanced projects, a specialized AI Tool for Web Vision can offer more powerful features for image analysis and processing.
Going Deeper: Tackling Severe Blur in Photoshop
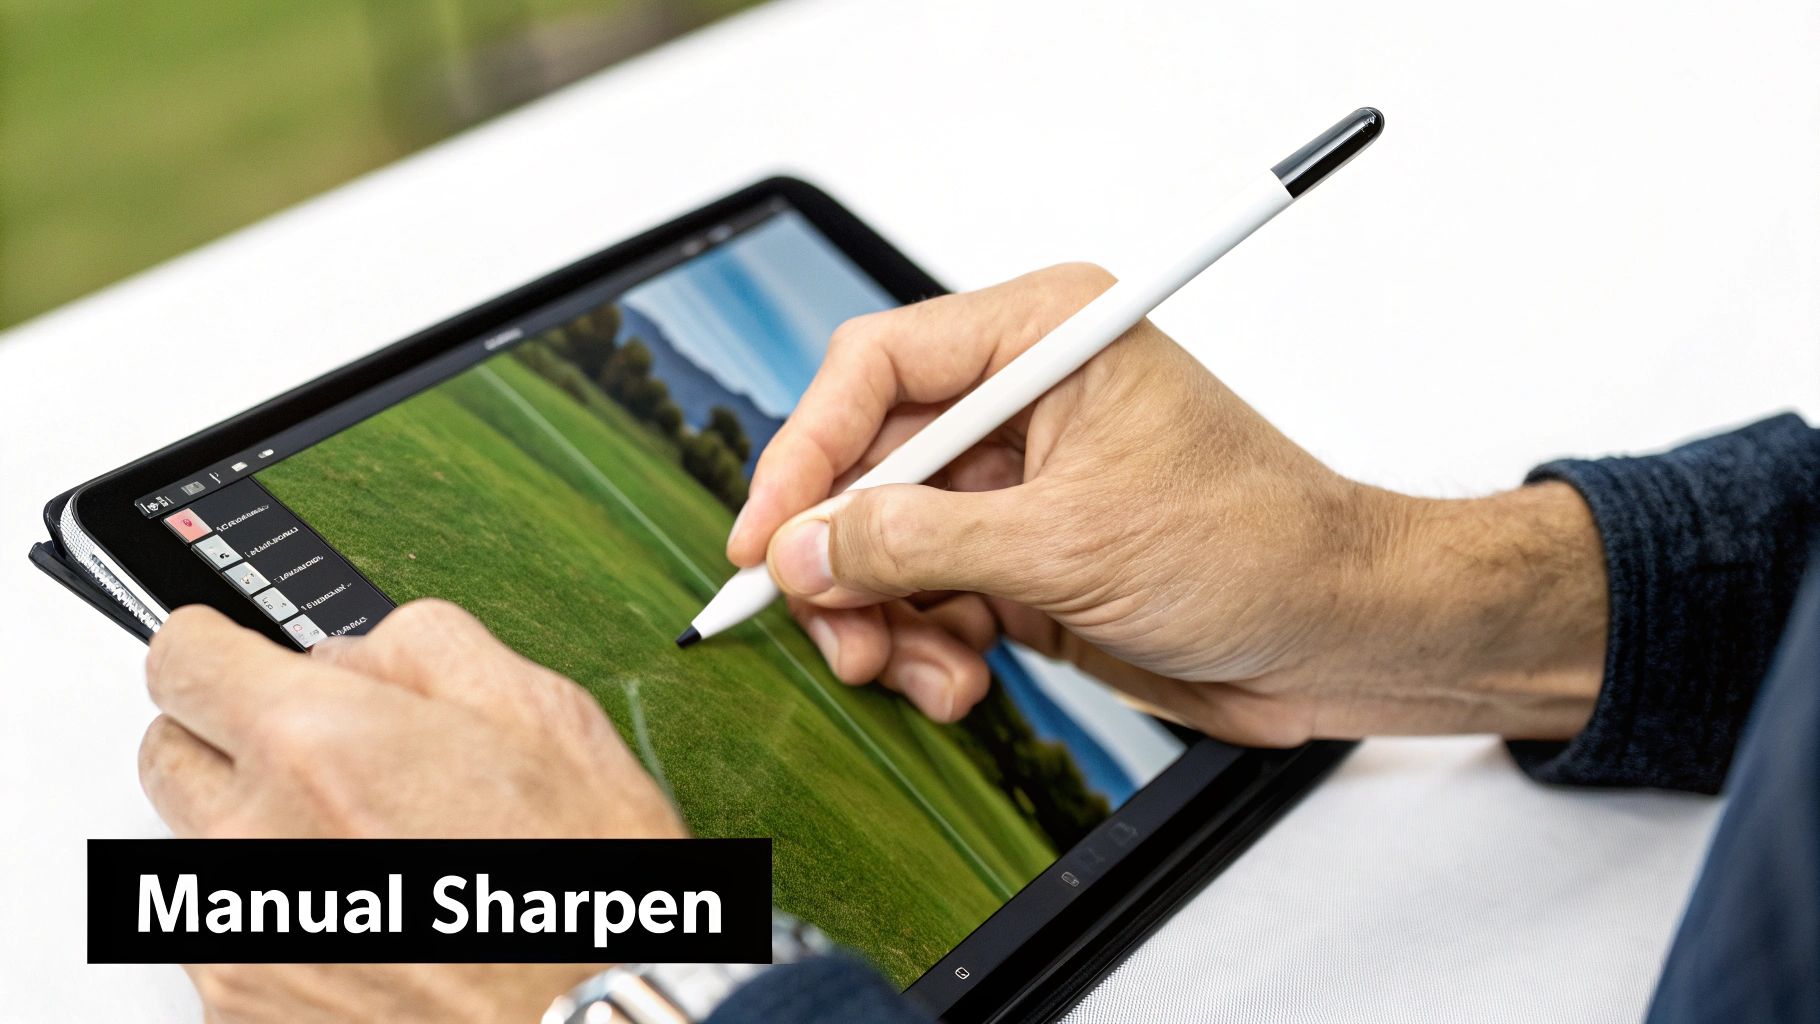
Sometimes, an AI tool isn't enough for severe blur. This is when you need the surgical control of Adobe Photoshop. Here are two practical tutorials for tackling different types of blur.
Tutorial 1: Fixing Camera Shake with the Shake Reduction Filter
Use this method for photos where the entire image is blurry from an unsteady hand.
- Open Your Image: Launch Photoshop and open the blurry photo.
- Duplicate the Layer: Before you do anything, right-click your background layer and select "Duplicate Layer." This is a non-destructive practice that lets you undo changes easily.
- Apply Shake Reduction: Go to the top menu and navigate to
Filter > Sharpen > Shake Reduction. Photoshop will automatically analyze the image and apply a correction. You'll often see a dramatic improvement immediately. - Fine-Tune the Blur Trace: In the Shake Reduction window, you'll see a box showing the "blur trace" — the path of the camera's movement. You can drag the corners of this box to change the area Photoshop analyzes or even draw new boxes over different parts of the image to get a better result.
- Adjust Advanced Settings: Use the
Blur Trace Settingssliders on the right. Slowly increaseSmoothingandArtifact Suppressionto reduce any digital weirdness the filter might introduce. Click "OK" when you're done.
Tutorial 2: Selectively Sharpening with Smart Sharpen and a Mask
Use this for photos where one part is out of focus (like a face) but the background is fine.
- Open and Duplicate: Just like before, open your image and duplicate the main layer.
- Apply Smart Sharpen: Navigate to
Filter > Sharpen > Smart Sharpen. In the pop-up window, make sure the "Preview" box is checked. - Adjust the Sliders: Focus on the part of the image you want to be sharp (e.g., the eyes in a portrait). Increase the
Amountslider to control the intensity and theRadiusslider to control the thickness of the sharpened edges. A small radius (1-2 pixels) is usually best. Click "OK." - Add a Layer Mask: With your sharpened layer selected, click the "Add Layer Mask" icon at the bottom of the Layers panel (it looks like a rectangle with a circle in it). A white mask thumbnail will appear next to your layer.
- Paint to Hide the Effect: Select the Brush Tool (B) and set your color to black. Paint over the areas you want to remain soft, like the person's skin or the background. The sharpening effect will disappear wherever you paint in black. This gives you precise control over what gets sharpened.
The real pro move is often a hybrid approach. Start with a quick AI tool for the heavy lifting. Then, pull that improved image into Photoshop to use layer masks and Smart Sharpen for that final, artistic touch.
This workflow gives you the best of both worlds: the raw power of AI and the nuanced control of manual editing. It’s the secret to learning how to remove blur from a photo effectively and bringing those once-lost memories back to life.
Common Mistakes to Avoid When Fixing Blurry Photos
Sharpening a photo is a real balancing act. It's so easy to get carried away and push it just a little too far, accidentally ruining what could have been a great shot.
The most common trap is over-sharpening. This is what introduces those ugly digital artifacts that just scream "heavily edited." You'll know you’ve done it when you see glowing edges or "halos" pop up around your subject. It can also give the whole image a gritty, unnatural texture. A once-smooth sky might suddenly look noisy, or skin can take on a crunchy, unpleasant look.
Overlooking the Details
A huge mistake I see all the time is judging the edits on a tiny preview. Sure, a photo might look perfectly crisp when you're zoomed out, but the real story is always in the details.
You absolutely have to check your work at 100% zoom. This is the only way to get an honest look at what you're doing and spot those subtle halos or that excessive noise before you hit save. Trust me, it’s a crucial habit to build.
Another critical error is sharpening too early in your workflow. Sharpening should always, always be the final step. Do all of your other adjustments first—things like color correction, exposure, and cropping. If you sharpen first, you’re just amplifying any existing noise and imperfections, which makes them much harder to clean up later.
It’s also good to keep your expectations in check. The quest for clarity isn't new; photographers have been battling blur since the 1800s. Early processes like the daguerreotype cut exposure times from hours down to just minutes—a massive leap for capturing clearer images back then. You can learn more about this incredible journey and the history of photography on MisterLocation.com.
Just like early photographers had their limits, so do our modern tools. A photo that's so blurry the subject is unrecognizable simply doesn't have enough data for even the smartest AI to fully recover. The goal is realistic improvement, not impossible perfection.
For a deeper dive into what today's AI can actually pull off, check out our guide on artificial intelligence photo enhancement. Stepping around these common mistakes will put you on the right track to learn how to remove blur from a photo and get believable, high-quality results every time.
A Few Common Questions About Unblurring Photos
Got a question about fixing a blurry photo? You're not alone. Here are some of the most common things people ask, along with some straight-to-the-point answers from our experience.
Can I Really Remove Blur From Any Photo?
Honestly, no. While you can improve the vast majority of photos, some are just too far gone.
If a photo is so blurry that you can't even make out the subject, or it's plagued by extreme motion streaks, even the most powerful AI is going to have a tough time. It needs some visual data to work with, and if there's nothing there to rebuild, the results will be limited. Think of it less as a magic wand and more as an incredible restoration tool. The goal is a massive improvement, not a perfect miracle every time.
So, what's the best software to unblur a picture? For most common issues—like a slightly soft focus or minor camera shake—an AI-powered tool is your best bet for speed and quality. But for those really tough cases, nothing beats the manual control of Adobe Photoshop, which has specialized filters professionals have relied on for years.
The real key is matching the tool to the problem. For a slightly soft portrait, AI is a quick and brilliant fix. For a photo with wild camera shake from a moving car, you’ll probably need the surgical precision of Photoshop.
Does Sharpening an Image Reduce Its Quality?
Sharpening itself doesn't lower the resolution, but over-sharpening definitely will. When you push it too far, you introduce ugly digital artifacts that scream "over-edited" and make the photo look harsh and unnatural.
Keep an eye out for these classic signs you've gone too far:
- Halos: You'll see weird, bright outlines around the edges of objects.
- Noise: Smooth areas, like a clear sky or skin, will suddenly look gritty and grainy.
- Crunchy Textures: Details start to look brittle and overly harsh instead of naturally sharp.
The best way to avoid this is to apply sharpening in small, subtle increments. Always, and I mean always, zoom in to 100% to check your work. It's the only way to see what's really happening to the pixels.
Of course, once your images are crystal-clear, you want people to see them. Getting your work to show up online is a whole other skill. For photographers looking to build a professional presence, understanding SEO for photographers is a great next step to showcase your amazing, sharp photos.
Can I Fix Blurry Photos on My Phone?
Absolutely! Your phone is a surprisingly powerful editing tool.
You don't need a beefy computer to make huge improvements. Mobile apps like Snapseed, Adobe Lightroom Mobile, and Remini pack some serious sharpening and AI enhancement features. They make it incredibly convenient to fix blurry shots right after you take them.
Ready to rescue your own photos from the blur? With AI Photo HQ, you can bring back detail, sharpen soft images, and even restore old family pictures in just a few clicks. It’s time to turn your blurry memories into crisp, clear masterpieces.

