That gut-wrenching feeling of finding treasured photos soaked in water is something you don't forget. But don't despair—if you act fast, you can absolutely save them. The first few hours are the most critical part of the entire journey. This guide provides practical, step-by-step instructions to help you salvage your irreplaceable memories.
What to Do Immediately After Finding Damaged Photos
When you're staring at a pile of wet, potentially ruined memories, it's easy to feel overwhelmed. The steps you take in these first moments will halt the damage and pave the way for a successful recovery. Your goal right now isn't perfection; it's stabilization.
Unfortunately, more and more people are facing this exact problem. The damage restoration industry has ballooned into a market worth an estimated $7.1 billion in the U.S. as of 2025. A huge driver for this is the rise in natural disasters, which cause devastating property damage and put irreplaceable items like photos at risk. You can get more details on this trend in the full damage restoration services market report.
First Actions for Photo Triage
Your absolute top priority is to stop the photos from drying while they're still stuck together. If they dry in a clump, the delicate emulsion—the layer with the actual image on it—will fuse together and tear when you try to separate them. Here is a step-by-step tutorial for what to do immediately.
Step 1: Emergency Freezing (If you're short on time)
If you cannot work on the photos right away, you must freeze them.
- Carefully place stacks of wet photos into Ziploc-style plastic bags. Do not try to separate them yet.
- Press out as much air as possible and seal the bags.
- Place the bags flat in a freezer. This hits the pause button on any further damage or mold growth, buying you precious time.
Step 2: Prepare Your Workspace
When you're ready to start, get your area ready.
- Find a clean, flat surface with good lighting.
- Gather your materials: shallow trays (like baking sheets), distilled water (tap water minerals can leave spots), and soft paper towels.
- Fill a tray with cool, distilled water.
Whatever you do, don't use soaps or detergents, and never, ever scrub the photos.
This infographic breaks down the entire process from that initial emergency response to the final digital touch-up.
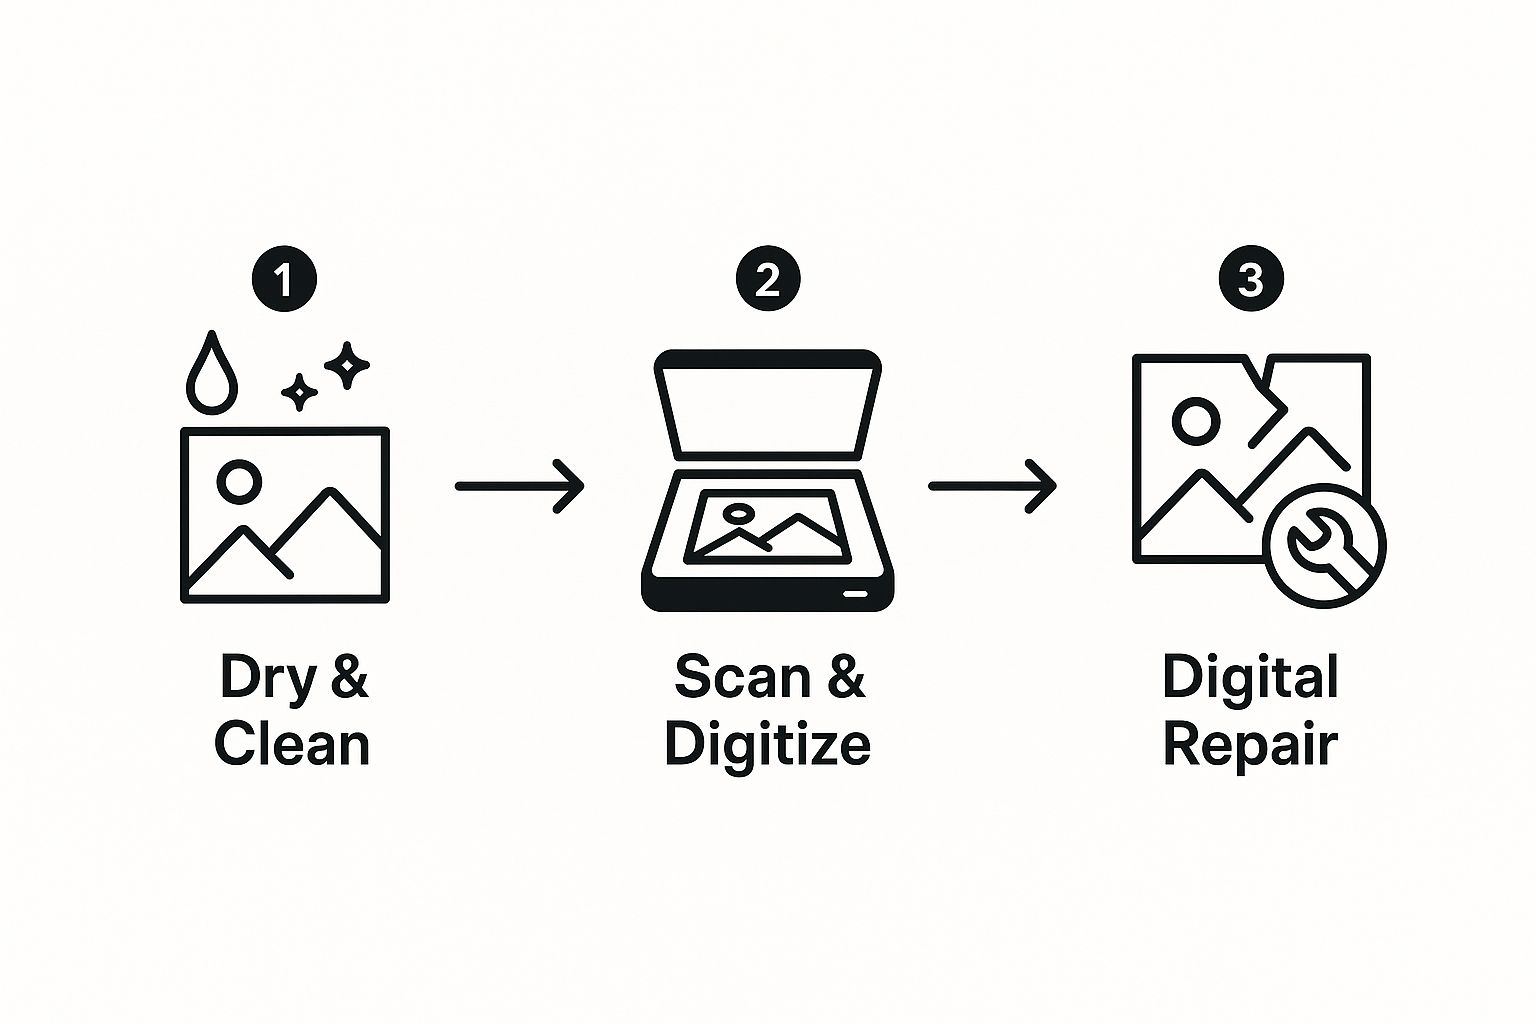
As you can see, that physical preservation work is the foundation for everything that comes next.
Initial Photo Triage Checklist
When disaster strikes, having a clear plan makes all the difference. This checklist covers your immediate, non-negotiable first steps. Following these actions gives your photos the best possible chance of survival before you move on to more detailed restoration.
| Action Item | Why It's Important | Materials Needed |
|---|---|---|
| Gently remove photos from dirty water. | Prevents further contamination from mud, silt, or chemicals. | Clean hands or nitrile gloves |
| Keep photos wet in a clean container. | Stops them from drying stuck together, which causes irreversible tearing. | Shallow tray, distilled water |
| Freeze photos if you can't work immediately. | Pauses deterioration and prevents mold growth, buying you time. | Ziploc bags, freezer |
| Prepare a clean, dedicated workspace. | Avoids introducing new dirt or debris onto the fragile photo surfaces. | Flat surface, good lighting |
Acting decisively with these first steps can mean the difference between a treasured memory and a lost one.
Gently Separating Stuck Photographs
This is where you need a steady hand and a lot of patience. If photos are stuck in a solid block, do not try prying them apart while they're dry. You'll just rip them. Follow this tutorial instead.
Step-by-Step Separation Guide:
- Submerge the Stack: Place the entire stuck-together block of photos into your tray of cool, distilled water. Ensure they are fully submerged.
- Soak Patiently: Let them soak for at least 30-60 minutes. Don't rush this. The water needs time to penetrate the layers and loosen the bond.
- Attempt to Separate: Starting at one corner of the top photo, gently try to peel it away from the one below it. If you feel any resistance, stop immediately.
- Re-Soak if Needed: If the photos won't separate, let them soak longer. You can try running a very gentle stream of water between the layers to help them along.
- Rinse and Isolate: Once a photo is free, place it by itself in another tray of clean, distilled water for a final rinse. This removes any lingering residue.
This careful, immediate handling is what makes any future digital photo restoration possible.
A Practical Guide to Safely Drying Your Photographs
Okay, you've managed to gently rinse and separate your photos. Now comes the drying phase, where your patience is just as crucial as your technique. How you dry these photos will set the stage for a successful water damaged photo restoration. The goal is to let moisture evaporate evenly without the photo curling or sticking.
Laying the Groundwork for Proper Air-Drying
First, let's set up your drying station. You need a clean, flat, and dry spot where your photos can be left undisturbed for several hours.
Step 1: Choose a Surface: A kitchen counter, a spare table, or a clean patch of floor will work.
Step 2: Cover the Surface: Protect your surface and the photos by laying down an absorbent, lint-free material. Good options include:
- Plain paper towels: Use a brand without deep embossed patterns.
- Clean, white cotton sheets: Ensure they are white to prevent dye transfer.
- Fiberglass window screening: You can buy this at a hardware store. It allows air to circulate underneath the photo, speeding up drying.
The best drying method depends on your photos. For a few modern, glossy prints, laying them flat is fine. For many photos or older matte prints, hanging is better.
Techniques for Drying Different Photo Types
Your drying strategy needs to adapt to the photos themselves. Modern prints on resin-coated paper are tougher than older, fiber-based prints.
Tutorial: How to Lay Photos Flat to Dry
- After a final rinse in distilled water, hold the photo by a corner and let excess water drip off for a few seconds.
- Place the photograph face up on the absorbent surface you prepared.
- Leave at least an inch of space between each photo for air circulation.
Crucial Tip: Whatever you do, never place photos face down to dry. The wet emulsion on the front is incredibly sticky and will bond to the drying surface like glue. When you try to peel it up later, you'll rip the image right off. This kind of damage is almost always irreversible.
As they dry, photos will curl at the edges. This is normal. Do not press them flat under a book while they're damp. This traps moisture and can lead to mold. We'll flatten them later, once they're completely dry.
Building a Simple DIY Drying Rack
If you have many photos to dry, laying them out can take up too much space. A drying line is a fantastic, space-saving alternative.
How to Make a Photo Drying Line:
- Find two stable anchor points (e.g., kitchen chairs, cabinet knobs).
- String a piece of fishing line, twine, or dental floss between them. Make it taut.
- Use plastic clothespins or binder clips to gently hang photos by one corner on the line. Avoid wooden clothespins, which can stain wet paper.
- Ensure there's enough space between photos so they don't touch.
This method provides excellent airflow to both sides, which can reduce curling. To speed up drying and prevent mildew, open a window or use a fan on a low setting, pointed away from the photos to create gentle air circulation.
Digitizing Damaged Photos for High-Quality Repair
Once your photos are completely dry, you're ready to create a high-quality digital copy. This is where the real magic happens. By digitizing the print, you create a perfect working canvas where you can undo the damage without ever touching—and potentially harming—the fragile original again. This is a non-negotiable step in any serious water damaged photo restoration project.
It’s easy to forget that what we're doing is a small but vital part of a much larger picture. The disaster restoration industry, valued at nearly USD 50 billion in 2025, is growing fast, largely because of an increase in extreme weather events. Water damage is a massive part of that, causing everything from structural issues to mold, which affects our homes and precious keepsakes alike.
How to Digitize Your Photos
You have two main options: a flatbed scanner or a digital camera. For photo restoration, a flatbed scanner is superior. It provides even lighting, prevents distortion, and allows precise resolution control.
A camera can work in a pinch, but it requires a tripod, two light sources at 45-degree angles to eliminate glare, and a perfectly parallel setup to avoid skewed images.
My advice? Stick with a flatbed scanner. It’s built for one thing—creating a flawless, flat digital image—and it does that job exceptionally well. When your original is already compromised, you need that reliability.
If your photo is so curled that it won't lie flat, lay a piece of anti-Newton ring (ANR) glass over it on the scanner bed. This will gently press it flat for a sharp scan without creating rainbow-like interference patterns.
Getting Your Scanner Settings Just Right
The most critical setting is resolution, measured in dots per inch (DPI). This determines the level of detail.
Step-by-Step Scanner Settings Tutorial:
- Clean the Scanner Glass: Use a microfiber cloth and glass cleaner to remove any dust or fingerprints.
- Set the Resolution (DPI):
- For standard 4x6 or 5x7 prints, select 600 DPI.
- For small photos (e.g., wallet-sized), use 1200 DPI to capture enough detail for enlargement.
- For negatives or slides, use a dedicated film scanner at 2400-3200 DPI.
- Choose the Color Mode: Select "Color" or "RGB" mode, even for black-and-white photos, to capture subtle tonal variations from the damage.
- Select the File Format: Always save your scan as a TIFF file. JPEGs lose data every time you save them. TIFFs are "lossless," preserving every single pixel—essential for high-quality restoration.
- Scan and Save: Perform the scan and save the TIFF file to a dedicated folder on your computer.
Once you’ve digitized these memories, they are now valuable digital files. Taking a moment for understanding the impact of natural disasters on data will help you create a backup strategy that keeps your newly-saved photos safe for good.
The interest in this is absolutely exploding. The global market for photo restoration is expected to jump from about USD 420 million in 2025 to almost USD 1.2 billion by 2032. You can see more on this in the full photograph restoration service market report.
Applying AI for Specific Damage Types
Not all water damage is created equal. A photo with light discoloration needs a different approach than one with physical tears. Let's walk through step-by-step tutorials for two common scenarios.
Scenario 1: The Faded, Discolored Portrait
This is a common problem: a portrait where water has caused colors to bleed, leaving a brownish or yellow tint. The original vibrancy is gone.
Tutorial: How to Fix Discoloration
- Upload Your Scan: Open your AI photo restoration software (like AI Photo HQ) and upload the high-resolution TIFF file you created.
- Select the Color Tool: Find and click the feature named "Color Correction" or "Colorize."
- Let the AI Work: The tool will automatically analyze the image, identify unnatural color casts, and restore the original color balance based on its training.
- Adjust the Intensity: The initial result might look too vibrant. Use the "Intensity" or "Strength" slider to dial the effect back to 70-80% for a more natural, authentic look that respects the photo's age.
Scenario 2: The Photo with Stains and Missing Pieces
Now for a tougher case: a photo with mold spots, dark water stains, or a torn corner where the image layer lifted away. This requires more advanced water damaged photo restoration tools.
Tutorial: How to Repair Physical Damage
- Fix Stains and Spots:
- Select the "Scratch & Blemish Remover" tool.
- The AI will automatically detect and highlight imperfections like mold spots and water stains.
- Click "Apply" or "Remove" to let the AI seamlessly fill in these spots using pixel data from the surrounding area.
- Repair Tears and Missing Sections:
- Choose the "Generative Fill" or "Inpainting" feature.
- Use your mouse to highlight the torn or empty area of the photo.
- The AI will analyze the rest of the image context (e.g., a shirt pattern, a background wall) and generate a new section that fits perfectly.
AI Restoration Feature Guide for Water Damage
Choosing the right tool for the job is half the battle. This table breaks down common types of water damage and points you to the AI feature that will give you the best results.
| Type of Water Damage | Recommended AI Feature | Pro Tip for Best Results |
|---|---|---|
| Faded & Yellowed Colors | Color Correction / Colorize | Adjust the intensity slider to avoid an overly digital look. Aim for natural tones. |
| Water Stains & Tidelines | Scratch & Blemish Remover | For large or faint stains, you may need to apply the tool in several small sections. |
| Mold & Mildew Spots | Scratch & Blemish Remover | Zoom in close to catch every tiny spot. The AI is precise and can handle these easily. |
| Tears & Rips | Generative Fill / Inpainting | Select a slightly larger area than the tear itself to give the AI more context to work with. |
| Missing Corners/Pieces | Generative Fill / Inpainting | Use this after you've fixed all other blemishes so the AI has a clean image to analyze. |
| Stuck to Glass or Paper | Scratch & Blemish Remover | After scanning, use this tool to remove any leftover paper texture or residue patterns. |
Think of these tools as your digital restoration kit. For an even deeper look, our guide on how to restore old photos online has more examples for complex repairs.
Fine-Tuning Your AI-Restored Images
AI completes the heavy lifting of a water damaged photo restoration, but the final artistic touches are up to you. The goal isn't just repair; it's to preserve the photo's character. This final stage is about small, intentional tweaks that restore the photograph's soul.
Recapturing Authentic Vintage Tones
AI can sometimes over-correct color, making a vintage print look too modern. Here's a quick tutorial to restore its authentic feel using software like Photoshop or GIMP.
Example Tutorial: Restoring 1980s Warmth
- Open your restored image.
- Go to
Image > Adjustments > Color Balance. - In the "Midtones" section, slightly move the top slider towards Red and the bottom slider towards Yellow. A small adjustment (e.g., +5) is often enough.
- For sepia photos, apply a sepia photo filter and then reduce the layer's opacity to 20-30% for a subtle effect.
This isn’t about slapping on a generic filter; it’s about bringing back the photo’s original mood.
The real art of restoration lies in knowing what not to fix. Some imperfections, like the soft focus of an old lens or the specific grain of the film, are part of the photo’s story. Preserving these details is just as important as removing the damage.
Polishing Minor Imperfections
AI can miss tiny artifacts. The Clone Stamp and Healing Brush are your go-to tools for these final fixes.
Example Tutorial: Fixing Small Blemishes
- Zoom into an area with a minor flaw, like an unnatural pattern left by the AI.
- Select the Healing Brush tool.
- Hold Alt/Option and click on a clean, nearby area with similar texture (e.g., a smooth part of a cheek).
- Release the key and "paint" over the small blemish. The tool will blend the texture seamlessly.
These final, manual tweaks elevate your water damaged photo restoration from merely repaired to truly restored.
Common Questions About Photo Restoration
When you’re staring at a box of soaked memories, it’s easy to feel overwhelmed. A ton of questions probably start racing through your mind. The journey to a successful water damaged photo restoration isn't always obvious, but getting answers to a few key concerns can make a world of difference. Let's walk through some of the most common ones I hear.
Can a Totally Submerged Photo Actually Be Saved?
This is almost always the first thing people ask, and the answer is surprisingly hopeful: yes, often it can be. It helps to remember that most professional photo paper was literally designed to be submerged in chemicals during the development process, so it has more built-in water resistance than you'd expect.
Whether you'll be successful really boils down to a few critical factors:
- How quickly you act: The faster you can get those photos separated and soaking in clean water, the better your chances. The real damage happens as they dry and fuse together.
- The type of paper: Modern resin-coated prints are pretty tough. Older fiber-based or matte papers? They’re far more delicate and need a much gentler touch.
- The water itself: Clean rainwater is one thing, but silty floodwater is a whole different beast. The grit can physically scrape away the photo's surface.
Even if a photo looks like a complete goner, don't just toss it. I've seen amazing recoveries happen with careful physical cleaning followed by smart digital repair.
Should I DIY or Hire a Professional Service?
Figuring out whether to tackle this yourself or call in a pro is a balancing act between your time, your budget, and how precious the photo is. A DIY approach is a great choice if the damage is relatively minor—think light water spots or some discoloration—and you feel confident in handling the steps.
However, I'd strongly suggest hiring a professional service if:
- The photo is your only copy of a priceless memory.
- The damage is severe, with big tears or chunks of the image missing.
- You're dealing with photos stuck to glass or have serious mold growth.
The cost for a pro to digitally restore a single picture can run anywhere from $70 to $150 per image, and that can add up fast. You have to weigh that cost against how irreplaceable the photo is. Sometimes, the peace of mind that comes with an expert taking over is worth every penny.
What Is the One Mistake I Must Avoid?
If I could point to one fatal error in water damaged photo restoration, it’s this: applying direct heat or rubbing the photo while it's wet.
That image you see isn't just ink on paper; it's a delicate layer of gelatin emulsion. When it gets wet, that emulsion turns into a soft, sticky gel. Blasting it with a hairdryer to speed things up will cause it to crack and peel right off the paper, and that damage is irreversible. Trying to wipe it with a cloth, no matter how gently, will just smear and erase the image completely. Once that emulsion is gone, it’s gone for good.
Patience is your most important tool here. For more practical advice on handling delicate prints, check out our in-depth guide to old photo restoration, which covers many of the same principles of careful handling.
Don't let water damage win. With AI Photo HQ, you have powerful, professional-grade restoration tools ready to go. Just upload your scanned photos and watch our AI repair stains, fix tears, and bring vibrant color back to faded memories in seconds. Try AI Photo HQ today and bring your cherished photos back to life.

