Learning how to make a background white is a foundational skill that can instantly elevate your photos. It's a quick fix that eliminates distractions, draws focus to your subject, and gives your images a clean, professional finish. For anyone in e-commerce, building a portfolio, or creating marketing materials, this is an essential technique.
Why a White Background Is a Game Changer
Before we jump into the step-by-step instructions, it’s worth understanding why this technique is so effective. A crisp white background isn't just a style choice; it's a strategic move that directs attention and builds trust. When you remove visual clutter, your product or subject becomes the undeniable hero of the shot.
This simple change also creates a consistent, polished look no matter where you post—from your Shopify store to your LinkedIn profile. By stripping away everything distracting, you're letting the important details, like colors and textures, really pop.
The Gold Standard for Online Marketplaces
If you're selling online, a white background is more than just a good idea—it's often a hard rule. Big players like Amazon and eBay have strict image guidelines that require plain backdrops. They do this to create a uniform and high-quality shopping experience for everyone.
A clean, consistent look doesn't just check a box for marketplace rules. It sends a psychological signal to customers that your brand is credible and professional, making them more likely to trust you and make a purchase.
Following these rules is essential if you want to succeed. In fact, this practice is so widespread that studies have found over 75% of all e-commerce product photos use a white background to improve clarity and keep colors looking accurate. It's a foundational skill for millions of listings worldwide. You can see how the pros use these standards to get the best results.
Forget spending hours painstakingly tracing edges in clunky old software. If you need to make a photo background white, the smart move is to use an AI-powered tool that does all the heavy lifting for you. These editors are built for one thing: getting the job done fast, accurately, and without a steep learning curve.
The best ones use some seriously impressive algorithms to figure out where your subject ends and the background begins. They can handle tricky details like wisps of hair, see-through objects, or busy patterns that would be a nightmare to select by hand. This means anyone can get pro-level results without all the tedious, manual work.
What to Look for in a Great AI Editor
Heads up, though—not all AI tools are on the same level. When you're picking one out, there are a few key things to watch for that separate the good from the great.
- Pinpoint Edge Detection: The tool has to deliver a clean cut around your subject. No jagged edges or that weird, glowing halo effect.
- Handles the Tricky Stuff: It needs to preserve fine details. This is especially true for things like hair, animal fur, or complex clothing textures.
- Simple is Better: A one-click interface is what you're after. The whole point is to upload a picture and get a perfect white background in seconds, not get lost in confusing menus.
- Batch Processing Power: If you're running an e-commerce store, this is a non-negotiable. The ability to process a whole folder of images at once can turn a full day's work into a coffee break.
A truly great AI tool isn't just about speed. It’s about getting a result that looks completely natural and professional. The AI should handle 95% or more of the work, leaving you with only minor tweaks, if any at all.
Choosing the right editor means you’re working smarter, not harder, to get that polished, professional look. You can check out this curated list of the best AI tools for photo editing to see which one fits your workflow. It's all about finding the right tool for the job.
A Practical Walkthrough to a Perfect White Background
Let's walk through the exact steps of how this works. You can learn how to make a background white in less than a minute with a modern AI tool, transforming a cluttered photo into something clean and professional. It’s surprisingly simple and completely ditches the need for tedious manual editing.
The image below shows the traditional, manual way of getting a white background from the very beginning of a photoshoot.
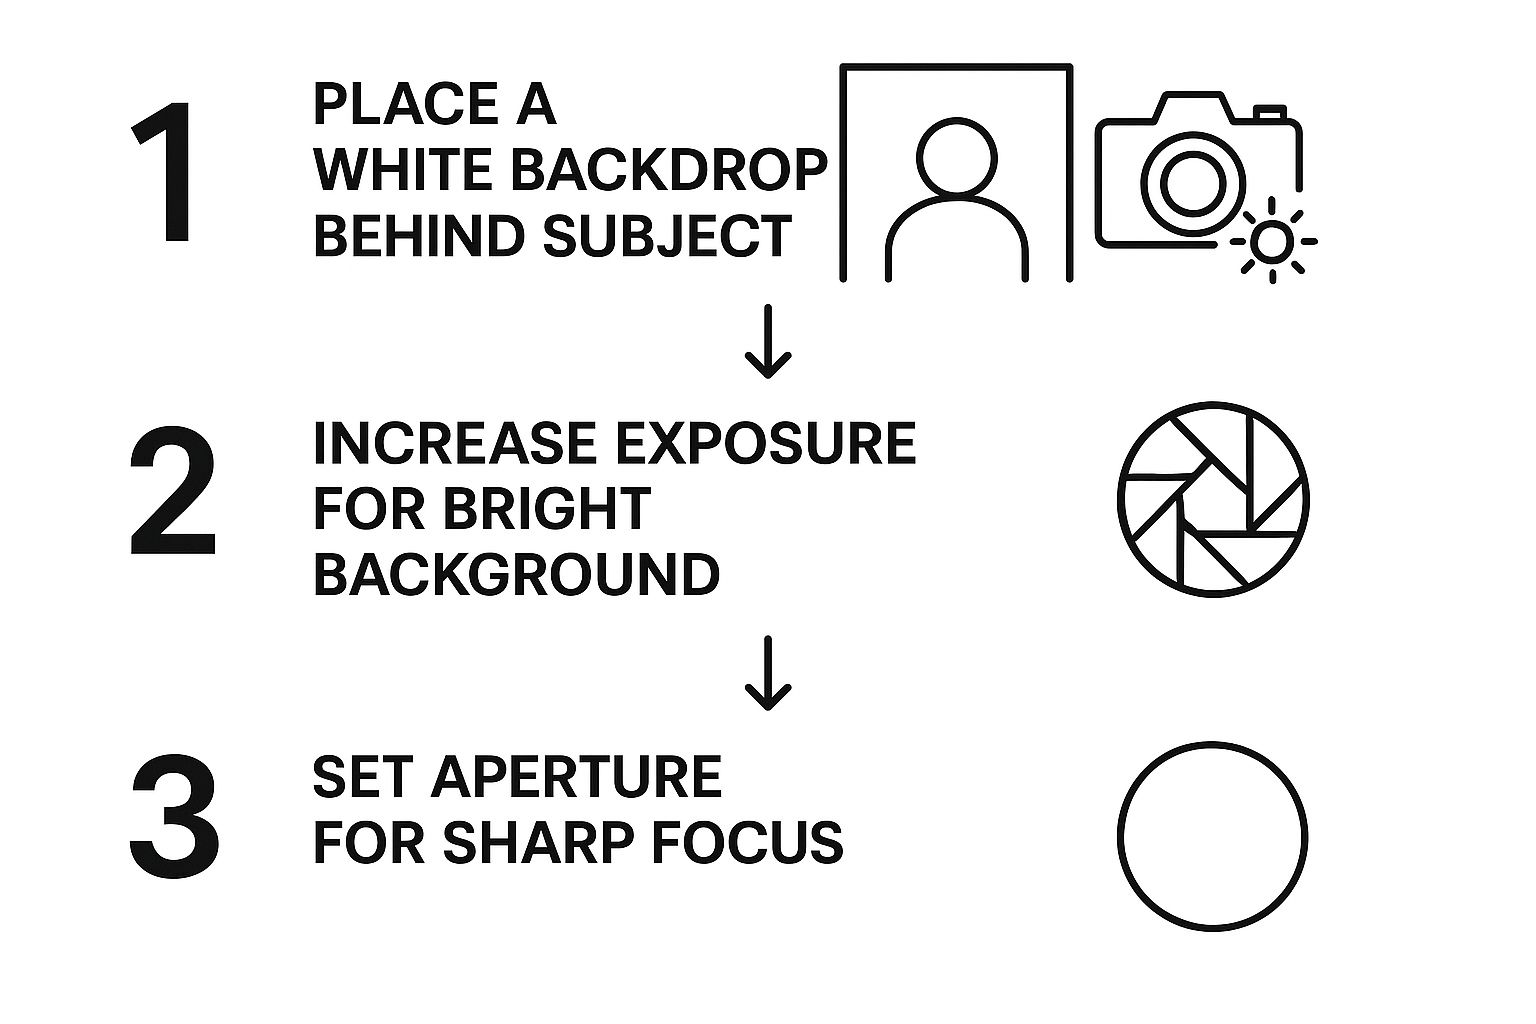
While that old-school approach is great for professional photographers with a full studio setup, an AI tool automates the whole process, saving you a ton of time and money on equipment.
From Upload to White Background in 3 Simple Steps
The core process couldn't be more straightforward. Here’s a typical workflow you’ll find in most modern AI background editors.
- Upload Your Image: Start by dragging and dropping your photo into the editor, or use the upload button to select the file from your computer. If you have multiple images, look for a "batch" or "multiple files" option to process them all at once.
- Let the AI Work: As soon as the image is uploaded, the AI automatically analyzes it to identify the main subject and separates it from the background. This usually takes just a few seconds. The background will typically become transparent, leaving you with a clean cutout.
- Set the Background to White: Now, look for a "background color" or "edit background" option. A color palette will appear. Select pure white. You can often enter a specific hex code (#FFFFFF) or RGB value (255, 255, 255) to ensure it's a true, clean white. Once you’re happy with the result, click "Download."
If you want to get into the nitty-gritty of how that works, we've got a full guide on how to remove a background from a picture.
A quick technical tip: pure white is defined by the pixel value RGB (255, 255, 255). Using this exact value creates a true, brilliant white that keeps your brand visuals consistent. That’s a big deal for the 87% of marketers who say a consistent visual strategy is a top priority. For more on this, check out some insights on digital marketing strategies at Adobe Stock.
This is exactly the kind of precision AI tools deliver, without you having to lift a finger.
Before and After: A Visual Comparison
Seeing the transformation firsthand really drives home how powerful this technology is. Here’s a quick look at how different types of photos are improved by swapping a busy background for a clean, white one.
| Original Photo (Busy Background) | Edited Photo (White Background) | Key Improvement |
|---|---|---|
| Product on a wooden table | Product on a clean white background | Focus is entirely on the product's details and features. |
| Person in a crowded outdoor setting | Person isolated on a white background | The subject becomes the undisputed focal point, perfect for headshots or profiles. |
| Car parked on a street | Car on a white background | Eliminates distractions, giving it a professional, catalog-ready appearance. |
As you can see, the change isn't just cosmetic—it fundamentally alters how the viewer perceives the subject, making it look more professional and trustworthy.
An Interface Built for Speed
The best tools are the ones that don't get in your way. A simple, intuitive interface is what makes the workflow feel so smooth and fast.
You can see that the whole user experience is built around a few core actions: upload, edit, and download. Whether you’re touching up a single portrait or running a whole batch of product shots, the goal is always to get a polished, professional result without getting bogged down in complicated menus. The final image comes out crisp, focused, and ready to go.
Pro Tips for a Truly Flawless Finish
Once you've got the basics down for making a background white, a few extra tweaks can take your images from pretty good to genuinely professional. The single biggest factor? Starting with a high-quality, well-lit photograph.
Good lighting is your best friend here. It helps the AI figure out exactly where your subject ends and the background begins, which is key to avoiding those weird, unnatural shadows and fuzzy edges we all hate.

Seriously, don't skip this initial step. An AI tool can perform some incredible magic, but it can't just invent detail that was never there. A clear, sharp source image will always give you a much better final product.
Tackling Tricky Subjects
Some subjects are just a pain to edit. We've all been there. Think about products with reflective surfaces, models with flyaway hair, or anything semi-transparent. For these, a little prep work during the photoshoot goes a very long way.
Reflective Items: Photographing shiny things like jewelry or glassware? Use a big, soft light source. This will cut down on the harsh glares that can confuse the AI. For a DIY setup, place white foam boards around the product to bounce light and create softer, more manageable reflections.
Complex Edges: When you’re dealing with fine details like hair or fur, try shooting against a plain, contrasting background if possible. This gives the AI a clean, clear line to follow, which means a much crisper cutout for you.
Making these small adjustments during the shoot can save you a ton of time and frustration later on. It just helps the AI do its job perfectly.
The goal isn't just to chop out the background—it's to create a final image that looks real. A perfectly isolated subject can still look weird and out of place if it doesn't interact believably with its new white backdrop.
Adding Believable Finishing Touches
After the AI has worked its magic and removed the background, a couple of quick post-edits will add a layer of realism that makes the final image way more convincing.
Tutorial: How to Add a Drop Shadow
- After setting the background to white, look for an "Effects," "Shadow," or "Adjustments" menu in the editor.
- Select "Drop Shadow." You'll usually see several controls.
- Offset/Distance: This controls how far the shadow is from your object. A small value keeps it tight and realistic.
- Blur/Softness: This determines how sharp or fuzzy the shadow edges are. A slightly blurred shadow often looks more natural.
- Opacity/Transparency: Adjust this to make the shadow darker or lighter. A value around 20-40% is usually enough to ground the object without being distracting.
- Apply the changes and download your image.
A subtle drop shadow is often all you need to stop your subject from looking like it’s floating in a white void.
Putting Your White Background Images to Work
So, you’ve mastered making a photo background white. What now? This skill goes way beyond just cleaning up your e-commerce listings. Think of these crisp, professional images as your brand’s new secret weapon, ready to be deployed across all sorts of platforms.
They’re foundational assets, really. A polished headshot against a stark white background instantly looks more credible and sharp on a LinkedIn profile. The same goes for your website—these distraction-free visuals are perfect for hero images, creating a clean, high-end feel the second a visitor lands on your page.

Beyond Digital Marketing
The power of a white background isn't just for the web. It has a huge impact on your business operations and even physical products.
Take business presentations, for example. Clarity is everything. In fact, one industry analysis showed that a whopping 85% of business reports stick to white backgrounds for charts and graphs. Why? Because it keeps the focus squarely on the data.
Your perfectly isolated images can be dropped into anything from brochures and flyers to custom stickers and standout social media graphics. The clean slate gives you total creative freedom.
Once you have your perfected images, you can start applying them to your broader sales strategy by following essential visual merchandising guidelines, which can help attract shoppers and give sales a real boost.
And if you’re looking at a mountain of product photos, don't worry. You can seriously speed up your workflow when you batch edit photos.
Got Questions? We've Got Answers
Even with a tool as simple as AI Photo HQ, you're bound to have a few questions when you're first starting out. Here are some of the most common things people ask when learning how to get that perfect white background.
Can I Get Away With Using a Low-Resolution Photo?
You can, but it's not recommended if you're aiming for a professional look. For the cleanest edges and a truly sharp finish, always start with the highest-resolution image you have. A high-quality source image gives the AI more data to analyze, which translates directly to a more precise and believable cutout.
What if the AI Messes Up the Cutout?
It happens, especially with tricky details like wisps of hair or semi-transparent objects. That's why most good editors include manual touch-up tools.
If you spot a bit of background left behind or a piece of your subject is missing, look for an "Erase" or "Restore" brush. A few clicks with a small brush is usually all it takes to refine the edges and perfect the cutout.
The whole point of an AI editor is to do the heavy lifting—getting you 95% of the way there in a couple of seconds. A quick manual touch-up is just that final polish needed for those particularly complex shots.
Does Making the Background White Change the File Size?
Yes, it almost always makes the file smaller. A busy, colorful background is packed with visual information. When you replace that complexity with a solid white color, you're simplifying the image data. This is a huge benefit for websites and e-commerce stores, as smaller image files lead to faster page loading times.
How Can I Add a Realistic Shadow?
This is a key step that separates a good edit from a great one. Thankfully, you don't need to be a graphic designer. Many AI tools now have a one-click option to add a subtle drop shadow or ground shadow right after you remove the background. This instantly adds depth and makes your subject look grounded and natural, not like a flat sticker.
Ready to create your own stunning, professional images with flawless white backgrounds? With AI Photo HQ, you can remove backgrounds, generate entirely new visuals, and even restore old photos with just a few clicks.
Give your images the professional look they deserve. Transform them today at AI Photo HQ.

