
Ever wondered how creators manage to blend different photos into one seamless, stunning image? That’s the magic of superimposing—a creative technique that lets you layer pictures to build something entirely new. It’s the method behind everything from dramatic movie posters to the fun social media edits you see every day.

But don't think for a second that this requires complicated software or years of design school. These days, powerful AI tools like the ones we've built at AI Photo HQ let anyone create professional-quality composites. And fast.
Understanding The Core Concept
At its heart, superimposing is a pretty simple idea with a surprisingly long history. The practice actually dates back to the 19th century, long before anyone dreamed of digital tools. In 1851, French photographer Gustave Le Gray famously combined multiple negatives to work around the era's tech limitations, creating a single, perfect image from separate shots of the sky and sea. It’s amazing to see how far we've come since then.
That foundational technique of combining elements is the same one we use today, but thankfully, AI has automated all the tedious parts.
Here’s a quick overview of the modern workflow before we dive in.
The Superimposing Workflow at a Glance
This table breaks down the basic stages you'll go through. It’s a simple process, but understanding each step helps you get better results faster.
| Stage | Key Action | Goal |
|---|---|---|
| Selection | Pick a foreground subject and a background image. | Find two images that complement each other visually and thematically. |
| Isolation | Remove the background from your subject photo. | Create a clean cutout of your subject with crisp edges. |
| Layering | Place the isolated subject onto the new background. | Position and scale the subject to fit naturally into the new scene. |
| Blending | Adjust color, lighting, and shadows. | Make the final composite look believable and cohesive. |
Think of it as digital collage-making. You pick your elements, arrange them, and then polish everything until it forms a single, unified picture.
The real goal isn't just to stack images—it's to tell a story. A well-executed composite feels intentional and cohesive, making the impossible look real.
Now, let’s walk through each of these stages with practical examples and actionable steps to help you master this creative skill.
Choosing Your Photos for a Perfect Blend
I'm going to let you in on a little secret: the magic behind a believable composite image isn't really the software. It’s the photos you start with. Seriously. Even the most powerful tools can't salvage a project when the foreground and background images just don't belong together. Getting this first part right is 80% of the battle.
Think of it like cooking. The quality of your ingredients dictates how the final dish tastes. Dropping a low-resolution subject into a crisp, high-definition landscape will always look jarring and out of place. Before you even get to the fun part of layering, pause and really look at your chosen photos. Are they compatible?
Aligning Light and Perspective
The most common mistake I see, and the one that instantly shatters the illusion, is mismatched lighting. If your subject is clearly lit from the left, but the sun in your new background is blazing from the right, the final image will just feel… off. Our eyes are incredibly good at spotting these little inconsistencies, even if we can't quite put a finger on why.
Here's a quick tutorial on how to check your images for compatibility:
- Find the Light Source: Look at your subject photo. Identify the brightest spots and the direction of the shadows. Is the light coming from the top right? The left? Now do the same for your background image. If the light sources don't match, the final result will look unnatural.
- Check the Light Quality: Is the lighting in your subject photo soft and diffused (like on a cloudy day)? Or is it hard and direct, creating sharp shadows (like on a sunny day)? Your background image should have the same quality of light.
- Match the Camera Angle: Was your subject photographed from eye-level, from a low angle looking up, or from a high angle looking down? A person shot from a low angle will never look right placed on a background shot from above. Ensure the perspectives line up.
A pro tip I always use is to just look at the shadows. The length, direction, and softness of the shadows in both photos are your best clues for getting a perfect match.
Resolution and Subject Isolation
Another killer is image quality. Always try to work with photos that have a similar resolution. Placing a blurry, pixelated person onto a tack-sharp background is an instant giveaway that something isn't right. For a truly seamless blend, you need both images to be sharp and clear.
Once you’ve found two photos that play well together, the next job is to isolate your subject. In the past, this was a mind-numbing process of manually tracing around your subject with a digital pen. Thankfully, modern tools have made this ridiculously simple.
For instance, a tool like the AI Photo HQ background remover can handle this for you in a single click. You just upload the image, and its AI cleanly cuts the subject out from its original surroundings. What you're left with is a perfect "sticker" of your subject, ready to be dropped into its new home. Taking this one simple, automated step sets you up for a much more believable and professional-looking final image.
Your Guide to Layering Images with AI Tools
Okay, you've found the perfect photos and now it's time for the fun part—bringing them together. This is where we'll actually combine the images, and thanks to modern tools, it's way easier than you might think. We’re going to walk through a classic scenario: placing a person into a gorgeous landscape they never actually visited.
Here is a step-by-step tutorial for layering your images:
- Upload Your Background: Open your AI photo editor and upload your background image first. This will serve as your main canvas.
- Add Your Subject: Next, add your foreground image (the person you've already cut out from their original background) as a new layer on top. If you haven't done this yet, our guide on how to remove a background from a picture will get you sorted in just a few clicks.
- Position Your Subject: With both layers loaded, simply click and drag your subject around the canvas. Place them where the composition feels most balanced and natural.
- Resize and Rotate: Use the corner handles on your subject's layer to scale them up or down. Make their size proportional to the elements in the background. You can also rotate the layer slightly to match the perspective of the scene.
- Adjust Opacity (Optional): For artistic effects like ghosts or double exposures, you can lower the opacity slider to make your subject semi-transparent. For most realistic composites, you'll leave this at 100%.
If you're interested in exploring other ways technology can help with this, there are a ton of different AI photo editing tools out there designed to help you nail these kinds of composite images.
This visual breakdown shows just how straightforward the layering and positioning process is.
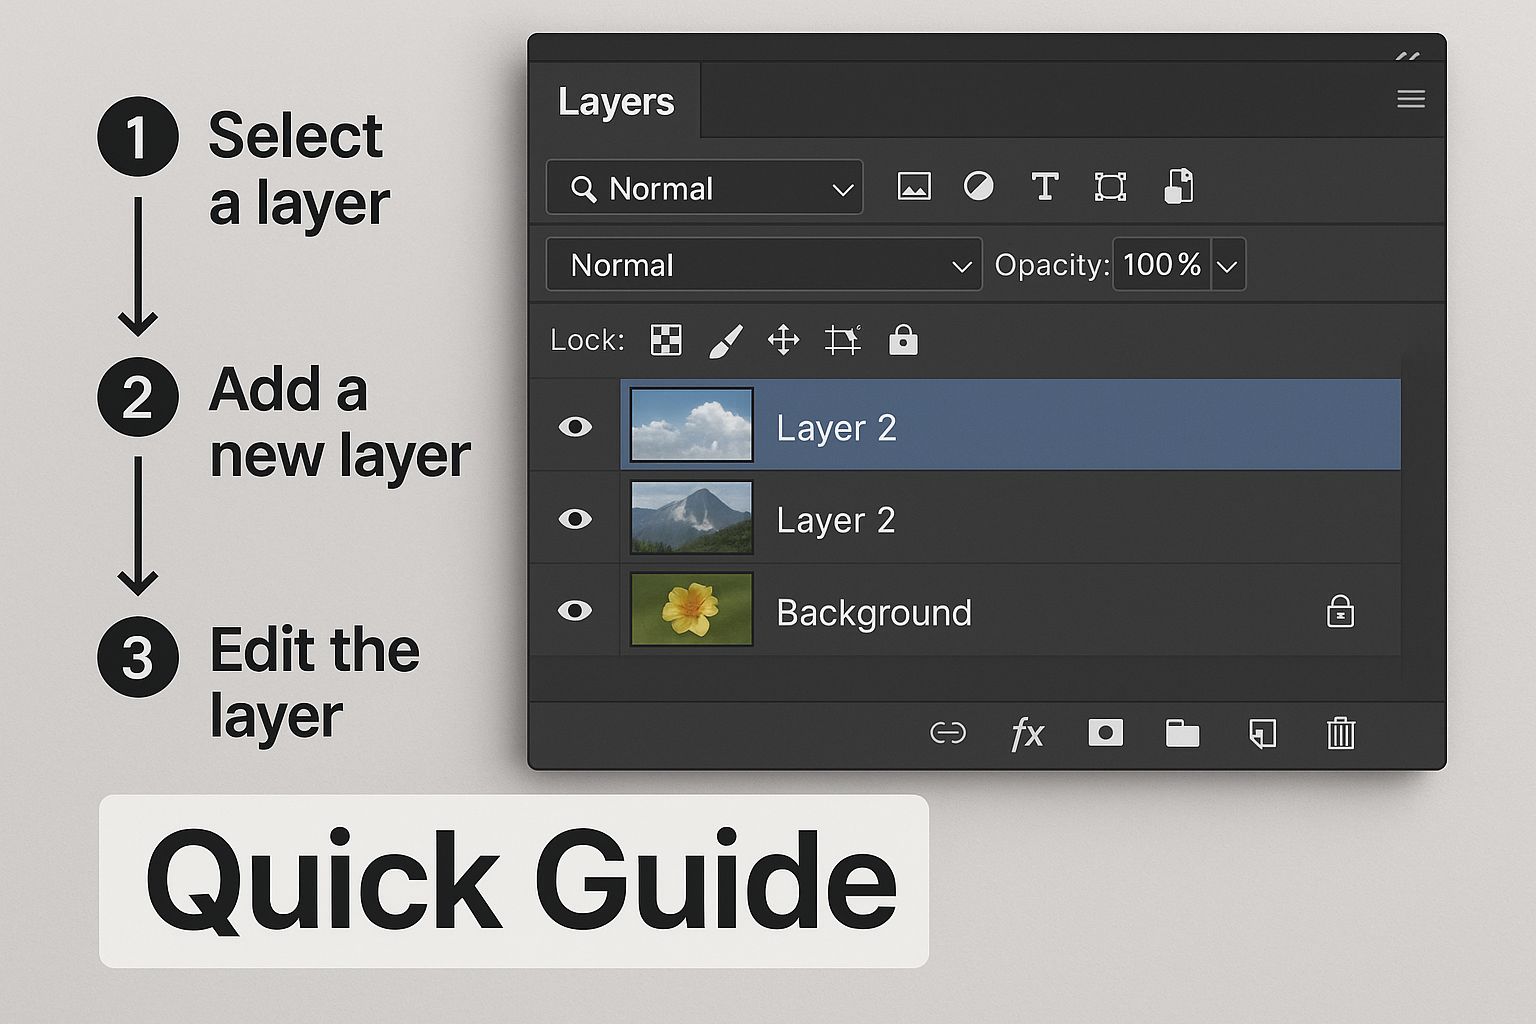
As you can see, the drag-and-drop controls in today's editors make layering feel intuitive, not technical.
Adjusting Scale, Rotation, and Opacity
Just dropping your subject into the scene isn't quite enough. To make it believable, you need to tweak it to fit the environment. This usually comes down to three key adjustments:
- Resizing: Grab the corner handles of your subject's layer to make them bigger or smaller. Your goal is to make their size proportional to the other elements in the background. This is crucial for maintaining a realistic sense of scale.
- Rotating: A slight rotation can make a world of difference. Tilting your subject just a few degrees can help it match the perspective and angles of the background, making it look much more naturally placed.
- Opacity: This setting controls how transparent your layer is. While you'll usually keep it at 100% for a solid subject, lowering the opacity is perfect for creating cool, ghostly effects or artistic double exposures.
Take your time here. It's the small, careful tweaks to scale and rotation that separate an obvious fake from a seamless, professional-looking composite. These are the details that truly sell the illusion.
Refining Your Composite for a Realistic Finish
So you’ve dropped your subject onto a new background.Great start, but this is where the real work begins. The difference between a clunky cut-and-paste job and a believable, professional-looking image is all in the finishing touches. It’s these subtle tweaks that trick the eye and sell the illusion.
Without these small adjustments, your image will just look… off. Let’s get into the nitty-gritty of blending your layers together so they look like they were meant to be.
Tutorial: Matching Color and Tone
If your subject was photographed under warm, yellow indoor light and you've placed them in a cool, blue-toned outdoor scene, it's going to stick out like a sore thumb. Here’s a quick tutorial for syncing the color palettes using sliders found in most AI photo editors:
- Select the Subject Layer: Make sure you've clicked on your subject so that your adjustments only affect them, not the background.
- Adjust Temperature: Look at the background image. Is it warm (yellow/orange) or cool (blue)? Find the "Temperature" or "Warmth" slider and move it slightly until your subject's lighting feels consistent with the scene.
- Correct Tint: If your subject has an unnatural green or pink hue, use the "Tint" slider to balance it out.
- Match Saturation: Is your background vibrant or muted? Adjust the "Saturation" slider on your subject to match. A common mistake is having a super-saturated subject on a less vibrant background.
A little trick I use is to add a very faint color overlay to the entire image at the very end. It acts like a unifying filter, pulling all the separate elements together as if they were shot through the same camera lens.
If you want to dive deeper into these kinds of advanced adjustments, our guide to AI image enhancement is a great next step.
Tutorial: Grounding Your Subject with Shadows
Honestly, this might be the most important step for making an image look real. An object without a shadow looks like it’s floating in space. A soft, believable shadow is what gives your subject weight and presence, truly grounding it in the new environment.
Here’s a quick and dirty way to create a basic shadow in most editors:
- Duplicate your subject layer.
- Fill this new copy with black or a dark gray.
- Position this new "shadow layer" underneath your original subject layer in the layer panel.
- Drag the shadow on the canvas so it’s slightly behind and below your subject. Think about where the light is coming from—the shadow should be on the opposite side.
- Apply a blur effect. Hard-edged shadows almost never look natural, so softening it is key.
- Lower the opacity until it looks like a subtle, natural shadow on the ground.
Once you have your masterpiece all dialed in, don't forget the final step if you're putting it on a website. It's so important to know about optimizing website images for faster load times to make sure your beautiful work doesn't slow everything down. Getting the color and shadows right are the details that truly elevate your work from amateur to pro.
Creative Ideas for Your Superimposed Images
So, you've got the hang of how to superimpose images. What's next? The technical part is one thing, but the real fun begins when you start applying those skills to create something totally new and eye-catching. Let's dive into a few projects that really put these techniques into practice.
Create Surreal Double Exposures
The double exposure is a classic artistic effect for a reason. It blends two photos, usually a portrait and a landscape, to create a single, dreamlike image. Here's a quick tutorial:
- Start with a clean portrait, ideally one with a simple white or neutral background.
- Find a compelling texture or landscape photo (e.g., a forest, a cityscape).
- Layer the landscape photo over your portrait.
- Lower the opacity of the landscape layer just enough so you can see the face beneath it.
- Use blending modes (like "Screen" or "Multiply") or an eraser tool to let key facial features, like the eyes and mouth, pop through more clearly.
The real magic happens when you find two images that create a combined story. A person looking off into the distance paired with a winding road can suggest a journey or an unknown future.
Design Unique Product Mockups
If you're running a small business, superimposing lets you create beautiful lifestyle shots without booking an expensive studio.
- Take a high-quality photo of your product against a plain background.
- Use an AI tool to remove the background, leaving a clean cutout of your product.
- Find a stylish stock photo that fits your brand (e.g., a minimalist desk, a marble countertop).
- Drop your product cutout onto this new background.
- Resize and position it naturally within the scene.
- The Secret Step: Add a subtle drop shadow underneath your product to give it weight and make it look like it truly belongs in the scene.
It’s a fantastic trick for showing off everything from skincare bottles to handmade jewelry in a totally professional way. For more inspiration, check out our list of creative photo ideas you can try.
Make Hilarious Memes and Fun Edits
Let's be honest, superimposing is the engine behind some of the best content on the internet. Ever wanted to put your friend’s face on a movie poster or drop your cat into a famous historical painting? This is how it's done.
- Find your background image—the movie poster, the painting, etc.
- Find a clear photo of your subject’s head.
- Remove the background from the headshot, isolating just the head.
- Layer the head over the original character in the poster or painting.
- Carefully resize and rotate the head to match the body’s angle and proportions.
- Make small adjustments to the color and lighting to help it blend in.
Got Questions About Superimposing Images?
Even with the best tools, a few questions always pop up when you're just getting the hang of superimposing images. Let's tackle some of the most common ones I hear so you can get back to creating.
What’s the Easiest Way to Superimpose One Picture on Another?
Honestly, the simplest route is using an online AI photo editor. These tools have completely changed the game by automating the most tedious part: removing the background.
The process is typically a simple tutorial in itself:
- Upload the image you want to cut out.
- Let the AI automatically remove the background in one click.
- Upload your desired background image.
- Drag and drop your cutout subject onto the new background.
It completely sidesteps the manual masking and complex layers you'd find in older, more traditional software.
How Do I Make My Superimposed Image Look Realistic?
Making a composite image look like it was shot that way for real comes down to getting three key details right: lighting, color, and shadows.
- Lighting: Look at your two images. Is the light source coming from the same direction in both? If not, it's an instant giveaway.
- Color: Use the color adjustment tools to match the warmth and saturation of your subject to the new background. A cool-toned person in a warm, sunny scene will always look out of place.
- Shadows: This is the big one. Always, always add a subtle shadow underneath your subject. It's this small touch that truly grounds the object in the scene and makes it feel real.
Paying attention to these three elements is what separates a quick, sloppy edit from a seamless and professional-looking composite. It's the secret sauce.
Can I Superimpose Images on My Phone?
Absolutely. You don't even need to hunt for a special app anymore.
Many powerful, web-based photo editors work perfectly right in your phone's browser. Just look for one with a clean, mobile-friendly interface designed for touchscreens. This lets you upload pictures from your camera roll, layer them, and make adjustments on the fly, wherever you are.
Ready to jump in and start creating your own stunning visual composites? The intuitive tools at AI Photo HQ make it incredibly easy to superimpose images, nail the background removal, and bring your creative ideas to life in just a few seconds. Get started for free at aiphotohq.com.

