Stepping back in time to capture the magic of a bygone era offers a unique way to create timeless, captivating photographs. But achieving that perfect vintage look is more than just applying a sepia filter. It's about understanding the nuances of fashion, makeup, lighting, and posing that defined each decade. This guide provides more than just inspiration; it's a collection of eight actionable vintage photoshoot ideas, complete with step-by-step instructions, practical tips, and specific examples to help you flawlessly execute your creative vision.
Whether you're a photographer looking to expand your portfolio, a content creator aiming for a unique aesthetic, or an individual eager to craft stunning self-portraits, this roundup will equip you with the knowledge to bring history to life. We will move beyond generic suggestions and dive into the specifics of recreating iconic looks.
Each section breaks down the essential elements, from must-have props and wardrobe staples to precise lighting setups and post-production techniques. You will learn not just what to shoot, but how to achieve a result that feels authentically vintage. Prepare to explore distinct styles, from the moody shadows of 1940s Film Noir to the vibrant energy of 1960s Mod fashion, transforming your concepts into compelling visual stories.
1. 1950s Pin-Up Style Photoshoot
The 1950s pin-up style is one of the most iconic vintage photoshoot ideas, celebrating a playful and glamorous form of femininity. Popularized by artists like Gil Elvgren and Alberto Vargas, and the legendary model Bettie Page, this style is characterized by its flirtatious poses, bold makeup, and meticulously styled retro fashion. It blends classic American beauty ideals of the era with a hint of cheeky confidence, creating timeless and eye-catching images.
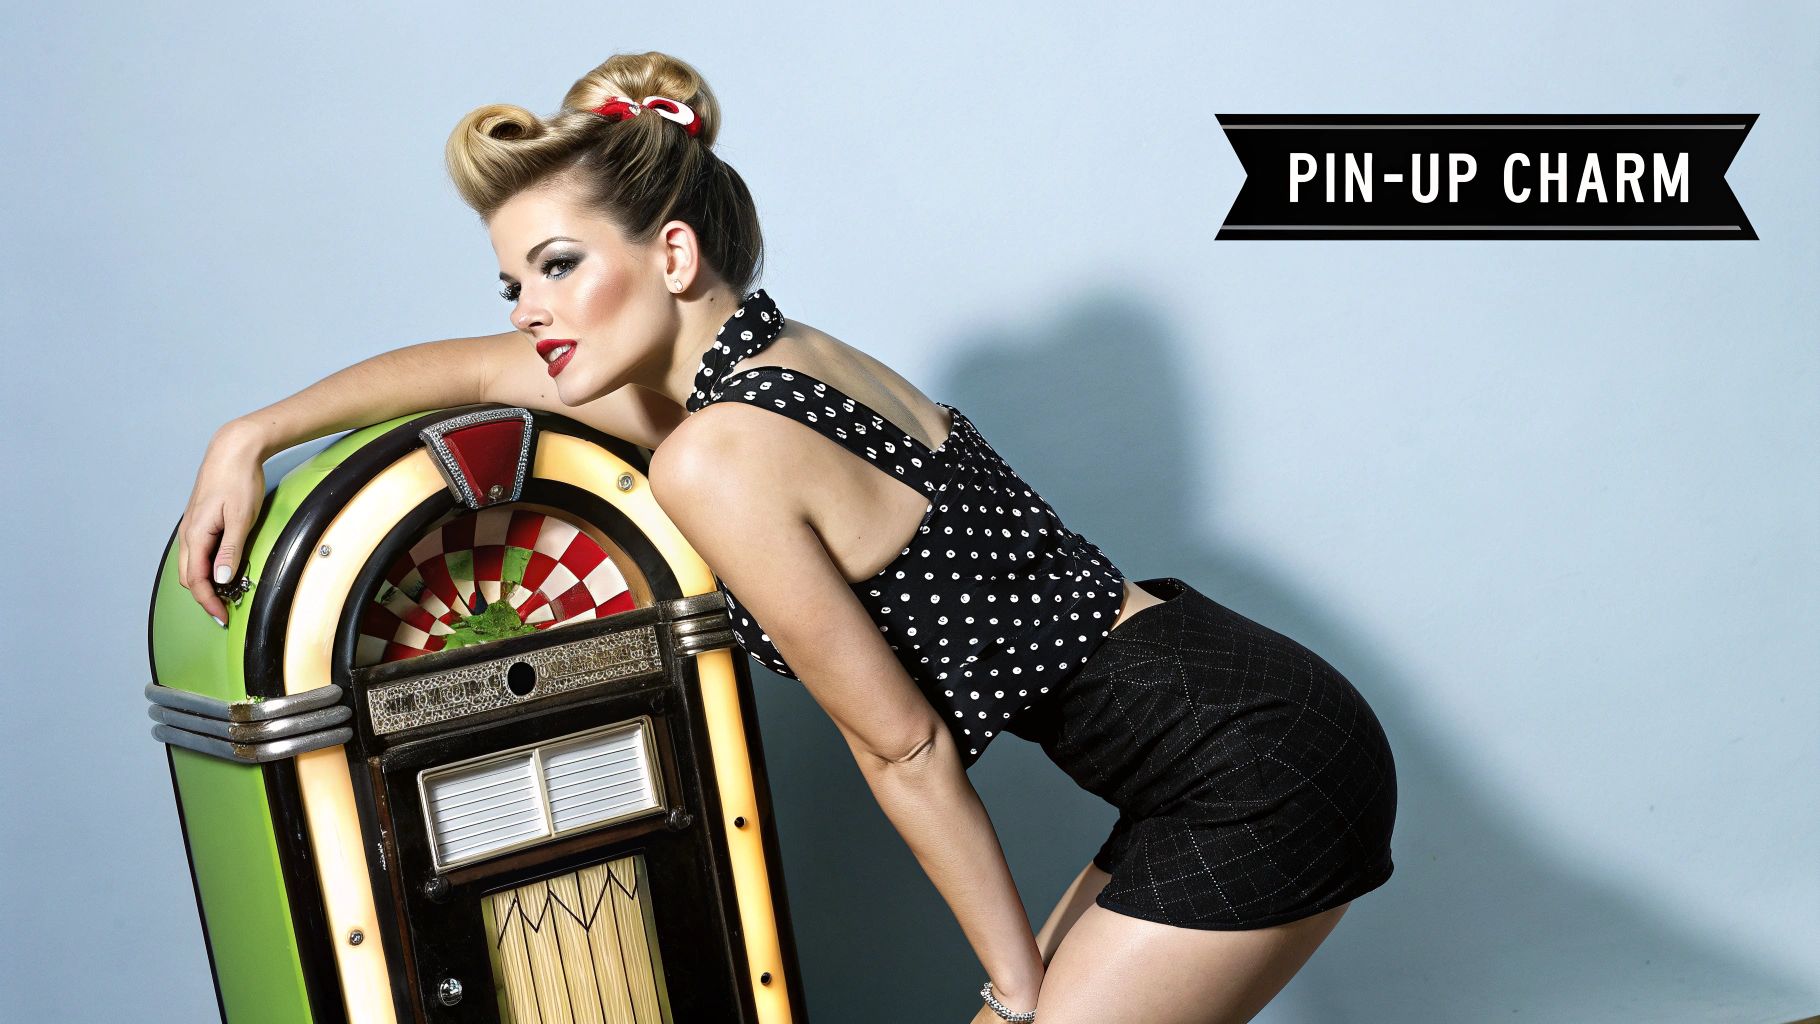
This aesthetic is perfect for anyone looking to create vibrant, personality-filled photos for a portfolio, social media, or a personal project. It emphasizes curves and personality, moving beyond simple portraits to tell a miniature story, often with a humorous or surprising twist.
How to Achieve the Pin-Up Look
Achieving an authentic pin-up look requires attention to several key areas: styling, posing, and lighting. The goal is to recreate the highly stylized, almost illustrative quality of classic pin-up art.
Step-by-Step Styling Guide:
- Wardrobe: Opt for high-waisted shorts, pencil skirts, sailor-themed outfits, polka dot dresses, or classic lingerie. The clothing should accentuate the waist and create an hourglass silhouette.
- Hair & Makeup: Victory rolls, bandanas, and perfectly coiffed curls are essential. For makeup, follow these steps: apply a matte foundation, draw a sharp winged eyeliner, use a bold red lipstick, and define your eyebrows with a high arch.
- Props: Incorporate era-appropriate props to enhance the narrative. Think vintage telephones, classic Coca-Cola bottles, cherry pies, or mechanic's tools for a "greaser" theme. Arrange them so the model can interact with them playfully.
Posing and Lighting Tips
The pose is everything in pin-up photography. It should feel candid yet perfectly constructed.
- Study the Masters: Look at the artwork of Elvgren and Vargas. Their subjects were often depicted in "predicament" poses - a dress caught on a fence or a surprised look at the camera. Practice these exaggerated, expressive poses.
- Facial Expressions: The signature pin-up expression combines a bright, wide-eyed look with a charming smile or a playful "oops" mouth shape. Direct, confident eye contact with the lens is key.
- Lighting Tutorial: Use a beauty dish or ring light. Place it directly in front of and slightly above the model's eye level. This setup creates a soft, glamorous light that minimizes harsh shadows and flatters the skin, replicating the classic Hollywood lighting style.
- Post-Processing Tutorial: In your editing software, slightly increase saturation to make colors like red pop. Use a skin-smoothing tool to create a flawless, illustrative finish, but be careful not to overdo it. Increase the contrast to make the image appear sharper and more vibrant.
2. 1920s Art Deco Glamour
The 1920s Art Deco Glamour photoshoot captures the elegance and revolutionary spirit of the Jazz Age. This vintage photoshoot idea draws inspiration from the Roaring Twenties, a period defined by its opulent parties, rebellious flapper fashion, and bold artistic innovation. Photographers like Edward Steichen and Cecil Beaton immortalized the era's sophisticated aesthetic, which celebrated luxury, geometric precision, and a new sense of modern freedom.
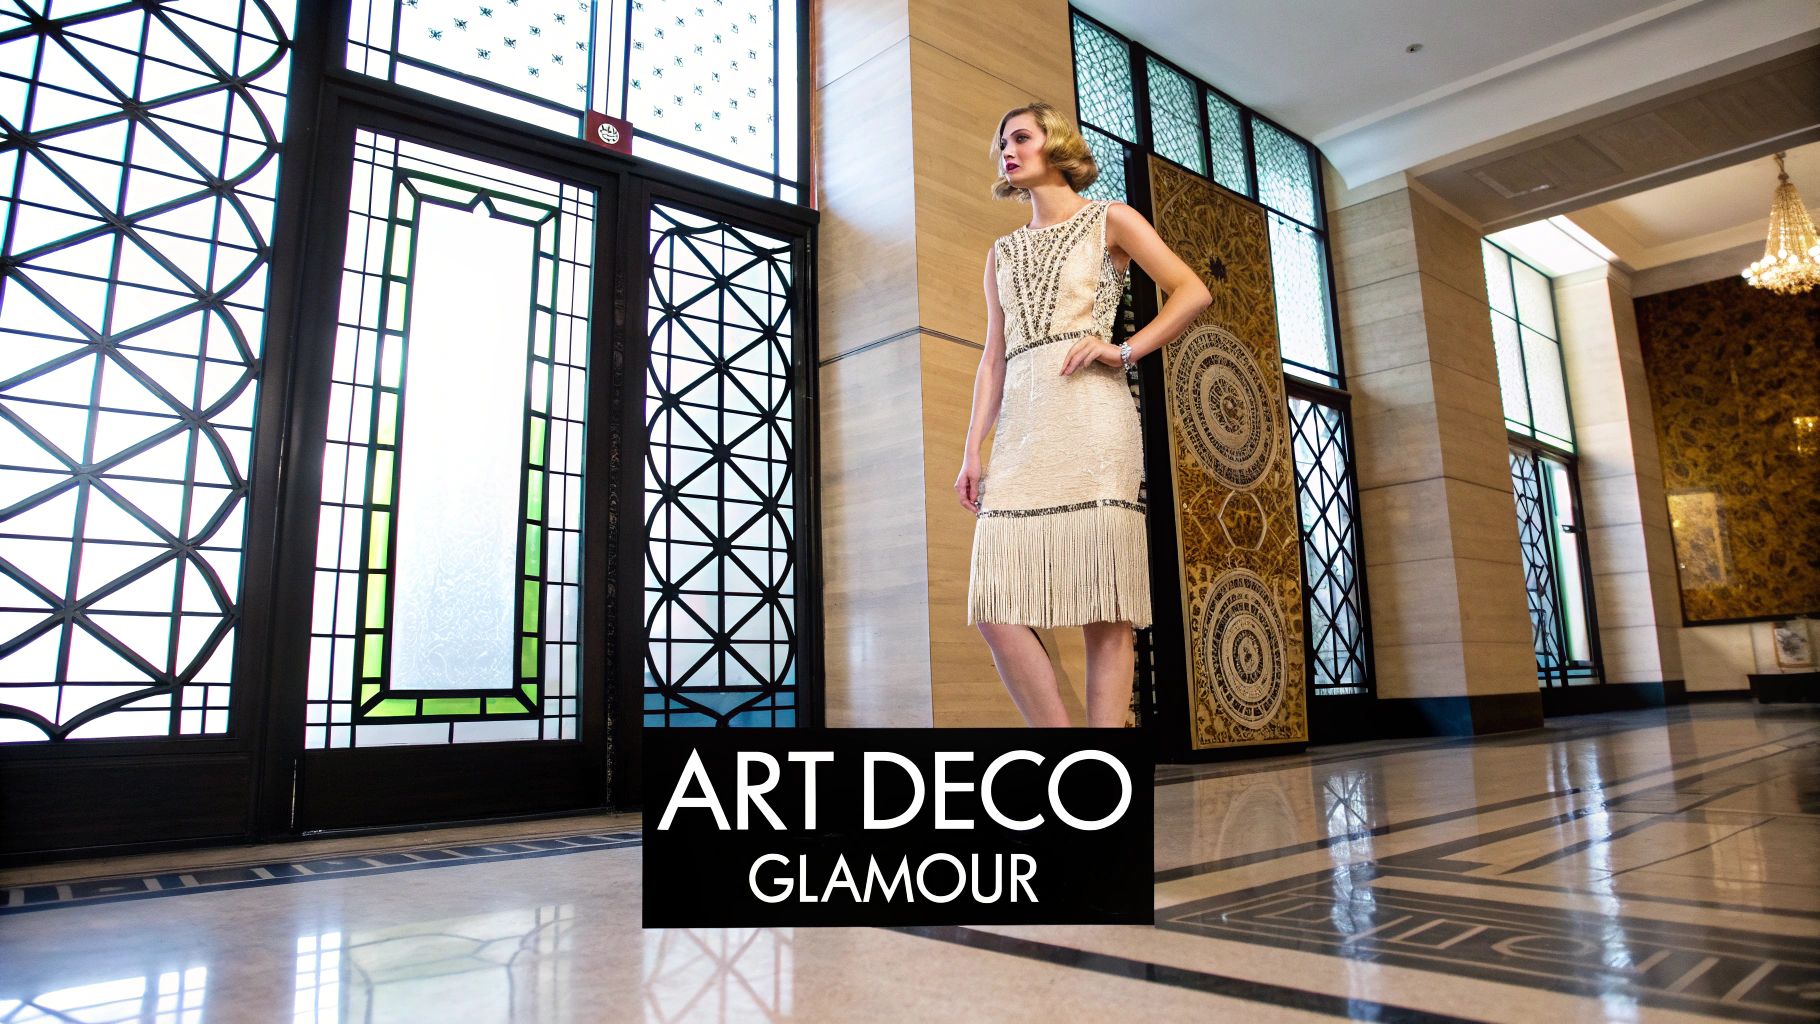
This theme is perfect for creating dramatic, high-fashion images that feel both timeless and cinematic. It's an excellent choice for editorial spreads, elegant personal portraits, or event photography with a Great Gatsby flair, allowing for creative exploration of light, shadow, and luxurious textures.
How to Achieve the Art Deco Look
Recreating the sophisticated look of the 1920s requires a focus on authentic styling, dramatic lighting, and specific post-processing techniques to mimic the era's photographic qualities.
Step-by-Step Styling Guide:
- Wardrobe: Choose drop-waist dresses adorned with beads, sequins, or fringe. For menswear, opt for tailored tuxedos or pinstripe suits. Fabrics like velvet, silk, and satin are key.
- Hair & Makeup: Iconic hairstyles include the sharp bob, finger waves, and elegant updos accessorized with jeweled headbands or feathers. For makeup, use kohl eyeliner to heavily rim the eyes, draw thin, defined brows, and create a "cupid's bow" lip shape with a deep red or burgundy lipstick.
- Props: Incorporate props like long pearl necklaces, cloche hats, feathered fans, vintage champagne coupes, and art deco-patterned backdrops to set the scene.
Posing and Lighting Tips
The mood of 1920s photography is often dramatic, melancholic, or coolly confident, a departure from the playful pin-up style.
- Study the Icons: Look at portraits of cultural icons like Louise Brooks and Josephine Baker. Poses were often statuesque and poised, with angular lines and a detached, elegant gaze.
- Facial Expressions: Aim for a more serious or contemplative expression. A subtle, closed-mouth smile or a direct, powerful stare into the lens works beautifully.
- Lighting Tutorial: To achieve a dramatic effect, use a single light source with a grid or snoot to focus the beam. Place it at a 45-degree angle to the side of the model to create Rembrandt lighting (a triangle of light on the shadowed cheek). This will produce deep shadows and highlight facial features, mimicking the cinematic style of the era.
- Post-Processing Tutorial: In your editing software, convert the image to black and white. Then, increase the contrast significantly to deepen the shadows and brighten the highlights. For an authentic touch, apply a subtle sepia tone filter. You can discover more techniques for achieving this specific look through advanced photo color grading to perfect the period aesthetic.
3. 1970s Bohemian Hippie Aesthetic
The 1970s bohemian hippie aesthetic is a free-spirited vintage photoshoot idea that captures the essence of the era's counterculture movement. Popularized by icons like Stevie Nicks and Joni Mitchell and documented by photographers like Jim Marshall, this style emphasizes a deep connection with nature, artistic expression, and a rejection of rigid conformity. It's defined by flowing fabrics, earthy color palettes, and a sense of effortless, natural beauty.
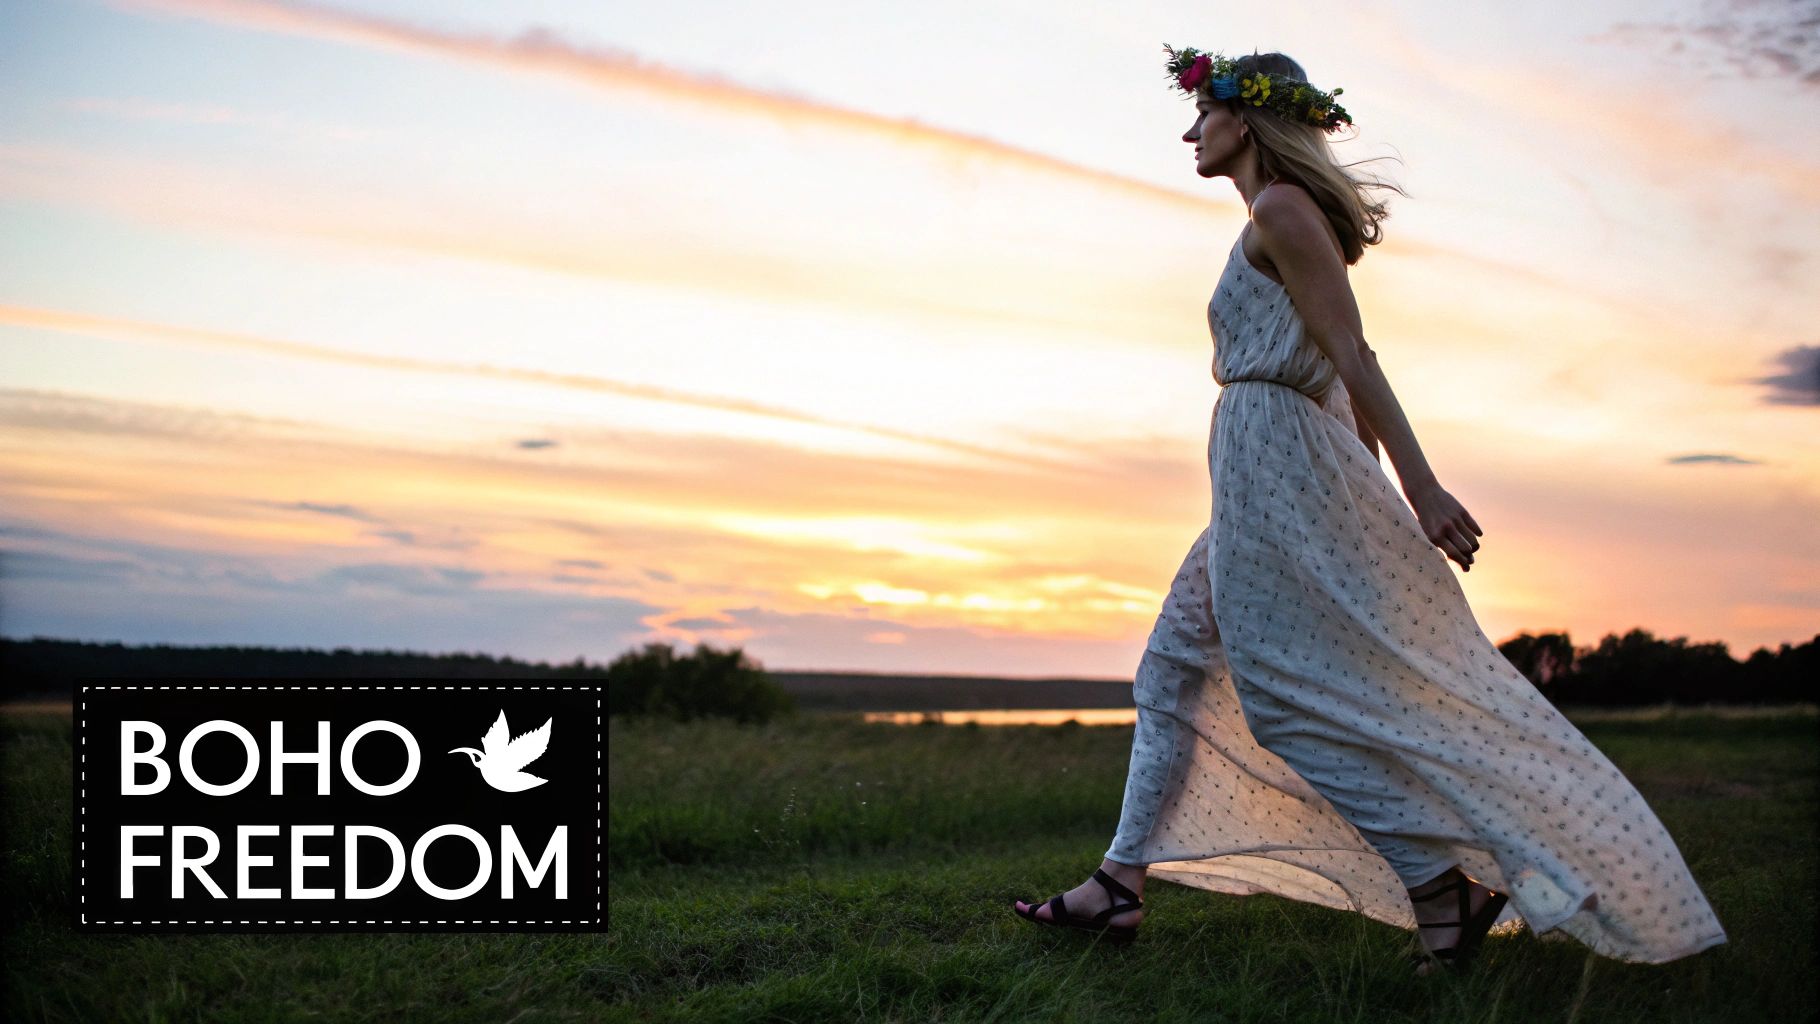
This aesthetic is ideal for creating authentic, emotive images that feel both nostalgic and timeless. It's perfect for outdoor portraits, festival-themed shoots, or anyone looking to convey a message of peace, freedom, and individuality. The focus is on capturing candid, unposed moments that reflect a genuine, wandering spirit.
How to Achieve the Bohemian Look
Creating an authentic bohemian vibe requires a focus on natural elements, from the location and lighting to the wardrobe and props. The goal is to create images that feel organic, warm, and deeply personal.
Step-by-Step Styling Guide:
- Wardrobe: Choose flowing maxi dresses, bell-bottom jeans, embroidered tops, crochet vests, and suede jackets. Layering different textures is key, so mix and match lace, denim, fringe, and floral prints.
- Hair & Makeup: Embrace a natural look. Think long, loose waves, simple braids, or flower crowns. Makeup should be minimal: apply a light foundation or tinted moisturizer, a touch of bronzer for a sun-kissed glow, and neutral eyeshadow tones.
- Props: Use props that enhance the connection to nature and artistry. Acoustic guitars, vintage vinyl records, dreamcatchers, wildflowers, and patterned blankets are all excellent choices.
Posing and Lighting Tips
The bohemian style is about capturing genuine emotion rather than stiff, formal poses.
- Embrace Movement: Encourage candid actions like walking through a field, twirling in a dress, or playing a guitar. These unposed moments create dynamic and authentic shots.
- Facial Expressions: Aim for serene, pensive, or joyful expressions. A gentle smile, a thoughtful gaze into the distance, or genuine laughter works better than a direct, posed look at the camera.
- Lighting Tutorial: Schedule your shoot during the golden hour—the hour just after sunrise or before sunset. Position your subject so the sun is behind them (backlighting). This will create a dreamy, ethereal glow and a beautiful rim light around their hair and body. Use a reflector to bounce some light back onto their face if needed.
- Post-Processing Tutorial: In post-production, apply a film-inspired filter with warm tones. Slightly lower the contrast and add a subtle grain effect to enhance the vintage, nostalgic feel. For an even more retro effect, you can learn how to make images look like Polaroids on aiphotohq.com.
4. 1940s Film Noir Style
Inspired by the classic Hollywood crime dramas of the 1940s and 50s, a film noir photoshoot captures a world of mystery, drama, and moody elegance. This style, popularized by cinematographers like John Alton and directors like Orson Welles, is defined by its dramatic use of shadow, high-contrast black and white imagery, and an atmosphere thick with suspense. It’s a powerful way to tell a story and create images that are both timeless and intensely atmospheric.
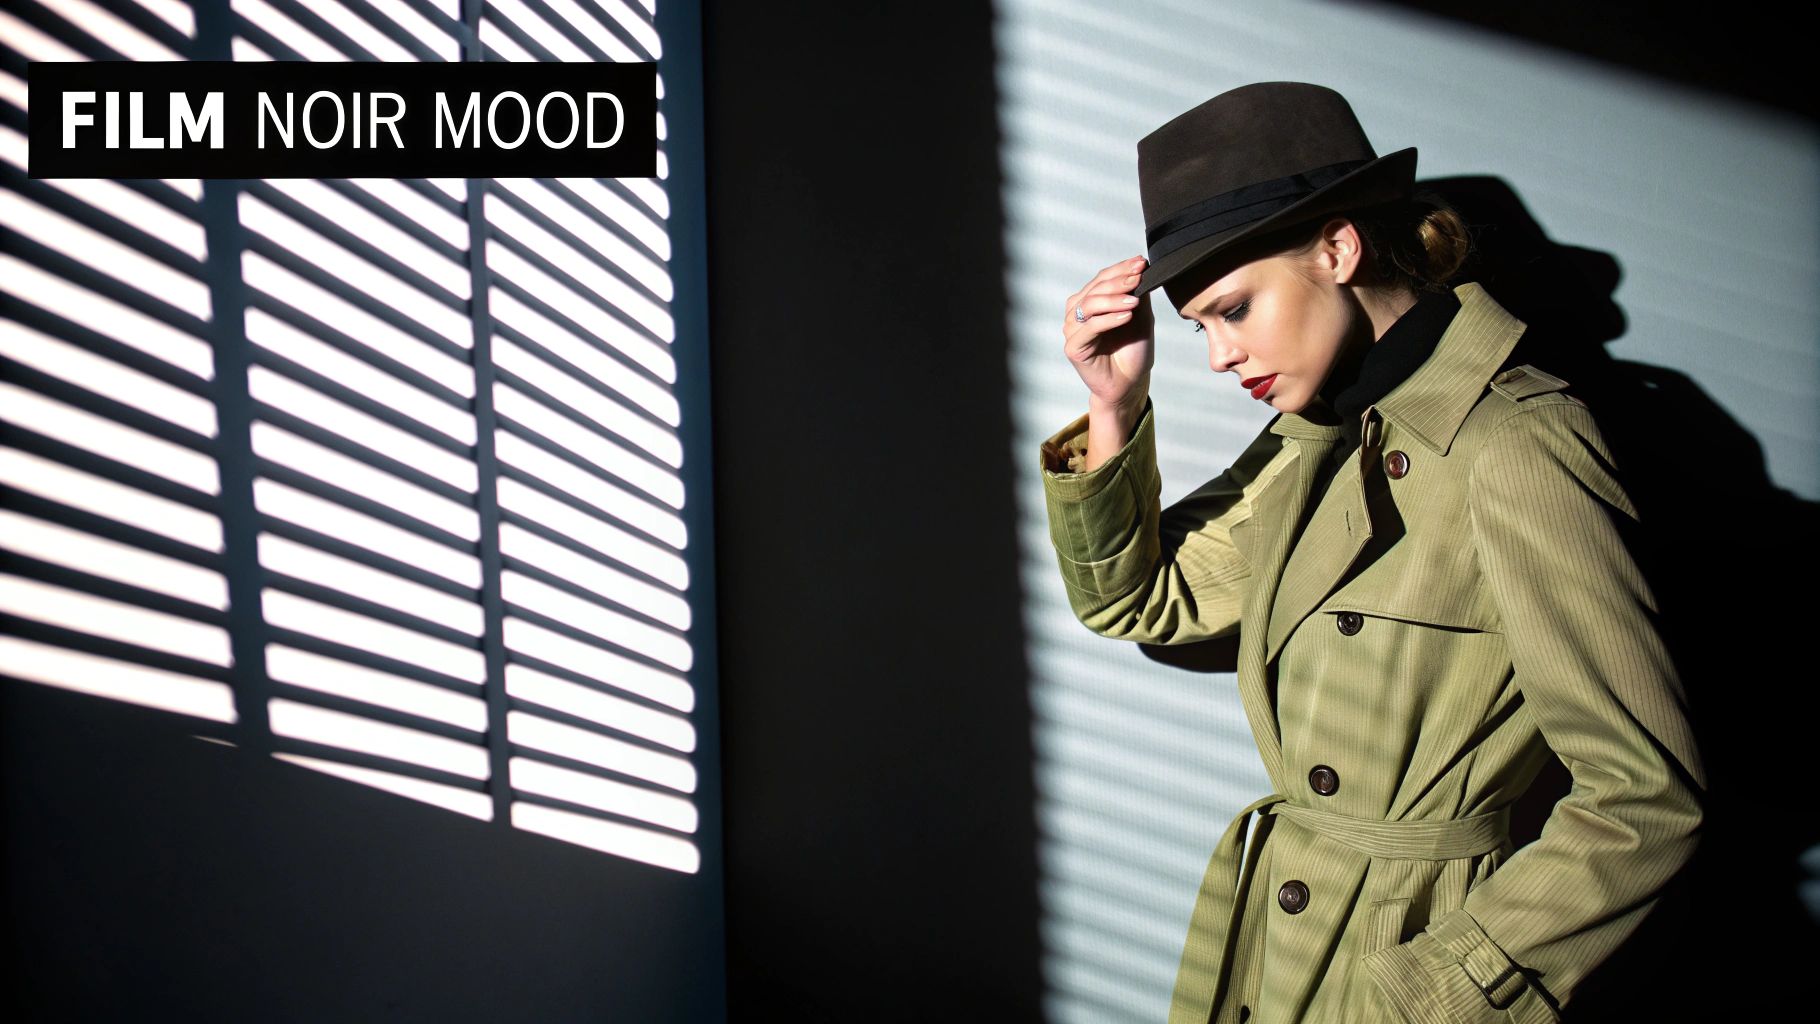
This aesthetic is perfect for creating evocative portraits, artistic series, or a unique editorial spread. Rather than focusing on bright colors, it uses light and shadow to sculpt the subject and guide the viewer's eye, making it one of the most compelling vintage photoshoot ideas for those who love storytelling.
How to Achieve the Film Noir Look
Creating an authentic film noir look is all about mastering light and conveying a specific mood. The key is to think like a classic cinematographer, using shadows as an active element in your composition.
Step-by-Step Styling Guide:
- Wardrobe: Classic 1940s silhouettes are essential. Think trench coats, fedoras, tailored suits for men, and elegant gowns, pencil skirts, or sharp-shouldered blouses for women. The clothing should feel sophisticated and slightly formal.
- Hair & Makeup: For women, opt for classic 1940s hairstyles like sculpted waves and victory rolls. Makeup should be dramatic, with a defined, often darker lip, strong brows, and contoured cheeks to catch the light.
- Props & Setting: Use props to create a narrative. Venetian blinds are classic for casting linear shadows. Vintage telephones, whiskey glasses, and prop cigarettes or smoke can add authenticity. A dimly lit, urban-feeling location or a sparse, elegant room works best.
Posing and Lighting Tips
The soul of film noir lies in its dramatic lighting and the mysterious poses it creates.
- Study the Classics: Watch films like The Maltese Falcon or Double Indemnity. Pay close attention to how light is used to obscure and reveal characters, often casting long, distorted shadows.
- Expression and Mood: Poses should be subtle and suggestive. A sideways glance, a hand shielding the face, or a pensive expression can convey more than an overt pose. The mood is typically somber, mysterious, or contemplative.
- Lighting Tutorial: Use a single, hard light source (like an unmodified speedlight or strobe) to create deep, defined shadows. A key technique is split lighting: place the light 90 degrees to the side of your subject to illuminate exactly half of their face, leaving the other half in shadow. This creates immediate drama and mystery.
- Post-Processing Tutorial: Convert your images to black and white in your editing software. Push the contrast to its limits: make your blacks truly black and your whites bright. Use the dodge and burn tools to selectively lighten and darken areas to enhance the sculpted, dramatic look. Add a medium grain to complete the vintage film feel.
5. 1960s Mod Fashion Photography
The 1960s Mod fashion photography style is a bold and graphic choice among vintage photoshoot ideas, capturing the revolutionary spirit of the Swinging London youth culture. Popularized by groundbreaking photographers like David Bailey and supermodels like Twiggy, this aesthetic breaks from tradition with its clean lines, geometric patterns, and vibrant, optimistic energy. It reflects a cultural shift towards modernism, freedom, and a new, more dynamic form of expression.
This aesthetic is perfect for creating high-impact, editorial-style images that feel both retro and strikingly contemporary. The focus is on shape, color, and attitude, making it ideal for fashion portfolios, brand lookbooks, or social media content that needs to grab attention instantly. It moves beyond static portraits to capture movement and a sense of rebellious fun.
How to Achieve the Mod Look
Capturing an authentic Mod look requires a focus on minimalism, bold graphics, and a specific approach to beauty and composition. The goal is to recreate the stark, high-contrast feel of 1960s fashion editorials.
Step-by-Step Styling Guide:
- Wardrobe: Choose A-line mini dresses, shift dresses, turtlenecks, and tailored suits. Key patterns include bold stripes, color-blocking, and geometric prints like checkerboards. Go-go boots or flat Mary Janes complete the look.
- Hair & Makeup: A sharp, geometric bob haircut or a pixie cut is classic. For makeup, follow these steps: apply a pale, matte foundation. Create a heavy "cut-crease" with black eyeliner in the eyelid's fold. Draw thin lines under the lower lashes to mimic Twiggy's signature style, and finish with pale, nude lipstick.
- Props: Keep props minimal to maintain focus on the fashion. A simple stool, a vintage Vespa scooter, or large geometric shapes in the background can enhance the scene without cluttering it.
Posing and Lighting Tips
Mod posing is about creating strong, angular shapes and conveying a cool, confident attitude.
- Study the Innovators: Look at the work of David Bailey and Terence Donovan. Their models often posed in dynamic, slightly awkward, or unconventional ways, such as leaning, jumping, or using their limbs to create sharp angles.
- Facial Expressions: The expression is typically neutral, aloof, or wide-eyed and doll-like. Unlike the pin-up's flirty smile, the Mod look is often more detached and effortlessly cool.
- Lighting Tutorial: Use hard, direct lighting. Place a single light source with a standard reflector (no softbox) directly in front of the model. This creates high contrast and sharp, defined shadows on the background, contributing to the graphic, pop-art feel of the era.
- Post-Processing Tutorial: In your editing software, increase the clarity and contrast. If using color, selectively boost the saturation of bold primary colors like red, blue, and yellow to make them pop against a neutral background. For a classic look, convert to high-contrast black and white.
6. Victorian/Edwardian Portrait Style
Stepping back into the late 19th and early 20th centuries, the Victorian and Edwardian portrait style offers a vintage photoshoot idea steeped in elegance, formality, and solemn beauty. This aesthetic captures the dignified and composed essence of early photography, popularized by pioneers like Julia Margaret Cameron and Nadar. It is defined by its elaborate period clothing, rigid yet graceful poses, and the signature sepia or monochrome tones that characterized the era's photographic technology.
This style is perfect for creating fine art portraits, themed family photos, or a powerful series that feels like it belongs in a museum. It moves beyond a simple snapshot to become a timeless piece of art, emphasizing character, tradition, and a sense of historical gravitas.
How to Achieve the Victorian/Edwardian Look
Recreating this aesthetic requires a focus on authenticity in clothing, posture, and the technical aspects of lighting and post-processing. The aim is to emulate the formal studio portraits of the time, where having one's picture taken was a significant event.
Step-by-Step Styling Guide:
- Wardrobe: Source authentic or high-quality reproduction garments. For a Victorian look, think corsets, bustles, high-collared lace blouses, and heavy fabrics. For an Edwardian feel, opt for slightly softer silhouettes, S-bend corsets, large hats, and long gloves. Theatrical costume rental companies are an excellent resource.
- Hair & Makeup: Hair should be styled in intricate updos, with tightly-set curls or severe center parts. Makeup should be minimal and matte, as heavy makeup was not considered respectable. Focus on a pale, powdered complexion.
- Props: Keep props simple and elegant. A leather-bound book, a delicate fan, a single flower, or a formal armchair can add context without distracting from the subject.
Posing and Lighting Tips
The solemn and composed nature of the pose is central to capturing the Victorian and Edwardian spirit.
- Study Historical Portraits: Observe original photographs from the era. Subjects rarely smiled due to long exposure times. Poses were stiff and formal, with excellent posture. Subjects often look slightly away from the camera or directly at it with a neutral, contemplative expression.
- Posture is Paramount: Emphasize a straight back and dignified bearing. Hands can be gently clasped in the lap or resting on a piece of furniture. The goal is to convey a sense of calm and respectability.
- Lighting Tutorial: To mimic the natural light from a large studio window, use a single, large softbox. Place it at a 45-degree angle to the subject. This will create soft, directional shadows that add depth and a painterly quality, wrapping gently around the facial features.
- Post-Processing Tutorial: In your editing software, first convert your image to black and white. Then, apply a sepia or brown toner effect. Add a subtle vignette (darkening the corners) to draw the viewer's eye to the center of the portrait. For those working with older family photos, modern tools can be invaluable. Learn more about historical photo enhancement and restoration by exploring the possibilities of photo restoration online.
7. 1980s Glamour and Fashion
The 1980s were a decade of bold excess, and this vintage photoshoot idea captures that vibrant, high-energy spirit. Defined by 'more is more' maximalism, 80s glamour and fashion photography features big hair, neon and metallic colors, dramatic makeup, and powerful, confident poses. Influenced by the rise of MTV, supermodels, and iconic photographers like Helmut Newton and Herb Ritts, this style is all about making a loud and unapologetic statement.
This aesthetic is perfect for creating dynamic, visually arresting images that stand out in a portfolio or on social media. It embraces theatricality and attitude, making it an excellent choice for fashion editorials, themed events, or anyone wanting to channel the decade's powerful and glamorous pop-culture icons.
How to Achieve the 80s Glamour Look
Recreating the authentic 80s look requires a focus on exaggeration and bold choices in styling, makeup, and lighting. The goal is to capture the era's high-contrast, often cinematic feel.
Step-by-Step Styling Guide:
- Wardrobe: Think shoulder pads, power suits, acid-wash denim, leather jackets, and metallic or sequined fabrics. Don't shy away from neon colors and animal prints. Layering is key.
- Hair & Makeup: Volume is everything. Aim for big, teased hair, perms, or a dramatic side-ponytail. To capture the authentic feel of the era, understanding specific hairstyling techniques is crucial; you can learn more about the trick to creating vintage curls to perfect the look. Makeup should feature bright, colorful eyeshadow (like electric blue or hot pink), heavy blush draped from the cheekbone to the temple, and bold lipstick.
- Props: Incorporate iconic 80s props like a boombox, a classic Walkman, oversized sunglasses, or vintage aerobics gear like leg warmers and headbands.
Posing and Lighting Tips
Poses should be strong, angular, and full of attitude. The lighting helps to create the dramatic mood characteristic of the decade.
- Strike a Pose: Study fashion editorials from 80s magazines like Vogue and Harper's Bazaar. Poses are often powerful and dynamic, with strong lines, hands on hips, and direct, confident glares at the camera.
- Facial Expressions: Go for a bold, intense look. A slight sneer, a confident smirk, or a powerful, direct stare works better than a soft smile. It's all about projecting confidence and control.
- Lighting Tutorial: Experiment with hard lighting and colored gels. Set up a key light to create dramatic shadows. Then, place a second light with a pink, blue, or purple gel aimed at the background or as a rim light on the subject. This instantly evokes the neon-soaked nightclub aesthetic of the 80s.
- Post-Processing Tutorial: Add a noticeable film grain in post-production. Slightly boost the contrast and use the HSL (Hue/Saturation/Luminance) panel to increase the saturation and brightness of your neon colors to make them pop against the dark background.
8. 1930s Hollywood Golden Age Glamour
The 1930s Hollywood Golden Age is the epitome of elegance, offering a sophisticated and dramatic vintage photoshoot idea. This style captures the high-contrast, luxurious feel of early cinema portraiture, popularized by photographers like George Hurrell who sculpted stars like Greta Garbo and Joan Crawford with light. It’s defined by its dramatic lighting, opulent fabrics, and impeccably refined hair and makeup, creating images that are both timeless and powerful.
This aesthetic is perfect for creating striking portraits, elegant wedding photos, or high-fashion editorial content. It moves beyond simple beauty shots to craft a mood of mystery, confidence, and unattainable allure, making it a standout choice for anyone looking to produce truly classic and artful photographs.
How to Achieve the Golden Age Look
Recreating the Golden Age look is a masterclass in lighting and poise. The goal is to emulate the highly controlled studio environments where Hollywood's first icons were immortalized, focusing on form, shadow, and luxurious texture.
Step-by-Step Styling Guide:
- Wardrobe: Choose garments made from rich, reflective fabrics like silk, satin, velvet, or lamé. Floor-length bias-cut gowns, fur stoles (faux or vintage), and art deco-inspired jewelry are essential for conveying opulence.
- Hair & Makeup: Sculpted finger waves or elegant updos are the signature hairstyles. Makeup should be precise: draw thin, highly arched eyebrows. Apply a smoky eye with a shimmer on the lid, and finish with a perfectly defined deep red or burgundy lip.
- Props: Keep props minimal and elegant. A long cigarette holder, a classic martini glass, or a simple string of pearls is often all that's needed to complete the scene.
Posing and Lighting Tips
The key to this style is the interplay between light and shadow, which creates drama and defines features.
- Study the Stars: Analyze portraits of Marlene Dietrich and Joan Crawford. Their poses are strong yet graceful, often involving a direct, smoldering gaze, an elegant hand placement near the face, or a powerful over-the-shoulder look.
- Facial Expressions: Aim for a serious, mysterious, or contemplative expression rather than a broad smile. The look is one of confidence and inner strength, communicating emotion through the eyes.
- Lighting Tutorial: Use a classic three-point lighting setup. 1) Place a strong key light (often a hard light source) to one side to create dramatic shadows. 2) Place a softer fill light on the opposite side at lower power to gently lift the shadows. 3) Place a backlight or "hair light" behind and above the subject to create a halo effect and separate them from the background.
- Post-Processing Tutorial: Convert images to black and white and increase the contrast. To achieve the signature dreamy glow, duplicate the image layer, apply a Gaussian blur to the top layer, and then lower its opacity until you achieve a subtle, soft-focus effect that doesn't sacrifice sharpness.
Vintage Photoshoot Styles Comparison Matrix
| Style | Implementation Complexity 🔄 | Resource Requirements ⚡ | Expected Outcomes ⭐📊 | Ideal Use Cases 💡 | Key Advantages ⭐ |
|---|---|---|---|---|---|
| 1950s Pin-Up Style Photoshoot | Medium - requires vintage hair & makeup | Moderate - props, authentic clothing costly | Bold, flattering images emphasizing curves and color | Vintage events, burlesque portfolios | Timeless appeal, strong visual impact |
| 1920s Art Deco Glamour | High - needs specific fashion & lighting | High - props, special locations | Sophisticated, artistic photos with dramatic shadows | Fashion editorials, Gatsby-themed events | Elegant aesthetic, rich historical context |
| 1970s Bohemian Hippie Aesthetic | Low - relaxed styling, outdoor shoots | Low to Moderate - natural settings preferred | Authentic, soft, natural imagery with earth-tone palette | Outdoor festivals, boho weddings | Emphasizes natural beauty, comfortable styling |
| 1940s Film Noir Style | High - advanced lighting skills needed | Moderate - indoor setup, B&W processing | Dramatic, moody black & white storytelling images | Dramatic portraits, fashion editorials | Striking, timeless noir aesthetic |
| 1960s Mod Fashion Photography | Medium - specific fashion knowledge | Moderate - bold makeup, styled sets | Vibrant, energetic images with graphic compositions | Fashion campaigns, urban shoots | Strong graphic elements, youth culture vibe |
| Victorian/Edwardian Portrait | High - formal posing and lighting skills | High - period costumes and props | Elegant, formal portraits with sepia toning | Historical reenactments, classical exhibitions | Timeless sophistication, rich cultural value |
| 1980s Glamour and Fashion | Medium-High - bold styling & lighting | Moderate - elaborate hair and makeup | High-energy, colorful, dramatic fashion images | Music videos, themed parties | Bold creativity, nostalgic glam |
| 1930s Hollywood Glamour | High - demanding lighting & styling | High - luxury fabrics, vintage hairstyles | Luxurious, refined images with glamour lighting | Celebrity portraits, elegant weddings | Universally flattering, timeless elegance |
Bringing Your Vintage Vision to Life
From the bold confidence of a 1950s pin-up to the dramatic shadows of 1940s film noir, each era we've explored offers a distinct visual language. Mastering these vintage photoshoot ideas is about more than just finding the right costume; it's about deeply understanding the cultural and aesthetic nuances of a specific time. The key takeaway is that authenticity is built through a careful combination of styling, posing, lighting, and post-production, with each element working in harmony to transport the viewer.
The true magic happens when you move beyond a surface-level homage and begin to tell a story. Whether it's the rebellious freedom of the 1970s hippie movement or the opulent glamour of the 1920s Art Deco scene, your images gain power when they evoke a specific mood and character. By focusing on the small, era-specific details outlined for each theme, such as the precise lighting techniques for film noir or the specific color palettes for a 1960s mod look, you elevate a simple portrait into a compelling piece of art.
Your Action Plan for Creating Timeless Images
To successfully execute your chosen vintage concept, it's crucial to have a clear, step-by-step plan. This ensures that your creative vision translates into a tangible, high-quality result.
Here are your actionable next steps:
Choose Your Era and Conduct Deep Research: Select the decade that resonates most with your creative goals. Go beyond the article and immerse yourself in films, magazines, and historical photography from that period. To help realize your creative concepts, consider drawing inspiration from resources such as The Vintage Allure Collection to see how classic styles are curated.
Create a Detailed Mood Board: Collect images that define your desired aesthetic. Include specific examples of makeup, hairstyles, wardrobe, props, poses, and lighting setups. This visual guide will be an invaluable reference for you and your team during the shoot.
Scout the Perfect Location: The setting is a critical character in your story. An Art Deco-inspired shoot needs a location with geometric patterns and lavish details, while a 1970s bohemian theme thrives in a natural, sun-drenched outdoor environment.
Practice and Refine Your Post-Processing: The final edit is where you seal the vintage look. Experiment with the post-production techniques mentioned, such as creating grainy textures for film noir or warm, faded tones for a 70s vibe. Don't be afraid to test different filters and adjustments until you perfectly capture the historical feel.
These vintage photoshoot ideas are not just templates to be copied; they are launchpads for your own unique creativity. Use them as a foundation, then infuse your personal style and narrative vision to craft images that are both authentically retro and undeniably yours.
Ready to explore these vintage aesthetics without the need for a physical set or wardrobe? AI Photo HQ allows you to generate stunning, era-specific images with simple text prompts. Turn your detailed mood board ideas into high-resolution visuals instantly and bring your creative concepts to life at AI Photo HQ.


