
So, you need to change the color of an image. The good news is, you've got options. You could use a slick AI tool for a near-instant result, fire up professional software like Photoshop for pixel-perfect control, or just use a free online editor for a quick fix without any fuss.
The real question is, which method is right for your project? This guide will walk you through the exact steps for each method, so you can pick the best one and get the job done.
Your Quick Guide to Changing Image Colors
Picking the right tool for changing image colors usually boils down to a trade-off between speed, precision, and cost. There’s no single "best" way to do it; the right tool is simply the one that fits what you need to do right now.
For example, if you're an e-commerce store owner, you might need to whip up several color variations of a new product for your website. In that scenario, an AI tool is your best friend—it's fast, efficient, and gets the job done without a steep learning curve.
But if you’re a professional photographer retouching a wedding photo, you need absolute control. You need to be able to subtly shift the color of a dress without messing with skin tones or the ambient light. That's where a powerhouse like Adobe Photoshop earns its keep.
This infographic lays out the different paths you can take.
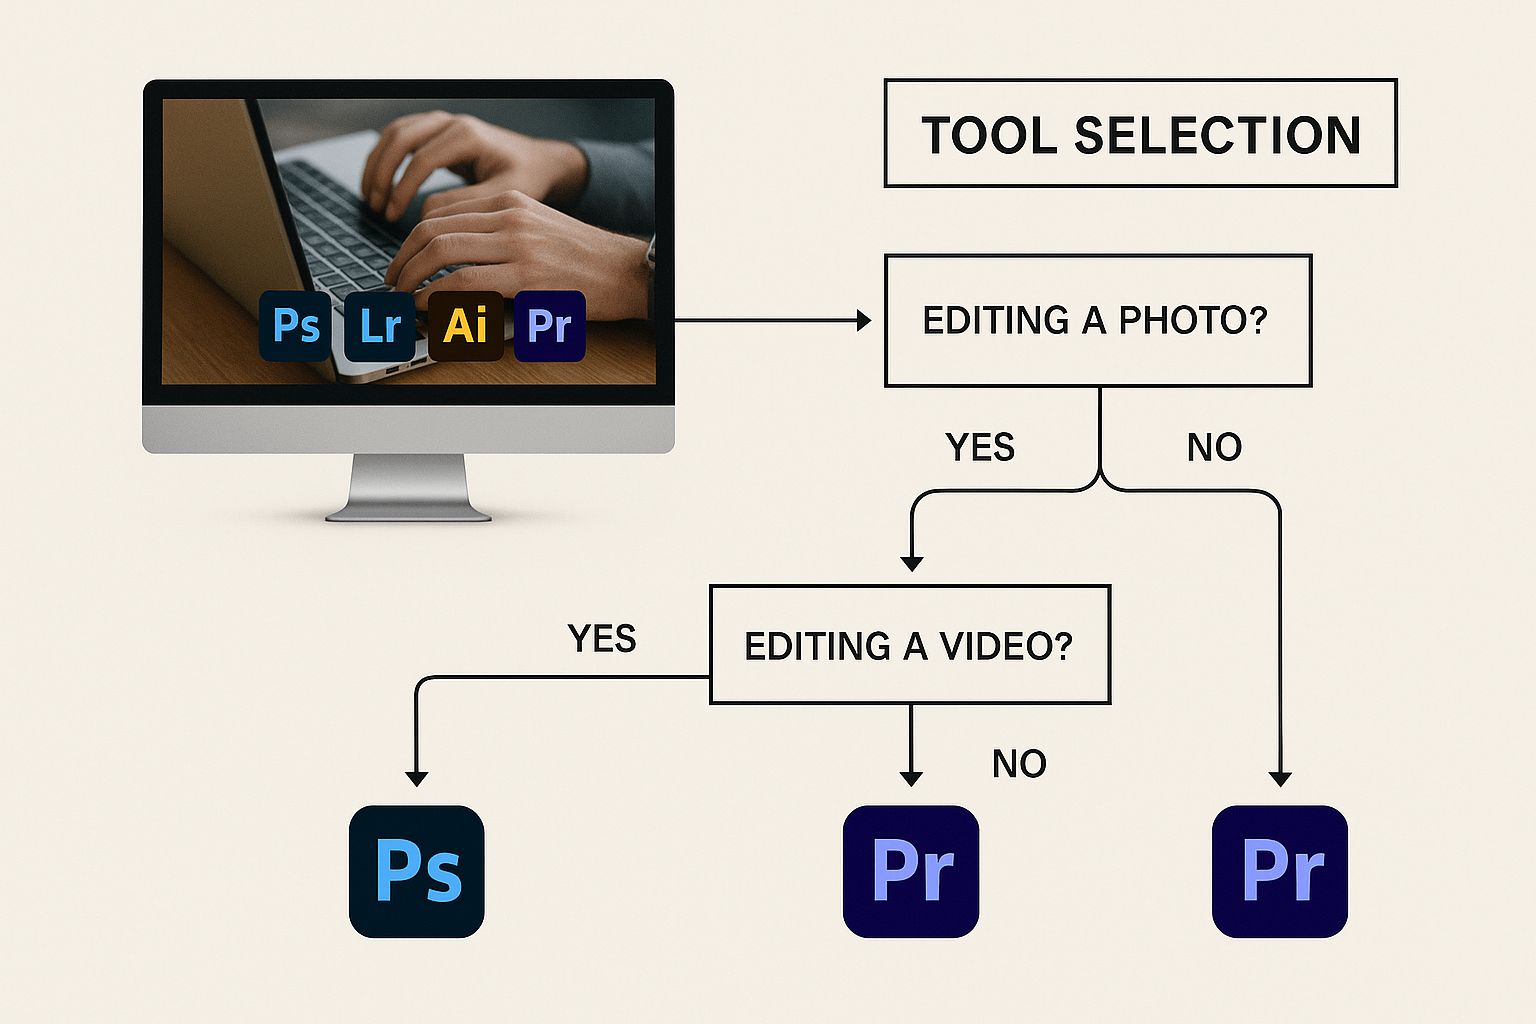
Think of it as a map. It shows you everything from the simple online editors to the advanced software, helping you decide where to start.
Choosing Your Method
The ability to digitally alter images isn't new, but it's come a long way. When digital imaging first appeared, it gave us an incredible new power to change image colors globally. By the 1990s, programs like Photoshop let us adjust color balance on the fly. Today, more than 90% of professional photographers and 70% of amateurs use digital tools for color correction. If you're interested, you can read the full history of color photography to see how far we've come.
When you're picking your tool, ask yourself these questions:
- Speed: Do I need this done in seconds, or do I have time to really dig in and fine-tune it?
- Precision: Is a simple color swap good enough, or do I need to get granular with shadows, highlights, and textures?
- Budget: Am I looking for something free, or am I willing to pay for more powerful features?
The most effective approach is to match the tool to the task. Using a complex program for a simple job is inefficient, while using a basic tool for a complex project leads to frustration.
To make this even clearer, I've put together a quick comparison table to help you weigh your options based on what matters most to you.
Which Image Color Changer is Right for You?
This table compares the most popular methods for changing image colors, helping you choose the best tool based on your skill level, budget, and what you want to achieve.
| Method | Best For | Ease of Use | Cost | Key Feature |
|---|---|---|---|---|
| AI Photo HQ | Quick, high-quality results & multiple variations. | Very Easy | Freemium | AI-powered object detection and one-click changes. |
| Adobe Photoshop | Professional photographers, designers, and artists. | Difficult | Subscription | Unmatched precision and a massive toolset. |
| Free Online Editors | Simple, one-off tasks and quick fixes. | Easy | Free | No installation needed; accessible anywhere. |
| Mobile Apps | On-the-go editing for social media. | Easy to Moderate | Free/Paid | Convenience and social media-ready filters. |
Ultimately, the choice comes down to what you're trying to accomplish. For fast and impressive results without the headache, an AI tool is fantastic. For complete creative control, nothing beats a professional suite. And for those simple, everyday tasks, a free tool gets the job done.
Recolor an Image Instantly With AI Tools
Tired of fiddling with complex selection tools and manual color adjustments? The absolute fastest way to change the color of something in a photo is to use an AI photo editor. These tools analyze your picture, identify the different objects, and let you swap out colors with a simple text command.
Imagine you're an e-commerce owner with a new t-shirt that comes in five colors. Instead of setting up five different photoshoots, you can take one perfect picture and let AI handle the variations. This saves a massive amount of time and money.
A Step-by-Step Tutorial Using an AI Editor
Getting this done is surprisingly simple. Here’s how it works with a tool like AI Photo HQ:
- Upload Your Image: Drag and drop your photo or click to upload it from your computer.
- Identify the Object: The AI will often detect the main subject, but you can also use a simple text prompt to specify what you want to change.
- Enter Your Command: In the text box, type a clear, descriptive command. Be specific for the best results. For example, instead of "change shirt," use "make the t-shirt navy blue."
- Generate and Download: Hit the generate button. The AI will process your request and give you a new version of the image in seconds. If you like it, you can download it immediately.
Here’s a look at what a typical AI editor's interface looks like. It’s designed for speed and simplicity.
The AI does all the heavy lifting in the background. This is what's really happening:
- Precise Object Masking: The AI automatically figures out the exact outline of the t-shirt, separating it from the person, the background, and everything else.
- Realistic Color Application: It then applies the new color while keeping the original fabric's texture, shadows, and highlights intact.
- Intelligent Lighting Adjustments: The tool makes sure the new color looks natural under the photo's existing lighting, so it doesn't look pasted on.
The real magic of AI is its ability to understand context. It doesn’t just flood a selected area with color; it re-imagines the object with the new color, making sure the final image looks totally believable and professional. You end up with a high-quality product shot in just a few seconds.
This approach is a total game-changer for anyone creating content for marketing campaigns, social media, or websites. If you're curious about what else these tools can do, our guide on the top AI tools for photo editing is a great place to start.
Mastering Precise Color Changes in Photoshop
When an AI’s quick fix just won't cut it, and you need absolute, pixel-perfect control, Adobe Photoshop is still the undisputed king. It’s the tool professionals turn to when they need to change a color with surgical precision.
The foundation for this level of control was laid in 1861 when James Clerk Maxwell produced the first-ever color photograph by merging three black-and-white shots taken through red, green, and blue filters. It's a fascinating rabbit hole to go down; you can explore the history of early color photography to see how far we've come.
Tutorial: Using Hue/Saturation for Targeted Edits
Let's say you're editing a wedding photo and a blue bridesmaid's dress needs to be purple. For this kind of targeted work, the Hue/Saturation adjustment layer is your best friend. This is a non-destructive approach, meaning you can experiment with colors without ever damaging the original image—a cornerstone of any solid photo editing workflow.
Here's the step-by-step process:
- Create an Adjustment Layer: Go to
Layer > New Adjustment Layer > Hue/Saturationin the top menu. This adds a new layer to your Layers panel that will control the colors of everything underneath it. - Select the Target Color: In the Properties panel that appears, click the dropdown menu that says "Master" and choose the color you want to isolate—in this case, select "Blues."
- Adjust the Hue: Slide the Hue slider left or right. You will see only the blue elements in your image (the dress) begin to change color in real-time. Move it until you find the perfect shade of purple.
- Refine the Color: Use the Saturation slider to make the new color more or less vibrant, and the Lightness slider to make it darker or lighter. This ensures the new color looks natural.
Tutorial: Swapping Colors Globally With Replace Color
What if you need to change every single instance of a specific color? For that, the Replace Color tool is a massive timesaver.
- Open the Tool: Go to
Image > Adjustments > Replace Color. A new dialog box will open. - Sample the Color: With the eyedropper tool automatically selected, click on the color in your image that you want to replace.
- Refine the Selection: Use the "Fuzziness" slider to control the range of the selected color. A higher value will include more similar shades.
- Change the Color: Adjust the Hue, Saturation, and Lightness sliders at the bottom of the dialog box until the selected color changes to your desired new color. Click OK.
Pro Tip: Whether you're using Hue/Saturation or Replace Color, always zoom way in to check the edges of your adjustment. It's common for a slight "halo" or color spill to appear. You can easily fix this by using the layer mask on your Hue/Saturation layer to paint away any areas where the effect went a little too far.
Don't Have Photoshop? Try These Free Online Tools to Recolor Images
You don’t need to shell out for expensive software just to change the color of an image. For most day-to-day tasks, free browser-based tools like Canva and Photopea are more than enough. The best part? No downloads, no subscriptions—you can just get the job done.
Let's imagine you're a small business owner and your product photo has a background that clashes with your brand's aesthetic. Here’s how to fix it in minutes.
Tutorial: Changing a Background Color in Canva
With a tool like Canva, you can jump right into its photo editor, upload your image, and start making changes immediately.
Here's a quick walkthrough:
- Upload Your Photo: Go to Canva's photo editor and upload the image you want to edit.
- Remove the Background: Click on the image, then select "Edit Photo." Find the "BG Remover" tool (this may require a Pro account). One click will instantly isolate your main subject.
- Add a New Background Color: With the background gone, you can now add a new color. You can select a new background element from the "Elements" tab and place it behind your object, or simply change the page's background color.
- Customize Your Color: Use the color picker to select a new shade or enter your brand’s specific hex code to ensure everything is perfectly on-brand.
- Download Your Image: Once you're happy, click "Share" and then "Download" to save your new graphic.
The real win here is speed and convenience. For updating social media posts or web graphics, these free tools give you 80% of the functionality of professional software with practically zero learning curve.
Now, it’s important to be realistic about their limitations. These tools are fantastic for solid colors and simple shapes, but they can sometimes stumble on more complex selections like fine hair or intricate patterns. If your image needs photorealistic blending, you might still need to turn to a more powerful tool like Photoshop. But for the vast majority of everyday tasks, a free online editor will serve you just fine.
Creative Tips for More Impactful Color Edits
Knowing how to change a color is one thing, but using that skill to tell a better story? That's where the real magic happens. A simple color shift can completely flip an image's mood on its head, guiding the viewer's eye and sparking an emotional response.
A great practical example is creating a selective color pop—making an entire scene black and white except for a single red umbrella. It's a classic technique for a reason: it instantly pulls focus right where you want it. Or you could take a standard landscape shot and apply a warm, golden-hour color grade to make it feel nostalgic and dreamy.
Using Color to Evoke Emotion
Sometimes the most subtle changes make the biggest difference. Transforming the vibrant green leaves of summer into the rich oranges of autumn can shift a photo’s entire narrative from one of bustling life to quiet, cozy reflection.
This isn’t a new concept, either. The unique color palettes of early films actually shaped our collective idea of what an ideal image should look like. The introduction of Kodachrome film back in 1935, for instance, set a new standard for rich, saturated tones that editors and photographers still try to emulate today.
The goal isn’t just to change a color; it’s to use it with purpose. Before you touch a single slider, ask yourself what feeling you want to create—drama, warmth, isolation? Let that answer guide your color palette.
Mastering these techniques definitely takes practice. If you want to dive deeper into creating specific moods with your edits, check out our guide on advanced photo colour grading.
And remember, great photo editing doesn't happen in a vacuum. Understanding broader design principles can elevate your work, too. For some great insights into how color impacts user experience, it's worth exploring some UI design best practices.
Common Questions About Changing Image Colors
Even with the best tools, you can still hit a few snags. One of the classic headaches is trying to alter pure black or white objects. Why? Because these shades don't technically have any color data for software to work with.
If you need to recolor something that's solid white, your best bet is to select the object and then add a new color overlay layer on top of it. For black objects, it's a similar process, but you'll need one extra step: adjust the layer's blending mode to "Screen" or "Lighten". This little trick lets the new color actually show through in a believable way.
Making Colors Look Natural
Getting a new color to look like it was there all along is where the real artistry comes in. Just slapping on a flat color almost always looks fake because it completely ignores the original image’s lighting, shadows, and highlights.
To sidestep that artificial look, you have to pay close attention to the light that's already in the photo.
Here's a pro tip I've used for years: always apply your color change on a separate layer. Once you have the color down, just lower that layer's opacity a little. This allows some of the original texture and lighting to peek through, which makes the entire edit feel much more convincing.
Finally, don't forget about your file format when you're ready to save. It can make a big difference. Here’s a quick breakdown:
- JPG: This is your go-to for most photos, especially ones with a lot of different colors and gradients. It uses compression to keep file sizes manageable, but be warned—saving a JPG over and over can start to degrade its quality.
- PNG: Perfect for any image that needs a transparent background, or for graphics with sharp lines and text. It’s a lossless format, meaning it holds onto every bit of quality, no matter how many times you save it.
For most photos you’ve recolored, saving as a high-quality JPG is perfectly fine. But if your image involves transparency, you always choose PNG.
Ready to create stunning color variations in seconds without all the manual adjustments? AI Photo HQ uses powerful AI to handle these tricky details for you, giving you professional results instantly. Try it for free at aiphotohq.com.

