
If you've ever tried to remove grain from a photo, you know the old-school methods often left you with a blurry, over-smoothed mess. Thankfully, modern AI-powered software has completely changed the game. These tools can intelligently pinpoint and eliminate digital noise—those pesky speckles in your low-light shots—without sacrificing the crisp details that make your photo great.
So, Why Do Your Photos Look Grainy in the First Place?

Ever captured a fantastic moment at a concert or a cozy evening scene, only to find the photo is covered in tiny, distracting speckles? That's digital noise, and it's essentially the modern version of old-school film grain. It almost always pops up when your camera's sensor just can't get enough light to produce a clean image.
The number one cause is a high ISO setting. You can think of ISO as your camera's artificial sensitivity to light. When you're in a dark place, cranking up the ISO helps you get a brighter photo. The trade-off? This process introduces tiny, random variations in color and brightness, which we see as grain.
Diving Deeper into the Causes of Digital Noise
It’s not just about ISO, though. Smaller camera sensors, like the ones in our smartphones, are much more susceptible to noise. Their compact size means they physically struggle to gather as much light as the bigger sensors found in DSLR or mirrorless cameras, especially when conditions aren't ideal. If you want to get ahead of the problem, a great place to start is by mastering some foundational lighting techniques in photography.
Here's a quick rundown of the usual suspects behind grainy photos:
- High ISO Settings: Pushing your camera's sensitivity to its limits in dim environments.
- Small Sensor Size: A common issue for smartphones and compact cameras that gather less light.
- Underexposure: If your photo is too dark and you try to brighten it in post-production, noise that was barely visible suddenly becomes front and center.
Common Causes of Photo Grain and How AI Solves Them
Digital noise has always been a headache for photographers, but AI has emerged as a powerful solution. The table below breaks down the common culprits and explains how today's technology tackles them head-on.
| Source of Digital Noise | How AI Technology Provides the Fix |
|---|---|
| High ISO | AI algorithms are trained on millions of images to differentiate between fine detail and noise, selectively smoothing only the grain. |
| Small Camera Sensors | AI can intelligently reconstruct detail that was lost or obscured by noise, making images from small sensors look much cleaner. |
| Underexposure | When you brighten a dark photo, AI denoisers can clean up the amplified noise without destroying the underlying image information. |
What this really means is that AI isn't just applying a simple blur filter; it's making intelligent decisions to rescue your photo's quality.
But here’s the good news: you don’t have to settle for grainy photos anymore. Today’s AI tools can analyze an image, figure out what’s unwanted noise and what’s important texture, and clean up the shot with incredible precision.
This isn't just a niche tool; it's a massive technological shift. The market for AI image denoiser software was valued at $500 million back in 2025 and is expected to grow at a 20% CAGR through 2033, driven by a huge demand for better editing solutions. You can dive into the numbers and read the full photo editing software market research to see just how big this trend is.
Now, let's move from the why to the how and look at how you can put these tools to work.
Your Practical Guide to Removing Grain with AI
Jumping into AI-powered editing is a lot less intimidating than it sounds. You really don't need to be a tech wizard to remove grain from a photo—the whole process is designed to be quick and intuitive.
Let's walk through a common scenario. Imagine you have a great photo from an indoor birthday party, but the low light left it looking grainy. Instead of trashing it, you can fix it in just a few steps.
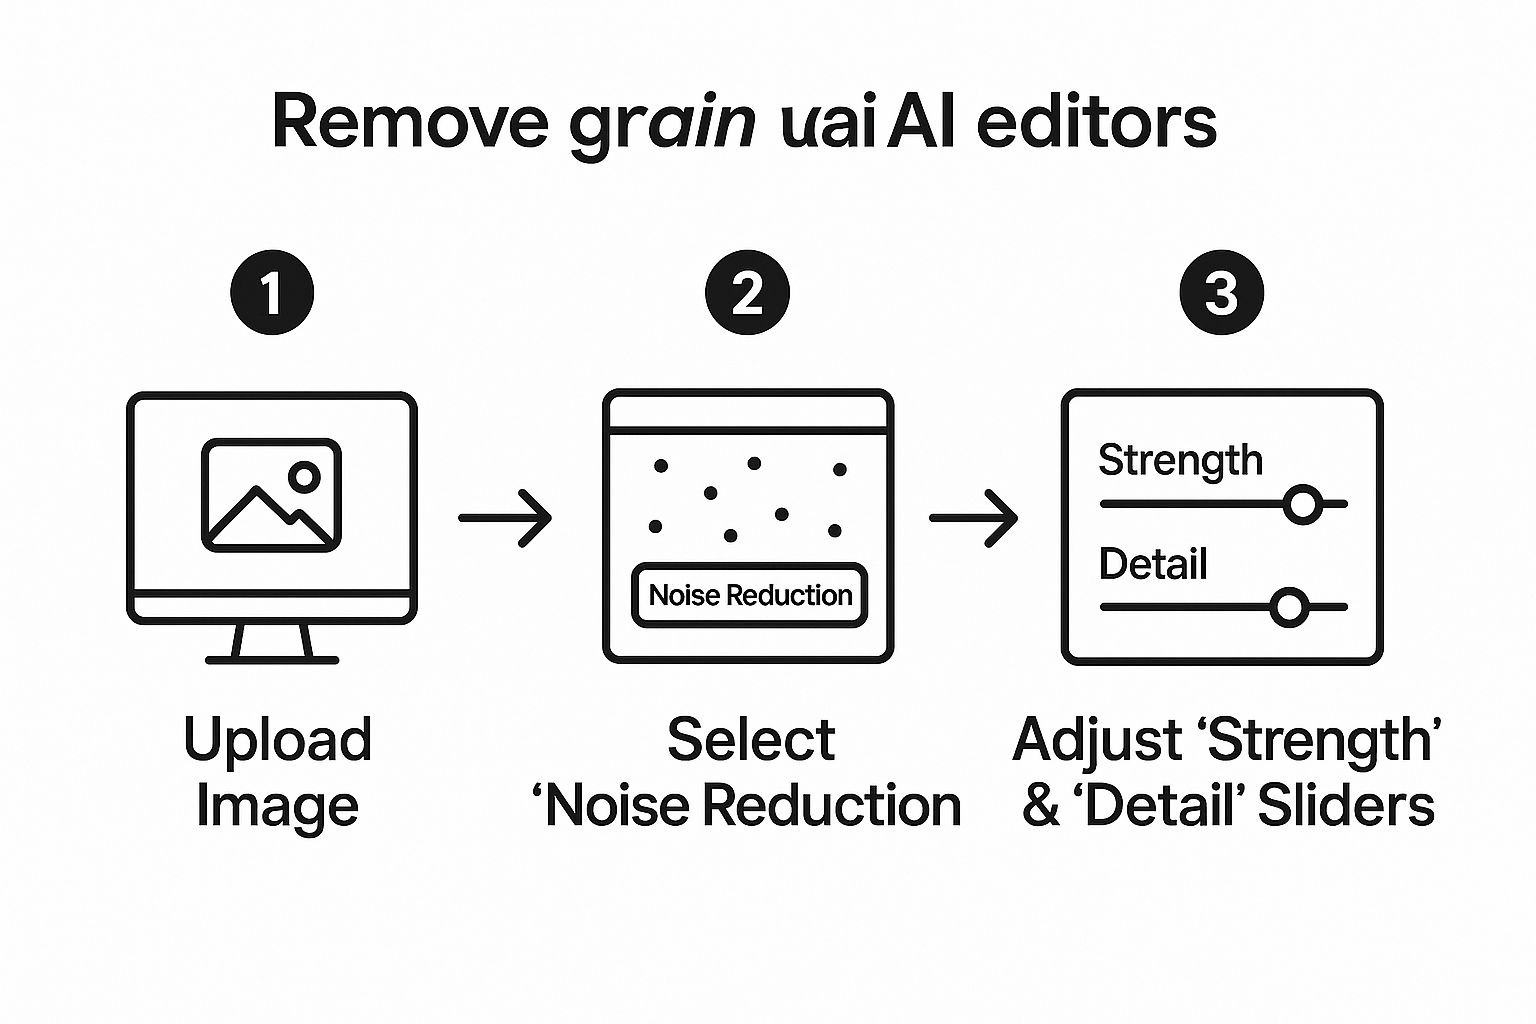
- Upload Your Photo: Start by opening an AI photo editor like AI Photo HQ. Most tools have a big, obvious "Upload" button or a "Drag and Drop" area. Select the grainy photo from your computer or phone.
- Locate the Denoise Tool: Once your photo is loaded, the software's editing panel will appear. Look for a feature labeled "Denoise," "Noise Reduction," or sometimes "Grain Removal." Click on it to open the controls.
- Make Initial Adjustments: The AI will often apply a default level of noise reduction automatically. Use the "Before/After" toggle or slider to see the initial effect. This gives you a starting point.
- Fine-Tune with Sliders: Now, take control. Adjust the "Strength" or "Amount" slider. Nudge it slowly to the right and watch the grain disappear in the preview window. Don't go too far too fast.
- Bring Back Detail: As you reduce noise, you might lose some sharpness. Use the corresponding "Detail" or "Sharpness" slider to recover crisp edges. The goal is to find a balance where the grain is gone but the photo doesn't look blurry.
- Save Your Work: Once you're happy with the result, hit the "Apply" or "Save" button. Download your clean, enhanced image.
Fine-Tuning Your Results
This is where you take the driver's seat. Most AI denoise tools give you two main sliders that work together to clean up your image without making it look fake.
- Strength/Amount: This slider controls how aggressive the grain removal is. Start by nudging it slowly to the right and watch the grain start to disappear.
- Detail/Sharpness: Here's the balancing act. Removing noise can sometimes soften the image a bit too much. This slider helps bring back that essential sharpness, keeping your photo crisp and clear.
Finding the sweet spot is key. If you push the Strength slider too far, you’ll end up with that plastic, overly-smoothed look nobody wants. The real goal is a natural finish where the distracting speckles are gone, but the important textures—like ripples in water or the fabric of a shirt—are still there.
This quick infographic breaks down the workflow. It really is that simple.
As you can see, it's a straightforward process: upload, adjust, and save. Powerful editing is right at your fingertips.
Don't be afraid to experiment. What works perfectly for one photo might not be right for the next. Keep toggling the preview on and off to see a quick before-and-after. It’s the fastest way to know if you're heading in the right direction.
The growing trend of AI integration in post-production is completely changing how we approach editing. What used to demand specialized software and a lot of patience is now accessible to anyone.
These tools can do way more than just fix noise. To see what else is possible, check out our guide on AI image enhancement. Once you get the hang of this simple technique, you're well on your way to creating cleaner, more professional photos every time.
Balancing Noise Reduction and Image Detail
It’s tempting to just slam the "Denoise" slider all the way to the right. That’s a classic rookie mistake. Sure, it’ll remove grain from a photo, but it often leaves the image looking flat, waxy, and completely unnatural. The real skill lies in finding that sweet spot—the perfect balance between cleaning up noise and keeping the essential textures that give a photo its life.
Think about a portrait where your subject is wearing a great wool sweater. Aggressive noise reduction might smooth out the grain in the background, but it could just as easily obliterate the delicate weave of the fabric, turning it into a blurry, undefined mess.
Your goal is to clean up distracting speckles without sacrificing the very character of the image.
Selective Adjustments for a Professional Finish
For more advanced control, some desktop editors offer selective adjustments. This is a game-changer for getting professional results. Here’s a step-by-step example for a night sky photo with a detailed foreground:
- Open Your Image: Load your photo into an editor with masking capabilities.
- Apply Global Noise Reduction: Start by applying a moderate level of noise reduction to the entire image. This will clean up the most obvious grain.
- Create a Mask: Select the masking tool (often a brush or gradient). Create a mask that covers the sky. You can "paint" over the sky area.
- Increase Sky Denoise: With the sky mask active, increase the Noise Reduction strength. This will smooth the sky significantly, making the stars pop without affecting the foreground.
- Invert the Mask and Refine: Invert your selection to target the foreground (trees, mountains, etc.). Now, decrease the Noise Reduction strength for this area. You might even lower it to zero to preserve every detail in the rocks and leaves.
This targeted approach gives you the best of both worlds:
- Clean backgrounds and shadows: Go heavier on the noise reduction in large, uniform areas like skies, walls, or out-of-focus backgrounds.
- Preserved subject detail: Use minimal (or zero) noise reduction on your main subject, especially on faces, clothing textures, and architectural details.
A fantastic rule of thumb is to always zoom in to 100%. This is the only way to get a true picture of how the noise and details are being affected. What looks great as a tiny thumbnail can often look plasticky and fake when you see it at full size.
Knowing When to Stop
Knowing when enough is enough is what separates a quick fix from a professional-quality edit. You don't have to obliterate every last speckle. In fact, leaving a tiny bit of residual grain can often make a digital photo feel more organic and less sterile.
If you find that noise reduction is costing you too much detail, try pairing it with other tools. For instance, after reducing the grain, you might need to apply a subtle sharpening effect to bring back some of that crispness to the edges.
Some tools, like an online image upscaler, actually combine enhancement and noise reduction in a single step, which can make the whole process a lot smoother. The key is to make small, incremental adjustments and constantly flick back and forth between the before and after. Stop when the image looks clean but still feels authentic.
Where Grain Removal Really Shines

The ability to remove grain from a photo isn't just some techy gimmick. It's a practical way to rescue and enhance the images that actually mean something to you. From old family memories to professional work, knowing when to apply noise reduction can completely change the game.
Let's walk through a practical tutorial for restoring an old, noisy family photo.
- Scan or Digitize the Photo: Start with the highest quality scan possible. A good resolution (at least 300 DPI) is crucial.
- Upload to an AI Editor: Use a tool like AI Photo HQ that specializes in restoration and enhancement.
- Apply One-Click Enhancement: Many tools have an "Auto-Enhance" or "Restoration" button. Try this first, as it often combines color correction, scratch removal, and noise reduction in one step.
- Target the Noise: If grain is still an issue, navigate to the "Denoise" tool. Old photos often have very blotchy noise.
- Adjust Carefully: Gently increase the Strength slider. For old photos, you need to be extra careful not to erase facial features. Use the Detail slider to bring back clarity in eyes and hair. The goal is to reduce the distracting fuzz, not make it look like a modern digital photo.
- Save the Restored Memory: Once the grain is minimized and the details are clear, save your restored image.
Taking Your Passion Projects to the Next Level
Astrophotography is another classic case. When you're trying to capture the Milky Way, you're usually pushing your camera's ISO to its absolute limit. The result is often a spectacular shot that's unfortunately loaded with distracting grain.
This is where a little targeted noise reduction makes a huge difference:
- It smooths out the dark sky, giving you that deep, inky black canvas you're after.
- This, in turn, makes the stars and nebulae look sharper and far more brilliant.
- The entire image just feels more professional and impactful.
You can transform a noisy, high-ISO shot into a stunningly clean image where all those cosmic details really pop.
Grain removal isn’t about chasing some unrealistic idea of perfection. It’s about getting rid of the distractions so the real subject and story can shine through. Whether it's a sentimental family picture or an ambitious shot of the night sky, the goal is always clarity.
Why Clean Images Matter in Business
The need for crisp, clean images carries right over into the professional world. In e-commerce, for example, your product photos have to be crystal clear to build trust and, ultimately, make sales. A grainy, low-quality picture of a product can make the whole brand feel cheap, and that directly influences a customer's decision to buy.
This constant demand for polished visuals is a huge reason the image editing software market is booming. For some perspective, the related market for background removal software was valued at USD 1.5 billion in 2024 and is expected to soar to USD 5.2 billion by 2033. If you want to dig deeper, you can discover more insights about the market growth on verifiedmarketreports.com.
That growth really highlights how critical clean, high-quality images are for digital marketing and commerce. By using AI to get rid of grain, you’re making sure your product shots are sharp, detailed, and professional—something every online business needs.
Common Mistakes to Avoid When Removing Grain

It’s easy to get a little too enthusiastic when you first figure out how to remove grain from a photo. I've been there. But a few common missteps can quickly turn a great rescue into an unnatural-looking mess. Knowing what to watch for will help you get clean, impressive results every single time.
The most frequent mistake I see is simply overdoing it. It's tempting to just crank the noise reduction slider all the way up, but this almost always strips the image of its essential textures. You're left with a photo that looks waxy, flat, and artificial—a look we often call "plastic skin." Remember, the goal is to reduce distracting noise, not obliterate all texture.
Forgetting That Every Photo Is Different
Another big one is applying the exact same preset or settings to every single image. A high-strength setting that works wonders on a noisy astrophotography shot will absolutely destroy the delicate details in a softly lit indoor portrait. Each photo has its own unique noise profile that depends on the light, the camera, and the ISO you used.
Before you touch any sliders, take a second to assess the image:
- Analyze the noise: Is it fine and uniform, or is it splotchy with ugly color noise?
- Identify key textures: Look for important details you need to keep, like the weave of fabric, strands of hair, or leaves on a tree.
- Adjust accordingly: I always start with a very low setting and slowly increase it. You want to dial it in just enough to remove the distracting grain while keeping the photo's character intact.
My best advice is to treat grain removal like salting your food. Start with a little, and only add more if it's truly necessary. It’s a lot easier to add more noise reduction than it is to recover details that have been smoothed into oblivion.
Starting with the Wrong File Type
Finally, a critical error is trying to edit a low-quality JPEG instead of a RAW file. JPEGs are compressed files, which means your camera has already thrown out a ton of the original image data to save space. When you try to remove grain from a JPEG, the software is working with limited information, which often leads to blotchy artifacts and disappointing results.
RAW files, on the other hand, contain all the rich, unprocessed data straight from your camera's sensor. This gives you way more flexibility and produces a much cleaner, more detailed image after noise reduction. If you think you might need to do any serious editing, always shoot in RAW. It makes a world of difference.
Got Questions About Photo Grain? We've Got Answers.
We get a lot of questions about how to remove grain from photos, so let's tackle a few of the most common ones. If you've ever been hesitant about cleaning up your images, these answers should clear things up.
Can I Actually Remove Grain Without Losing Quality?
Yes, you absolutely can. This used to be a huge problem with older software, which would just smudge the details and leave you with a blurry mess.
Modern AI denoisers are a completely different beast. They’re smart enough to tell the difference between ugly digital noise and the fine details you want to keep. The software analyzes the image content, intelligently smoothing out the noise while leaving textures and sharp edges intact. The trick is to not overdo it—a subtle adjustment is usually all you need for a clean, natural-looking shot.
Should I Denoise In-Camera or in Post-Production?
For the best possible results, always wait until you’re back at your computer. Using your camera’s built-in noise reduction might seem convenient, but it's a destructive process, especially if you're shooting JPEGs. It often applies a heavy-handed, one-size-fits-all blur that you can't undo.
By shooting in RAW and using a dedicated tool like AI Photo HQ later, you retain full control. You can dial in the exact amount of noise reduction needed, ensuring you preserve every last bit of critical detail.
What’s the Difference Between Digital Noise and Film Grain?
It's a great question, and the two are often confused. Digital noise is a technical flaw. It shows up as random, off-color pixels, usually when you’re shooting in low light and have to crank up the ISO. It's something we generally want to get rid of.
Film grain, on the other hand, is the beautiful, organic texture you see in old analog photos. It's caused by the physical silver crystals in the film itself. While digital noise is an unwanted artifact, many photographers intentionally add a film grain effect to their digital images to give them that classic, nostalgic vibe.
Ready to finally get rid of distracting grain in your photos? Give AI Photo HQ a try and see what a difference our AI can make. Clean up your images in seconds.

