
You’ve probably been there: you take what you think is a great shot, only to find it covered in a frustrating, sandy texture. The good news is you can remove graininess from photo files with modern AI tools, and it's easier than you might think. We're talking a few clicks, not the tedious manual adjustments that often leave pictures looking soft and artificial.
This guide will walk you through the exact steps to rescue your grainy photos using AI, turning them from noisy messes into clean, sharp images.
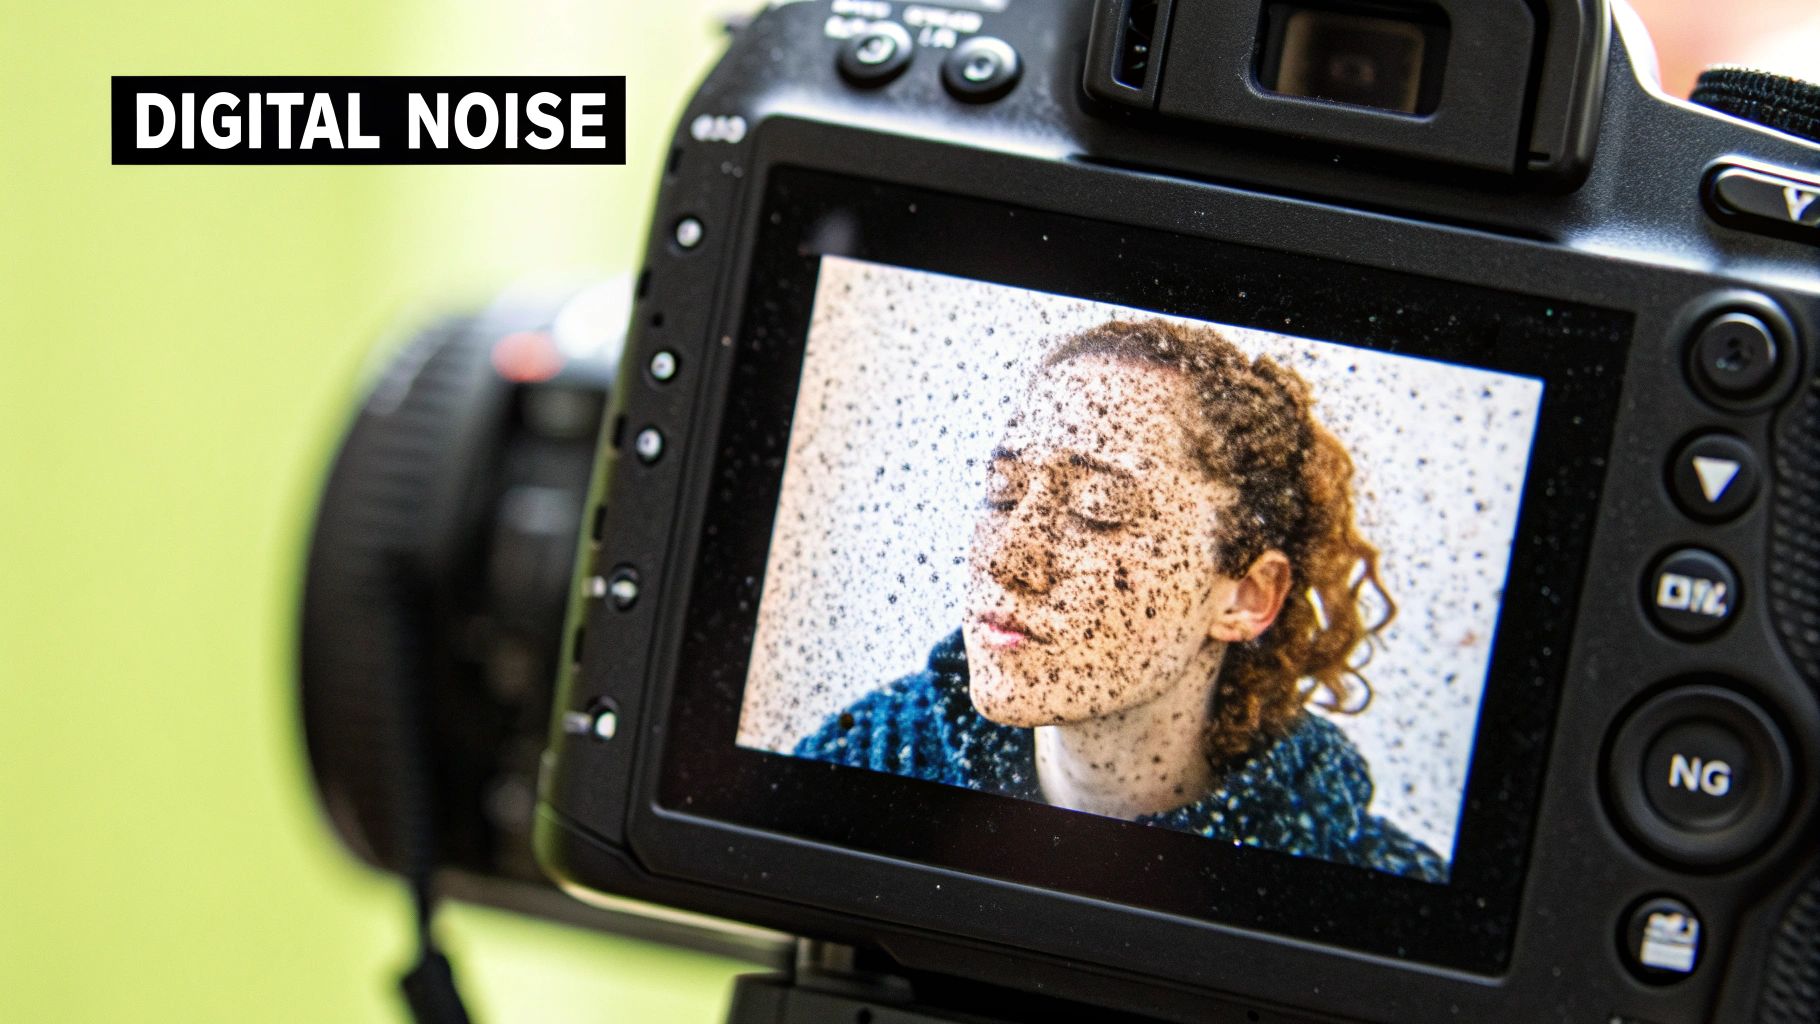
Why Your Photos Look Grainy and How AI Can Help
That speckled texture is technically called image noise. It's a classic problem that has plagued photographers since the dawn of digital cameras. Put simply, noise pops up when your camera's sensor just isn't getting enough light to produce a clean image.
To make up for the lack of light in dark environments, your camera bumps up its sensitivity, which is measured in ISO. A higher ISO definitely brightens the photo, but it comes at a cost—it also amplifies electronic interference on the sensor. That interference is what you see as random specks of color and brightness.
Understanding Digital Noise
This grainy effect is especially common in a few specific scenarios:
- Indoor Events: Picture a dimly lit birthday party or a concert where using a flash is a big no-no.
- Nighttime Landscapes: Capturing those stunning cityscapes or starry skies often means pushing your camera to its absolute limits.
- Fast-Action Shots: When you need to freeze motion in low light, you're forced to use a fast shutter speed and, you guessed it, a high ISO.
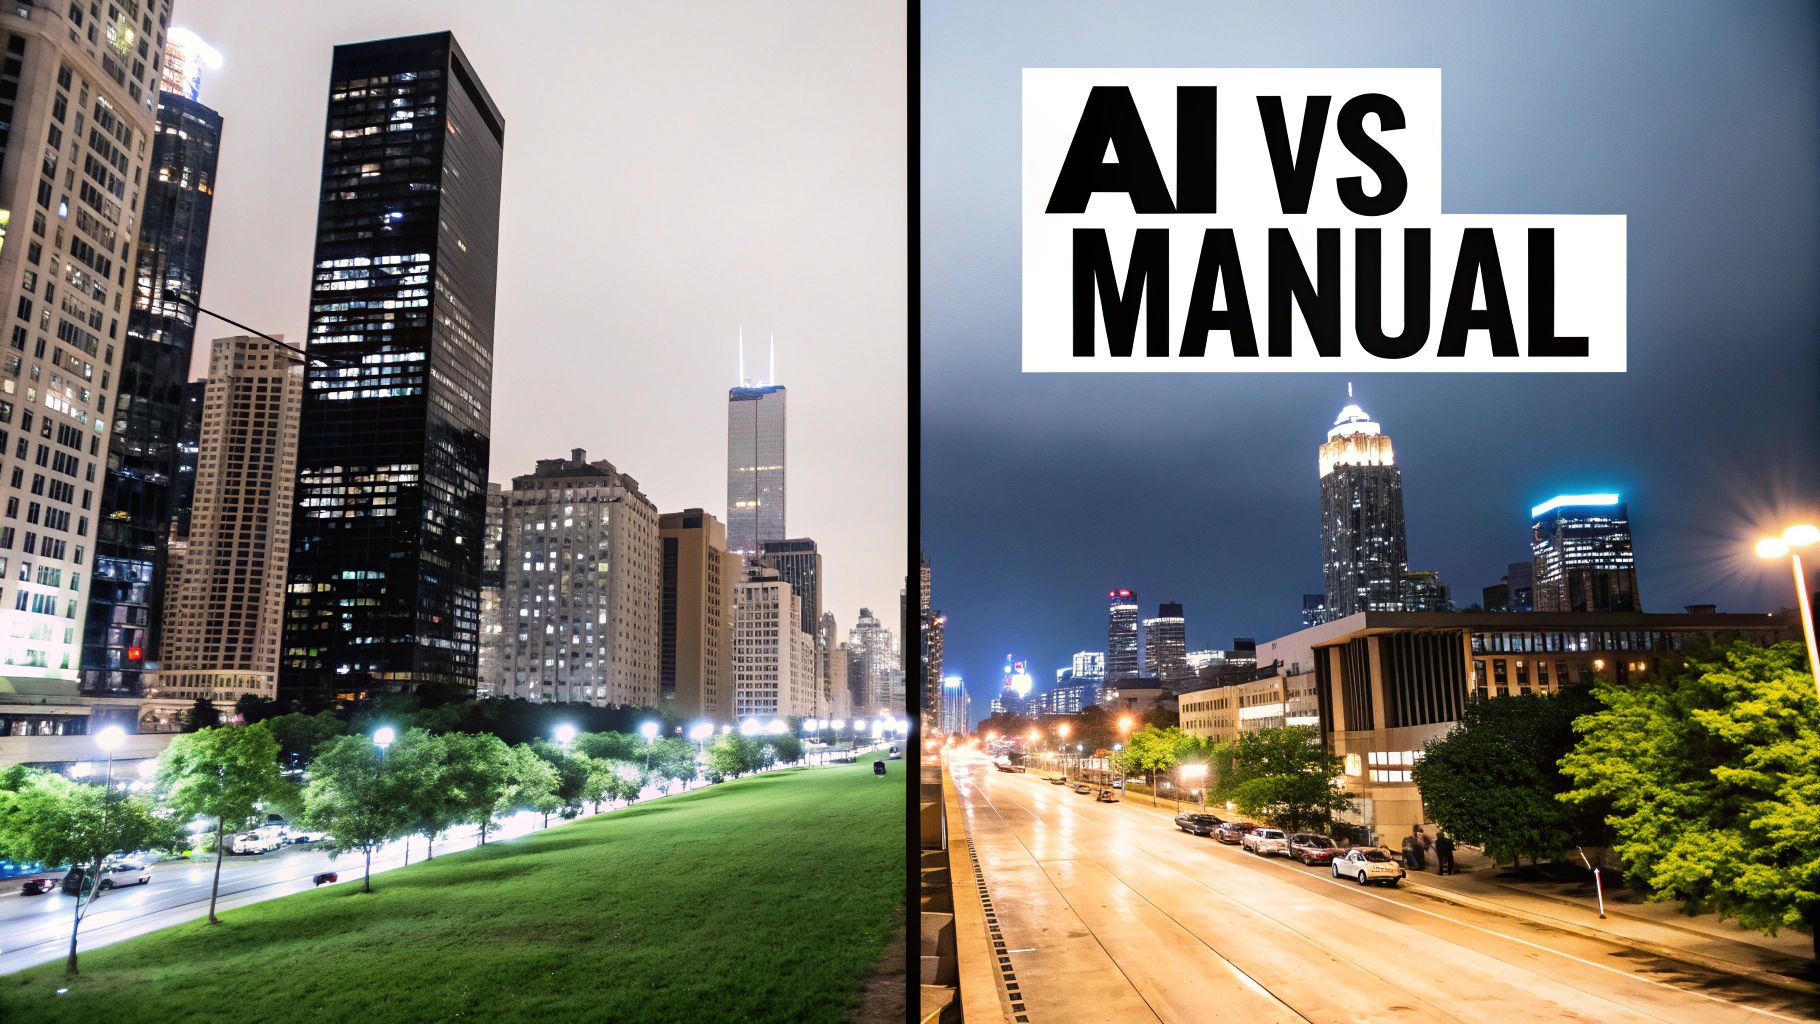
This image below does a great job of showing just how much different ISO settings can impact the amount of visible noise.
See how the image on the far right, shot at a really high ISO, is way grainier than the clean one on the left? That's exactly the kind of degradation AI tools are built to fix.
The Modern AI Solution
The old-school way to fix noise was to fiddle with "luminance" and "color" sliders in editing software. It was always a delicate balancing act. Pull the slider too far, and you'd wipe out all the fine details, leaving your subject looking like a plastic doll.
AI-powered denoisers are a completely different beast. They’ve been trained on millions of images, so they know the difference between unwanted grain and essential textures, like the fabric of a shirt or the pores on someone's skin. This lets them intelligently remove graininess from a photo while keeping everything sharp and clear.
The core issue here is something called the signal-to-noise ratio (SNR). As you crank up the ISO, the electronic "noise" starts to overpower the actual image "signal," making your photos grainy. Technical deep-dives show that going from a base ISO of 100 to 3200 can tank the SNR from over 40 dB down to below 25 dB—a massive drop in quality.
AI isn't just for fixing old photos, either. It’s also changing how we create new visuals from scratch. For example, a Pinterest AI image generator can be a huge help when you're trying to build out a visual content strategy, making professional-looking results more accessible than ever.
Using AI for One-Click Noise Reduction: A Step-by-Step Guide
Let’s walk through a practical example. Imagine you took a great, candid portrait at a family gathering. The lighting was dim, so you had to crank up the ISO. The result? A photo you love, but it's covered in that distracting, speckled grain. Here’s how to fix it in under a minute with a tool like AI Photo HQ.
Step 1: Upload Your Photo
The first move is the easiest—just drag and drop your grainy portrait right into the upload area of the tool. You can also click to browse your computer or phone for the image file.
Step 2: Let the AI Analyze the Image
Once it’s uploaded, the AI gets to work. It’s not just looking at pixels; it’s actually understanding your photo. It identifies the subject, the background, different textures, and sharp edges. This is the secret sauce that separates smart AI from old-school noise reduction, which often just smudges everything and kills important details. This step is automatic and takes only a few seconds.
Step 3: Choose the Right Noise Reduction Strength
After its quick analysis, the tool will usually offer a few strength settings, typically something like Low, Medium, and High. There's no single "best" setting; it all depends on your photo and the look you want.
Here’s a practical guide to choosing the right level:
- Low: Best for photos with just a hint of grain, perhaps from a slightly bumped-up ISO. Use this to gently clean things up while ensuring every last bit of fine detail—like the texture in a sweater or strands of hair—stays perfectly sharp.
- Medium: This is your go-to for most moderately noisy shots, like our indoor portrait example. It strikes the perfect balance, clearing out obvious grain without making the photo look overly processed.
- High: Reserve this for your most challenging photos. Think nighttime cityscapes or concert photos shot in a very dark venue. It’s aggressive and will tackle heavy noise, but be aware it might soften the very finest details as a trade-off.
Step 4: Preview and Compare
This is the most critical step. Use the live preview slider to compare the "before" and "after" versions in real time. Zoom in on an important part of the image, like your subject's eyes or a pattern on their clothing. Ask yourself: Is the High setting blurring the details? Is Low not quite strong enough? This instant visual feedback gives you complete control over the final result.
This chart gives you a quick visual breakdown of the trade-offs between strength and processing time.
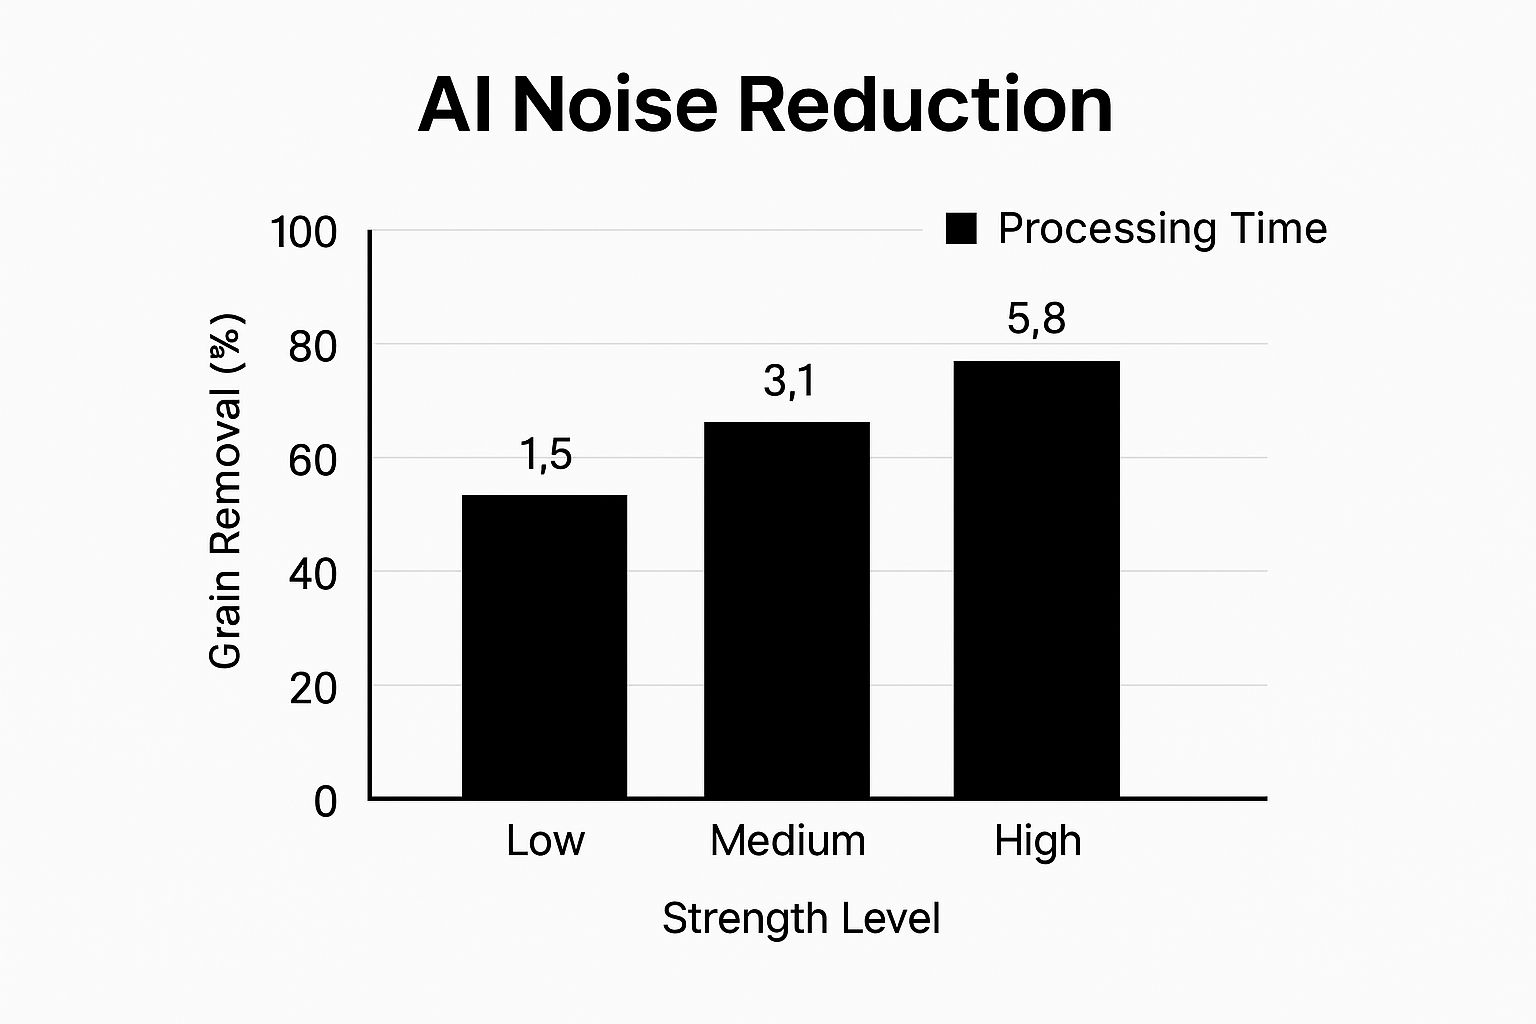
As you can see, cranking up the strength removes more grain, but it takes the AI a little bit longer to work its magic. It’s all about balancing power and speed.
Step 5: Finalize and Download
For our indoor portrait, the Medium setting is likely the winner. It will clean up the speckled noise on skin tones and in the background while keeping the eyes and smile perfectly crisp. Once you’re happy with the preview, just click the download button to save your beautifully restored photo.
The real magic is how selective the algorithm is. It knows to heavily smooth the noise in an out-of-focus background while leaving the sharp details of your subject’s face alone. This intelligent approach is why AI-powered denoising feels so effortless yet gives you such professional-looking results.
This kind of one-click fix is just one example of how AI is transforming photo editing. If you’re curious about what else is possible, you can dive deeper into the world of AI tools for photo editing that help with everything from color correction to removing unwanted objects. The whole point is to spend less time fighting with your photos and more time creating.
AI Denoising vs. Traditional Methods: What's the Real Difference?
For years, getting rid of graininess meant diving into programs like Adobe Lightroom and carefully nudging sliders back and forth. It was a delicate dance, a trade-off that every photographer knew well. Now, AI has completely changed the game.
But how different is it, really? Let’s break it down.
The old-school approach involved manually adjusting two main controls: Luminance (for brightness noise) and Color (for those weird color splotches). If you pushed them too far, you’d smooth out the grain, but you’d also lose precious detail. The result? An image that looked soft, waxy, or just plain unnatural. It was a constant battle between cleaning up the noise and keeping the texture that makes a photo feel real.
The Smart Way vs. The Hard Way
AI-powered tools, like the engine inside AI Photo HQ, work from a completely different playbook. Instead of just applying a blanket smoothing effect, the AI actually looks at your photo. It’s been trained on millions of images, so it understands the difference between unwanted digital noise and the essential details you want to keep.
Think about it this way: AI can be aggressive in smoothing out a blurry background while being incredibly careful around the sharp edges of a person’s face or the fine weave of their sweater. Traditional sliders can't do that. They apply the same level of reduction to every single pixel, which is why important details often get smudged out along with the grain.
This isn't just a subjective improvement; it's backed by data. Researchers have found that modern AI models have blown past older methods in performance. For example, some deep learning models showed a 54% improvement in measurable image quality scores when compared to traditional algorithms on standard test sets. You can see how AI outperforms older algorithms in this study if you want to dig into the technical side.
A Practical Comparison
The best way to see the difference is to compare the two workflows side-by-side. Imagine you’re trying to save a great shot from a dimly lit concert—a classic scenario for noisy photos.
Here's a quick rundown of how AI Denoising stacks up against the traditional manual approach.
AI Denoising vs Traditional Manual Denoising
| Feature | AI Denoising (e.g., AI Photo HQ) | Traditional Denoising (e.g., Lightroom Slider) |
|---|---|---|
| Workflow | A one-click process. The AI analyzes the image and applies a smart, context-aware fix automatically. | Manual adjustment. You have to carefully tweak multiple sliders, often going back and forth to find a balance. |
| Detail Preservation | High. The AI is specifically trained to tell noise and fine textures apart, so it saves critical details like hair or fabric. | Variable. It’s incredibly easy to lose fine detail, leading to a soft or overly smooth look if you push the sliders too far. |
| Speed | Fast. You get your results in just a few seconds, which is a huge time-saver when you have multiple photos. | Time-consuming. Getting the balance just right can take several minutes of trial-and-error for a single image. |
| Learning Curve | Minimal. The process is super intuitive. It’s built for everyone, even if you have zero technical photo editing skills. | Moderate. It takes practice to understand what luminance and color noise are and to develop a feel for the delicate balance. |
At the end of the day, AI offers a massive leap forward in both quality and efficiency. It takes the most tedious part of noise reduction off your plate, freeing you up to focus on the creative side of photography. This is one of the biggest benefits of modern AI image enhancement—it solves the tough technical problems for you, so you can get a better-looking photo in a fraction of the time.
Fine-Tuning Your Photo After Denoising
You've successfully used AI to remove the grain. The photo is clean, but it might look a little flat or soft. This is normal, and it's where a few final, targeted adjustments can make all the difference. This final 10% of editing is what separates a good photo from a great one.
Here’s a quick tutorial on how to add back sharpness and depth without reintroducing noise.
Tutorial: Restoring Sharpness with Precision
The goal is to sharpen only the most important parts of the image. For a portrait, that’s almost always the eyes.
- Open Your Denoised Photo: Load the clean image into your favorite photo editor (like Photoshop, GIMP, or even a mobile app like Snapseed).
- Select a Local Adjustment Tool: Find the sharpening brush, a radial filter, or a similar selective tool. You want to avoid a global filter that sharpens the entire image.
- Apply Sharpening to Key Areas: Carefully paint or apply the sharpening effect only on the eyes, eyelashes, and eyebrows. Keep the effect subtle. A little goes a long way.
- Compare the Result: Toggle the sharpening layer on and off. You should see the eyes "pop" with clarity while the skin remains smooth.
This same principle applies to any photo:
- Landscapes? Sharpen just the edges of mountains or the texture of tree bark.
- Product Shots? Hit the logo and key features to make them stand out.
This selective approach guides the viewer's eye exactly where you want it to go.
Reintroducing Depth and Contrast
Noise reduction can sometimes flatten an image. You can easily fix this with a few targeted tweaks to contrast and clarity. A slight bump in contrast will deepen the blacks and brighten the whites, adding that dynamic punch back into the scene.
Be really careful with the clarity or texture slider. It's fantastic for enhancing mid-tone details, but it's easy to overdo it and end up with a gritty look again. My rule of thumb? I never push clarity more than +10 on a denoised photo. It’s usually just enough to restore definition without ruining the clean result.
Think about a misty forest scene. A gentle nudge of contrast can help separate the layers of trees, creating a real sense of depth. Or picture a classic car—a touch of clarity will make the chrome details gleam without making the paint job look grainy. It’s all about making small, subtle enhancements that add up to a truly professional finish.
Once your photos are grain-free and perfectly tuned, you’ll want to prep them for where they’ll live online. If they're headed for a website, it's a good idea to optimize images for web performance so they load fast while still looking absolutely stunning for your visitors.
How to Avoid That Over-Processed Look
The whole point is to remove graininess from a photo, not to suck the life out of it. It’s a classic mistake: pushing the noise reduction sliders so far that the image becomes an unnaturally smooth, plastic-looking mess.
We've all seen it. Skin with zero texture, landscapes that look more like oil paintings, and a total loss of the fine details that make a photograph feel real. The key, as with most things in photo editing, is moderation.
Sometimes, a little grain isn't a flaw—it's character. In genres like black-and-white photography or moody portraiture, a subtle, film-like grain can inject a powerful dose of atmosphere and emotion. Wiping out every last speck can completely strip the image of its intended vibe.
Finding the Right Balance
Knowing when to stop is a skill you develop over time. An over-processed photo almost always loses the crisp, fine details that give it dimension. Hair clumps together into a solid shape, the texture of fabric vanishes, and tiny environmental details get smudged into oblivion.
You’re aiming for the sweet spot: a clean image that still feels authentic.
To get there, here are a few practical habits I swear by:
- Zoom In to 100%: Always, always check your edits at full magnification. It's the only way to really see if you're destroying critical detail. What looks fine on a small screen can be a blurry disaster when you zoom in.
- Toggle Before and After: Constantly flick between your original and the edited version. This simple action keeps your perspective grounded and stops you from straying too far from a natural look.
- Take a Five-Minute Break: Seriously, just step away from the screen. When you come back, your fresh eyes will instantly tell you if the image looks artificial.
The Great Grain Debate
Interestingly, the argument over how much grain to keep is a hot topic. A 2024 survey showed that 42% of photographers actually leave some grain in their images on purpose for aesthetic reasons.
Pushing AI denoisers too hard has real consequences. Some studies have found that aggressive processing can wipe out up to 15% of fine texture detail. It’s no surprise that professional platforms like Getty Images reportedly reject up to 8% of submissions each year for excessive noise or unnatural editing. You can get a deeper dive into the science of image noise and perception on cambridgeincolour.com.
My personal rule of thumb is to find the exact point where the distracting digital noise is gone, but the essential texture remains. The goal is enhancement, not obliteration. A clean photo should still look like a photo.
Ultimately, the "right" amount of noise reduction is a creative choice that should serve the image. Once you've found that perfect balance, you can take the mood even further with other creative adjustments. Our guide on photo colour grading is a great next step to learn how color can complement your clean, natural-looking shot.
Still Have Questions About Denoising Your Photos?
Even with a great tool in your back pocket, you might still be wondering about the finer points of cleaning up grainy photos. Let's tackle some of the most common questions I hear.
Can AI Really Fix My Grainy Smartphone Photos?
You bet. In fact, AI tools often deliver their most dramatic results on smartphone pictures.
Phone cameras, with their tiny sensors, are notorious for creating digital noise, especially when the light isn't perfect. Think of photos from a dimly lit restaurant or an indoor concert—those are prime candidates. The process is the same as with a DSLR photo; just upload your mobile shot, and the AI gets to work. It’s a fantastic way to give your everyday pictures a massive quality boost, making them look way more professional.
Will Denoising Actually Hurt My Photo's Quality?
That’s a totally valid concern, and it comes from a time when noise reduction tools were pretty blunt instruments. A modern, high-quality AI tool, however, won't reduce your photo's resolution or pixel dimensions. What it actually does is enhance the perceived quality by removing all that distracting speckle and fuzz.
Older, manual noise reduction methods often just blurred the photo, smudging important details along with the grain. Today's AI algorithms are much smarter. They've been trained to know the difference between unwanted noise and essential textures, preserving sharpness while cleaning up the image.
Is It Better to Just Avoid Grain in the First Place?
In a perfect world, yes. It's always a good idea to prevent excessive grain by shooting at the lowest possible ISO setting for your lighting conditions. A lower ISO means less sensor sensitivity, which directly translates to less digital noise.
But we don't shoot in a perfect world. Sometimes, you have to crank the ISO to capture a fast-moving subject or get the shot before the light fades completely. For all those real-world situations, having a powerful AI tool for post-processing is an absolute game-changer. It can rescue a photo that you otherwise would have had to throw away.
Does This Work on Old, Scanned Family Photos?
Absolutely, and the results can be incredible. AI noise reduction is exceptionally good at restoring old photographs.
Technically, the "grain" in a film photo is different from the "noise" in a digital one, but a well-trained algorithm can identify and smooth it out just as effectively. This can breathe new life into treasured family photos from decades ago, making them look sharper and cleaner without stripping away their nostalgic, vintage character. It’s a fantastic way to preserve your memories.
Ready to see what it can do for your photos? AI Photo HQ makes it incredibly simple to remove graininess from any image in seconds. Try it now and give your images the clarity they deserve.

