What Is CFG Scale? (And Why It Can Make or Break Your AI Images)
You've written a prompt, picked your model, and hit generate. The result? Either a gorgeous image that nails your vision — or an unrecognizable mess. Chances are, the difference comes down to one slider you might be ignoring: the CFG scale.
CFG scale (short for Classifier-Free Guidance scale) is one of the most important parameters in AI image generation. It controls how closely your AI model follows your text prompt versus doing its own creative thing. Get it right, and your images look intentional and polished. Get it wrong, and you'll wonder why the AI seems to be hallucinating.
In this guide, we'll break down exactly what CFG scale does, how it works under the hood, and — most importantly — what settings to use for different models and art styles. No PhD required.
CFG Scale in Plain English
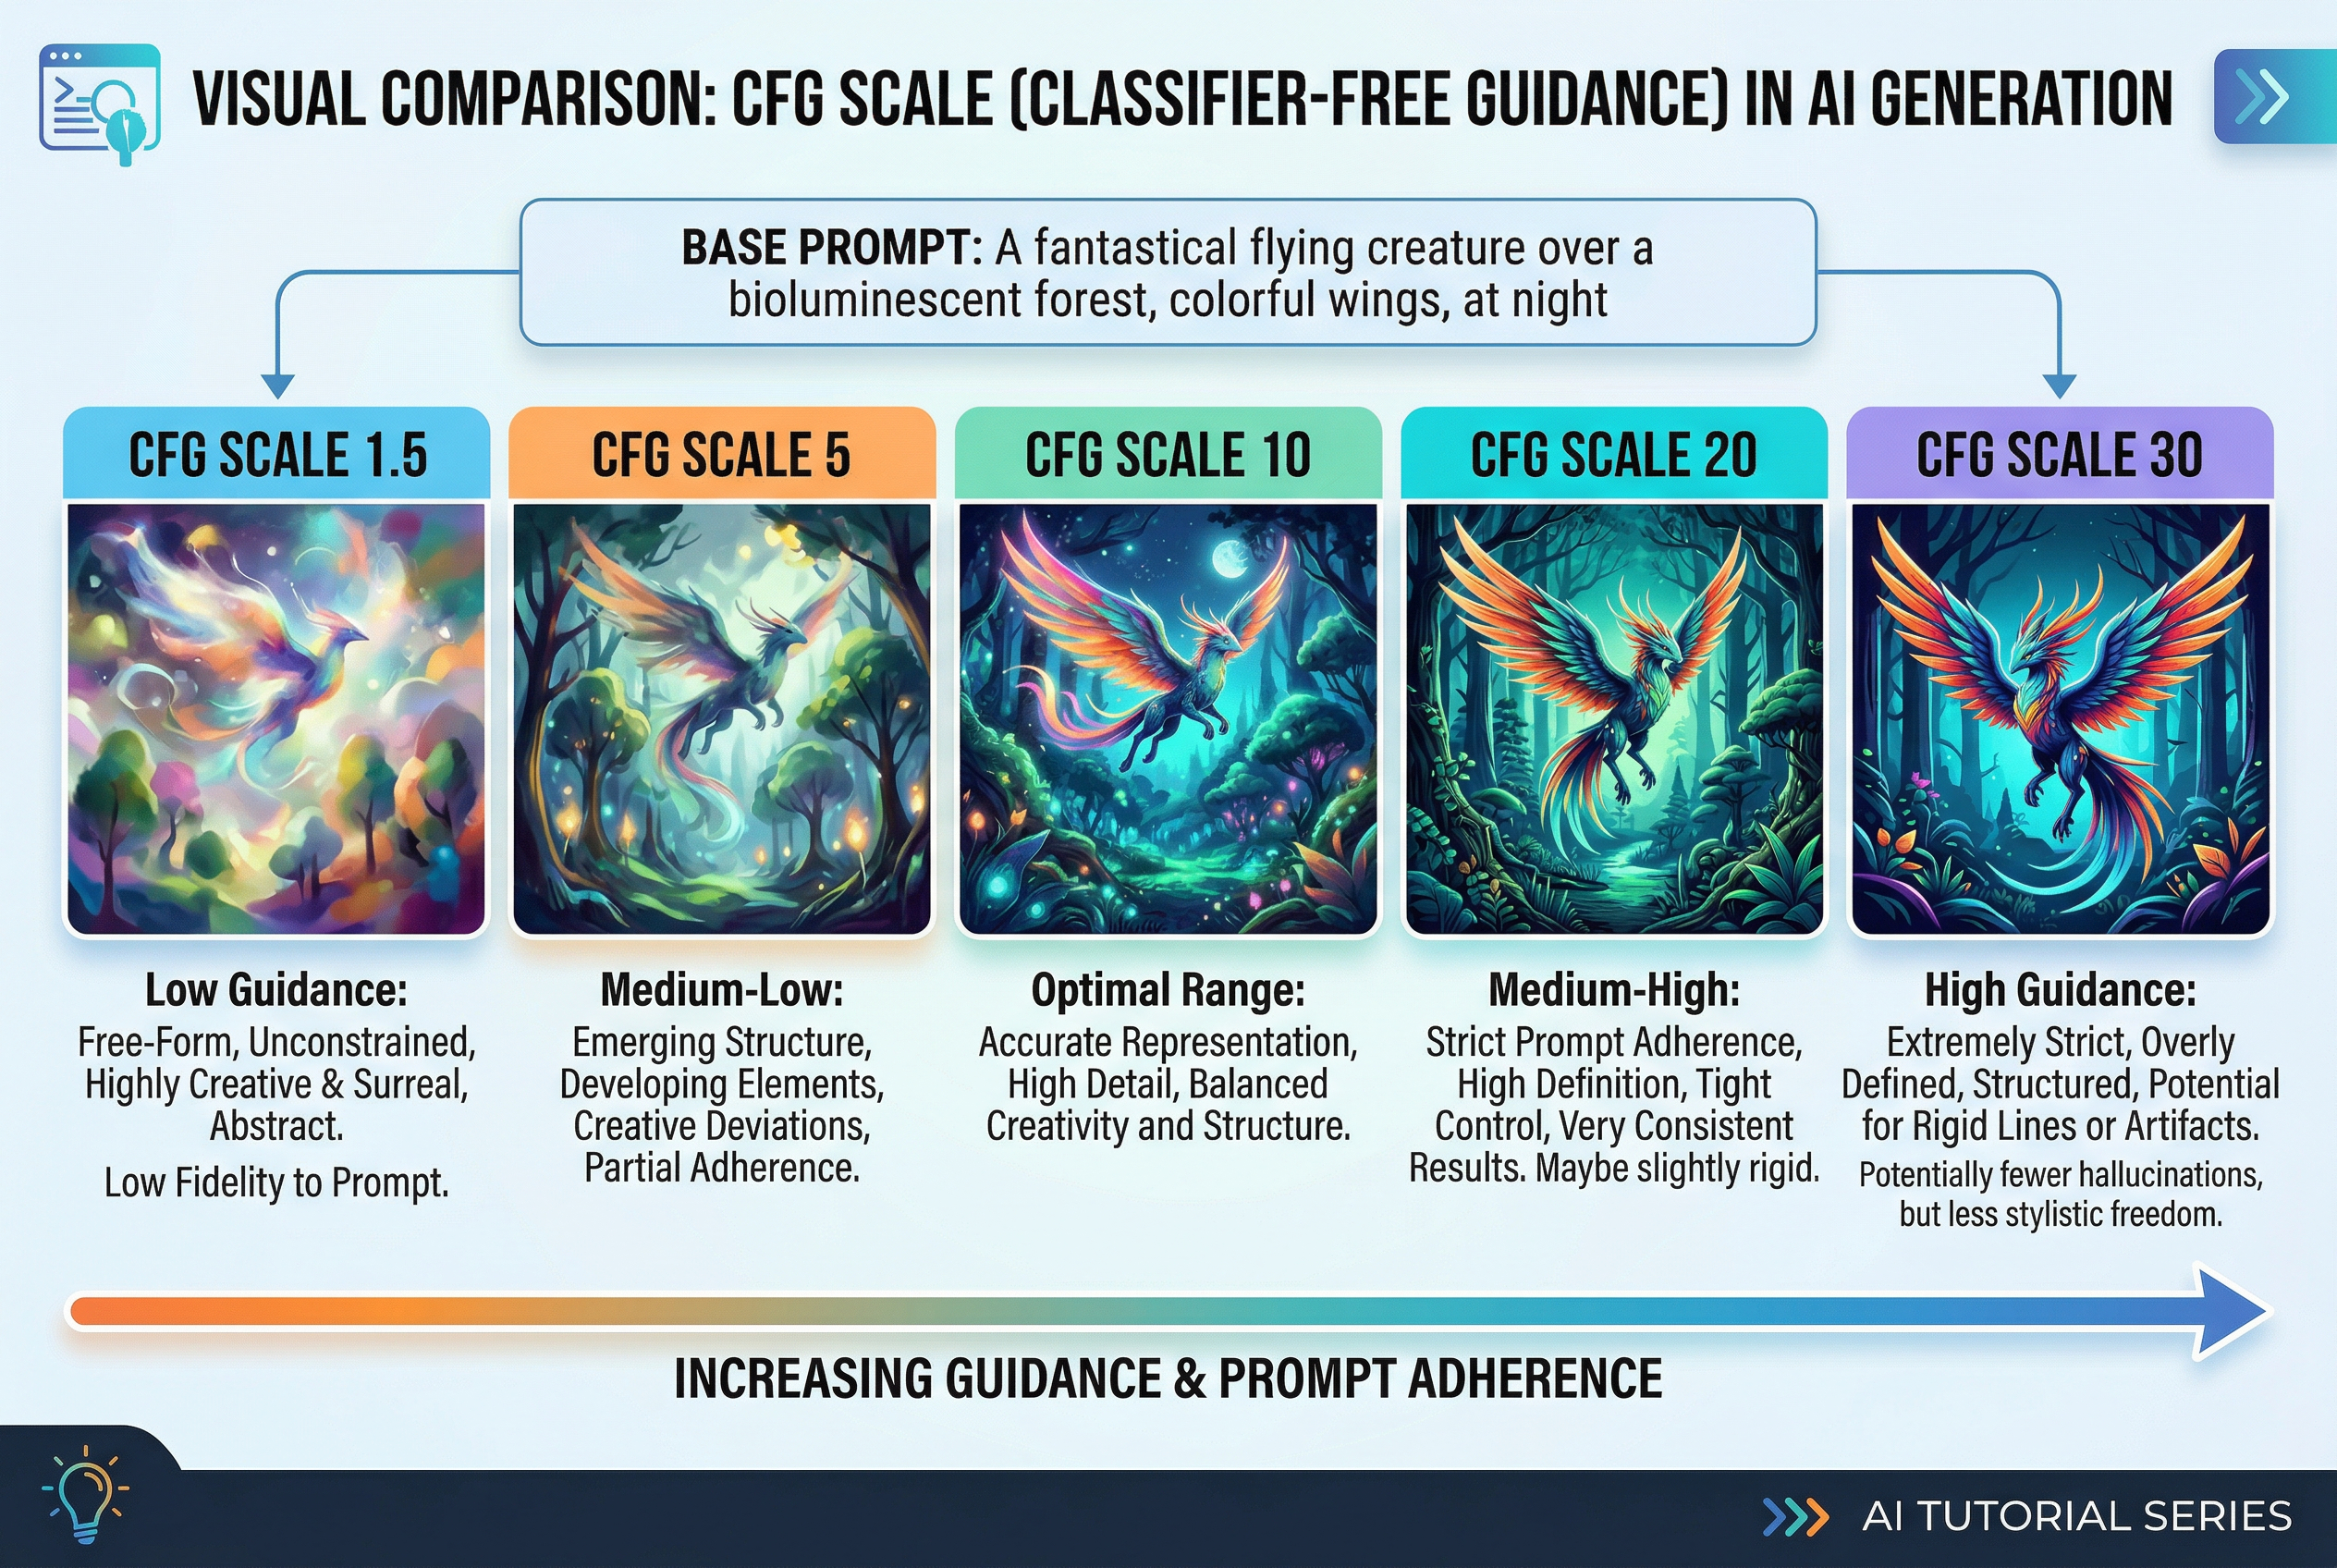
Think of CFG scale as a "strictness dial" for your AI.
- Low CFG (1–4): The AI loosely interprets your prompt. It adds its own ideas, gets creative, and sometimes wanders off-topic entirely. Images tend to look softer, more abstract, and occasionally incoherent.
- Medium CFG (5–10): The sweet spot for most people. The AI follows your prompt closely enough to produce recognizable results while still maintaining natural-looking image quality.
- High CFG (11–20+): The AI clings to every word in your prompt like a helicopter parent. Details get sharper and more literal, but images can become oversaturated, noisy, or filled with artifacts.
Here's the catch that trips up most beginners: higher doesn't mean better. Cranking CFG to 20 won't give you a "more accurate" image. It'll give you an over-processed one with weird color banding and visual noise. The goal is to find the CFG value where the AI understands your intent without trying too hard.
How CFG Scale Actually Works (The Technical Bit)
If you just want practical settings, feel free to skip to the cheat sheet. But understanding the mechanics will make you better at dialing in the perfect value.
CFG stands for Classifier-Free Guidance. Here's the basic idea:
When a diffusion model generates an image, it actually makes two predictions at every step of the process:
- An unconditional prediction — what the model thinks the image should look like without any prompt at all (basically, "what does a typical image look like?")
- A conditional prediction — what the model thinks the image should look like based on your specific text prompt
The CFG scale controls how much the model amplifies the difference between these two predictions. In formula terms:
final_output = unconditional + CFG_scale × (conditional − unconditional)
When CFG = 1, the model uses only the conditional prediction (your prompt) with no amplification. When CFG = 7, it takes the difference between the prompted and unprompted versions and pushes it 7× further in the direction of your prompt. When CFG = 20, it's pushing that difference 20× — which is why things start looking extreme.
Think of it like turning up the volume on a speaker. A little amplification makes the music sound clearer and more detailed. Too much, and it distorts.
Why "Classifier-Free"?
Older diffusion models used a separate classifier network (basically another AI model) to guide image generation toward specific labels like "cat" or "landscape." This worked, but it was clunky and limited.
Classifier-free guidance, introduced in a 2022 research paper, replaced that external classifier with the model's own understanding. Instead of asking a separate network "does this look like a cat?", the model compares its prompted output against its unprompted output. It's simpler, more flexible, and produces better results — which is why virtually every modern AI image generator uses this approach.
CFG Scale Settings by Model: A Complete Breakdown
Not all AI models respond to CFG scale the same way. This is one of the most common mistakes: using the same CFG value across different models and wondering why results vary wildly.
Stable Diffusion 1.5
SD 1.5 is the model that put AI art on the map, and it's still widely used thanks to its massive library of custom checkpoints and LoRAs.
- Default sweet spot: 7–9
- Photorealistic models: 5–8 (lower values help avoid the "AI look")
- Anime/illustration models: 7–12 (these can handle higher values without as many artifacts)
- Detailed scenes with long prompts: 9–12 (higher guidance helps the model hit more of your specific details)
- Avoid: Going above 15 — SD 1.5 starts producing visible noise and color distortion
SD 1.5 relies heavily on CFG to follow prompts, partly because its text encoder (CLIP ViT-L/14) is relatively simple. This means you might need higher CFG values to capture complex prompt details, but you'll hit the quality ceiling faster too.
Stable Diffusion XL (SDXL)
SDXL brought a significant upgrade: a dual text encoder system (OpenCLIP ViT-bigG + CLIP ViT-L) that understands prompts much better. The result? You can use lower CFG values and still get prompt-accurate results.
- Default sweet spot: 5–8
- Portraits: 5–6
- Landscapes and environments: 6–7
- Complex multi-subject scenes: 7–8
- Avoid: Going above 10 — SDXL's improved text understanding means high CFG causes oversaturation and artifacts faster than SD 1.5
Pro tip: If you're switching from SD 1.5 to SDXL, reduce your CFG by about 2 points from what you're used to. A lot of people move to SDXL and keep using CFG 7–9, which works but often produces slightly over-sharpened images. Try 5–6 first.
Stable Diffusion 3 / SD 3.5
SD3 and SD3.5 use an even more advanced architecture (MMDiT with three text encoders, including T5-XXL). Text comprehension is dramatically better, especially for spatial relationships and complex descriptions.
- Default sweet spot: 4–7
- Simple prompts: 3.5–5
- Complex scenes: 5–7
- Avoid: Going above 8 — the model is so good at following prompts that high CFG creates harsh, unnatural results quickly
Flux (Black Forest Labs)
Here's where things get interesting. Flux models handle guidance completely differently, and this trips up a lot of people.
Flux Dev and Flux Schnell are distilled models. During distillation, the guidance behavior gets baked into the model itself, so traditional CFG doesn't apply the same way.
- CFG scale: Leave it at 1 (yes, really)
- Guidance scale (separate parameter): 3–4 for Flux Dev, not applicable for Flux Schnell
The key distinction: In Flux, there's a separate "guidance" parameter that's different from traditional CFG. Flux Dev uses guidance-distilled inference, where a guidance value of 3–4 approximates what CFG 7 would do in older models. Flux Schnell doesn't use guidance at all — it's a single-step distilled model that has guidance behavior fully internalized.
If you set CFG to 7 in Flux Dev thinking it'll work like SD 1.5, you'll get a blown-out, artifacts-heavy mess. Always check which guidance system your model uses.
DALL·E, Midjourney, and Other Closed Models
Most commercial AI image generators (Midjourney, DALL·E 3, Adobe Firefly, and tools like AI Photo Generator) handle guidance internally. You don't get a CFG slider — the model automatically selects optimal guidance based on your prompt.
This is actually a feature, not a limitation. These platforms tune their guidance systems to work well out of the box, so you can focus on prompting instead of parameter tweaking. If you want the control that CFG provides, open-source models like Stable Diffusion are the way to go.
CFG Scale Cheat Sheet
Bookmark this. You'll come back to it.
By Model
| Model | Recommended CFG | Max Before Artifacts |
|---|---|---|
| SD 1.5 | 7–9 | ~15 |
| SDXL | 5–8 | ~10 |
| SD 3 / SD 3.5 | 4–7 | ~8 |
| Flux Dev | 1 (guidance: 3–4) | N/A |
| Flux Schnell | 1 (no guidance) | N/A |
By Style / Use Case
| Goal | CFG Range (SD 1.5) | CFG Range (SDXL) |
|---|---|---|
| Dreamy / abstract art | 3–5 | 2–4 |
| Photorealistic portraits | 5–8 | 4–6 |
| Landscapes / environments | 7–9 | 5–7 |
| Anime / illustration | 7–12 | 5–8 |
| Highly detailed scenes | 9–12 | 6–8 |
| Text in images | 10–14 | 7–9 |
CFG Scale vs. Other Parameters: How They Interact
CFG scale doesn't exist in a vacuum. It interacts with several other key settings, and understanding these relationships will save you hours of trial and error.
CFG Scale and Sampling Steps
Sampling steps control how many iterations the model goes through to refine your image. More steps = more refinement, but also more computation time.
Here's the interaction that matters: higher CFG values generally need more sampling steps to produce clean results. At CFG 7 with 20 steps, you might get a great image. At CFG 14 with 20 steps, the model hasn't had enough iterations to resolve the aggressive guidance, and you'll see noise. Bump it to 30–40 steps and the same CFG 14 might look acceptable.
Rule of thumb: If you're pushing CFG above 10, add 10–15 extra sampling steps to compensate.
CFG Scale and the Sampler
Different samplers respond to CFG differently:
- Euler / Euler a: Fast and forgiving. Handles a wide range of CFG values well. Great for experimentation.
- DPM++ 2M Karras: One of the most popular choices. Produces clean results at moderate CFG (5–9) and tolerates higher values better than most samplers.
- DDIM: Very stable across CFG ranges but can look slightly less detailed than other options.
- UniPC: Excellent for SDXL. Converges quickly and handles the lower CFG sweet spots well.
If you're not sure which sampler to use, DPM++ 2M Karras is the safe bet for most workflows.
CFG Scale and Negative Prompts
This one's important: CFG scale amplifies the effect of your negative prompt just as much as your positive prompt.
Remember the formula? The CFG scale amplifies the difference between the conditional (prompted) and unconditional predictions. Your negative prompt modifies the unconditional prediction, so higher CFG pushes the image further away from your negative prompt terms.
Practical takeaway: If you have aggressive negative prompts (like "blurry, deformed, low quality, watermark") and a high CFG, the model might over-correct and produce images that look artificially "perfect" — too smooth, too sharp, or uncanny. Try reducing CFG by 1–2 points if your negatives are heavy.
Common CFG Scale Mistakes (And How to Fix Them)
Mistake 1: Using the Same CFG for Every Model
As we covered above, every model architecture has a different optimal CFG range. Using CFG 7 across the board might work okay for SD 1.5, but it'll produce over-guided images in SDXL and cause chaos in Flux.
Fix: Start with the model-specific defaults from the cheat sheet above, then adjust by ±2 based on your results.
Mistake 2: Cranking CFG to "Fix" a Bad Prompt
When the AI isn't following your prompt, the temptation is to push CFG higher. Sometimes this works (if CFG was genuinely too low). But more often, the problem is the prompt itself — ambiguous wording, conflicting descriptions, or concepts the model hasn't learned well.
Fix: Before touching CFG, try rewriting your prompt. Be more specific. Break complex ideas into simpler descriptions. Use known trigger words for your specific model or LoRA.
Mistake 3: Ignoring CFG When Troubleshooting Artifacts
You've got an image with weird color banding, noise, or distortion. You start adjusting the sampler, adding negative prompts, changing the seed — but never think to lower CFG.
Fix: Many common artifact issues are simply caused by CFG being 2–3 points too high. Try reducing it before changing anything else. It's the quickest troubleshooting step.
Mistake 4: Not Adjusting CFG for Different Aspect Ratios
This is a lesser-known interaction. Non-standard aspect ratios (wide panoramas, tall portraits) sometimes respond differently to CFG, especially in SD 1.5 which was trained primarily on 512×512 images.
Fix: For extreme aspect ratios, try reducing CFG by 1–2 points. The model is already working harder to generate coherent compositions at unusual dimensions — extra guidance pressure can push it over the edge.
Mistake 5: Changing CFG and Seed at the Same Time
If you're testing CFG values but also randomizing the seed each time, you'll never know which change improved the image.
Fix: Lock your seed, then sweep through CFG values in increments of 1–2. This isolates the effect of CFG and helps you find the optimal value for your specific prompt and model combo.
CFG Scale for Specific Use Cases
Photorealistic AI Portraits
For photorealistic results — especially faces and skin tones — lower is usually better. High CFG creates harsh shadows, unnatural skin textures, and that telltale "AI sharpness" that makes images look processed.
- SD 1.5 with realistic checkpoints: CFG 5–7
- SDXL: CFG 4–6
- Pair with: Low negative prompt weight, DPM++ 2M Karras sampler, 25–30 steps
Anime and Illustration
Anime models are designed to produce bold lines, saturated colors, and stylized features. They generally tolerate higher CFG values without looking "over-processed" because the art style inherently has strong contrasts.
- SD 1.5 anime checkpoints: CFG 7–12
- SDXL anime checkpoints: CFG 5–9
- Pair with: Euler a sampler, 20–28 steps
Landscapes and Environment Art
Landscapes benefit from moderate CFG — enough to nail the composition and lighting you described, but not so much that natural elements (clouds, water, foliage) look artificial.
- SD 1.5: CFG 7–9
- SDXL: CFG 5–7
- Pair with: DPM++ 2M Karras or DPM++ SDE Karras, 25–35 steps
Text and Typography in Images
Generating readable text in images is one of the hardest tasks for diffusion models. Higher CFG can help because it forces the model to follow the exact characters you've specified — but there's a narrow window before artifacts appear.
- SD 1.5: CFG 10–14 (with extra steps)
- SDXL: CFG 7–9
- Flux Dev: Guidance 3.5–4 (Flux is significantly better at text than SD models)
Inpainting and Img2Img
When you're working with existing images (inpainting a face, modifying a background), CFG interacts with the denoising strength parameter. Higher denoising means the model can change more of the image, and CFG controls how strictly it follows your prompt for those changes.
- Light edits (denoising 0.2–0.4): CFG 5–7
- Moderate changes (denoising 0.4–0.7): CFG 7–10
- Heavy repaints (denoising 0.7–1.0): Treat like txt2img — use your model's standard CFG range
The Evolution of Guidance: Where CFG Is Heading
The AI image generation space moves fast, and CFG as we know it is already evolving.
Distilled and Flow-Matching Models
Newer architectures like Flux, Stable Diffusion 3, and various distilled models are moving away from traditional CFG. Instead of requiring the model to make two separate predictions (conditioned and unconditioned) at every step, these models bake guidance behavior directly into the network during training.
The result: fewer parameters to tweak, faster generation, and more consistent quality out of the box. The trade-off is less granular control for power users — but for most people, this is an upgrade.
Dynamic and Scheduled CFG
Advanced users in tools like ComfyUI are experimenting with dynamic CFG schedules — changing the CFG value during the generation process. For example:
- Start with high CFG (10–12) for the first 30% of steps to establish strong composition
- Gradually reduce to low CFG (4–6) for the remaining steps to refine details naturally
This produces images with both strong prompt adherence and natural-looking quality. Several custom nodes and workflows exist for this in ComfyUI, and it's likely to become a standard feature in future tools.
Perturbed Attention Guidance (PAG)
One emerging alternative is Perturbed Attention Guidance, which doesn't require the unconditional prediction step at all. Instead of comparing prompted vs. unprompted outputs, PAG perturbs the model's self-attention layers to create a guidance signal. Early results show comparable quality with fewer computation steps — meaning faster generation without sacrificing control.
Quick-Start Workflow for Finding Your Ideal CFG
If you're new to tweaking CFG, here's a simple process that works every time:
- Start at the model default: SD 1.5 → CFG 7 | SDXL → CFG 6 | SD3 → CFG 5
- Lock your seed: Pick any seed and keep it constant while testing.
- Generate a baseline image at the default CFG.
- Generate at CFG ±2: So for SD 1.5, try CFG 5 and CFG 9.
- Evaluate:
- Too soft/ignoring prompt? → Increase CFG by 1–2
- Artifacts, noise, oversaturation? → Decrease CFG by 1–2
- Looks good? → You're done.
- Fine-tune in increments of 0.5 once you've found the approximate range.
This entire process takes about 5 minutes and 6–8 test generations. Once you know your sweet spot for a given model + prompt style, you'll rarely need to change it.
Wrapping Up
CFG scale is one of those parameters that seems simple on the surface but has a profound impact on everything your AI generates. The difference between a mediocre image and a stunning one is often just 2–3 points on the CFG slider.
The key takeaways:
- CFG controls prompt adherence vs. creative freedom — it's a balance, not a "higher is better" situation
- Every model has a different sweet spot — SDXL needs lower CFG than SD 1.5, and Flux barely uses traditional CFG at all
- CFG interacts with everything — samplers, steps, negative prompts, and even aspect ratio all affect the optimal value
- When in doubt, go lower — it's easier to add guidance than to fix over-guided artifacts
- Test systematically — lock your seed, sweep CFG in small increments, and let the results speak
Now go experiment. The best way to internalize CFG is to see its effects across your own prompts and preferred models. Start with the cheat sheet, adjust to taste, and before long, dialing in the perfect CFG value will be second nature.

