Thanks to AI, bringing old photos back from the brink is easier than ever. We're talking about fixing faded colors, healing deep scratches, and pulling blurry details back into sharp focus—all with just a few clicks. With a tool like AI Photo HQ, you don’t need to be a professional editor to give your cherished memories a new lease on life. This guide will walk you through the practical steps, from scanning your physical photos to letting the software work its magic.
Giving Your Old Photos a Second Chance with AI
Got a shoebox full of family photos? The ones that are faded, torn, or have that weird color cast from decades past? Not too long ago, fixing them meant finding a specialist and spending a small fortune. But artificial intelligence has completely changed the game. Now, anyone can restore those irreplaceable moments.
This guide is your hands-on walkthrough for using AI Photo HQ to breathe new life into your history.
Photo restoration has come a long way from the early days of manually editing scanned prints. Big leaps in AI and neural networks have made the process incredibly fast and surprisingly accurate. What used to be hours of painstaking work can now produce stunning results in minutes, complete with sharp details and natural-looking colors.
What to Expect in This Guide
Think of this less as a technical manual and more as a step-by-step tutorial for making your history vibrant again. We'll start at the very beginning—getting your photos digitized the right way to set yourself up for success. After that, we’ll jump straight into the AI Photo HQ software with a practical example.
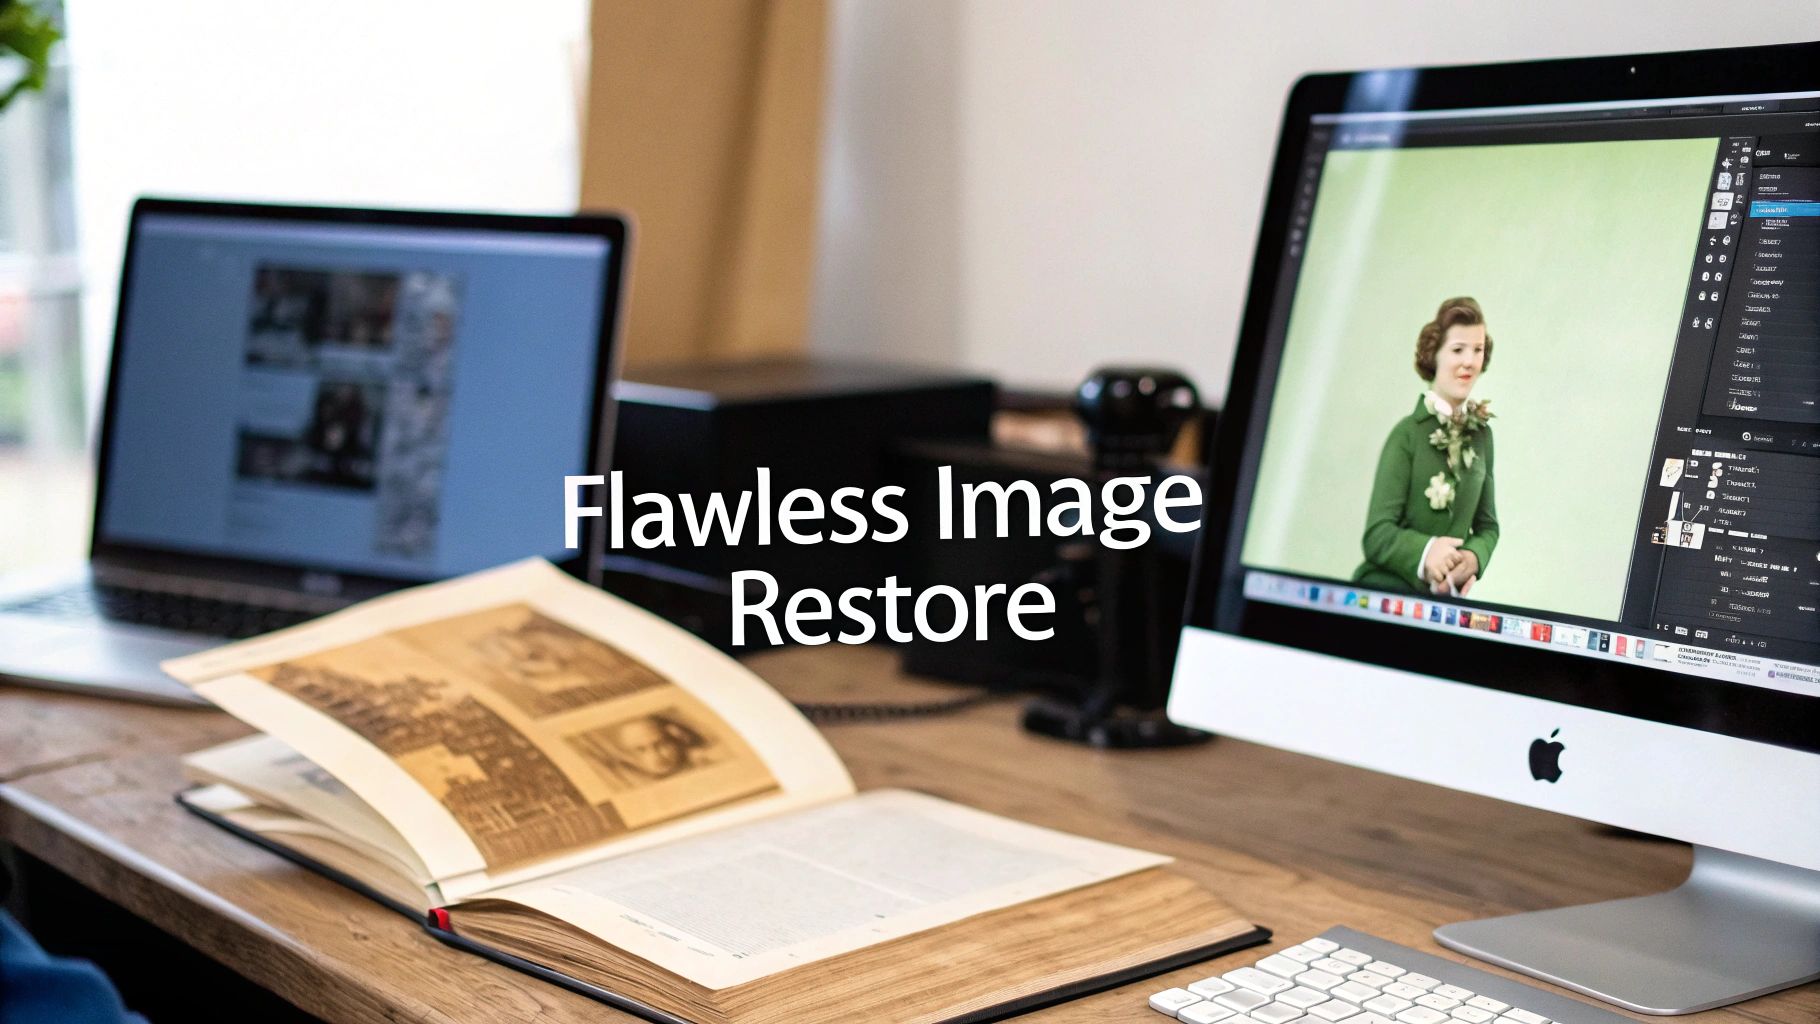
Here’s a quick look at the interface where all the action happens.
As you can see, it’s a clean layout that gives you direct access to some powerful tools for scratch removal, color correction, and even fixing faces.
I'll show you exactly which AI settings to use for common problems like scratches, fading, and discoloration, complete with some real before-and-after examples. For a deeper dive into what's possible, check out our guide on enhancing old photographs.
Key Takeaway: The real goal of AI restoration isn’t to create a perfect, plastic-looking image. It’s about recovering the original spirit and detail of the photograph while keeping its authentic character intact.
And once your photos are restored, a whole new world of creative possibilities opens up. For instance, you could take that beautifully restored portrait of your great-grandmother and learn how to turn a photo into a painting for a truly unique piece of art.
Digitizing Your Photos for Flawless Restoration
Every restoration project stands or falls on the scan you feed into AI Photo HQ. A poor scan will lead to poor results. Think of your scan as the bedrock—get it right, and everything built on top will shine. Here’s how to do it step-by-step.
Step 1: Prepare Your Print And Scanner
Start by handling your photographs with care.
- Clean the Photo: Use a soft microfiber cloth or a gentle burst of compressed air to sweep away loose dust from the photo's surface. This prevents scratches.
- Clean the Scanner: Wipe down the scanner bed with a lint-free cloth. Any smudges or tiny fibers on the glass can show up in your final scan.
Step 2: Choose The Right Scanner Settings
Once everything is spotless, open your scanner software and dive into the options. The goal is simple: give the AI every bit of information it needs to reconstruct your image.
Focus on these three pillars:
- File Format: Always opt for TIFF (Tagged Image File Format). Unlike JPEGs, TIFF doesn’t throw away data. You get a lossless, pixel-perfect starting point.
- Color Depth: Crank it to 24-bit or 48-bit color if your scanner allows. More bits mean smoother gradients and richer tones—essential when you’re tackling faded skies or discolored skin.
- Resolution (DPI): Higher DPI delivers more dots to work with, but bigger files. Match your scan resolution to what you actually need for printing or display.
Pro Tip: If you’re scanning a magazine or newspaper clipping, resist the “descreen” filter. It softens moiré patterns but can blur fine details you’ll later want the AI to sharpen.
Scanner Resolution Guide for Photo Restoration
Choosing the right DPI can feel overwhelming, but it really comes down to matching resolution with your end goal. Scan too low and you lose detail; scan too high and you’re wrestling with unwieldy file sizes.
Here’s a quick reference to help you zero in on the sweet spot:
| Scan Resolution (DPI) | Best For | Resulting File Size | Restoration Potential |
|---|---|---|---|
| 300 DPI | Standard 4×6 or 5×7 prints you won’t enlarge | ~5–10 MB per scan | Good for basic color tweaks and minor scratch repair |
| 600 DPI | Most family photos, especially if you plan a small enlargement | ~20–40 MB per scan | Excellent for tackling visible creases, fading, and moderate damage |
| 1200 DPI | Tiny snapshots or shots destined for big enlargements | ~80–120 MB per scan | Ideal for severe damage, capturing every scratch and supporting facial reconstruction |
With the right DPI, AI Photo HQ can pick up even the faintest crack or discoloration. Invest a few extra minutes here and you’ll save hours of fine-tuning later on.
A Practical Walkthrough of AI Photo HQ
Once you have a high-quality scan, it's time for the fun part. We'll walk through this together using a real photo: a classic portrait from the 1950s with common problems like color fading, soft focus, and a large crease. This tutorial gives you a hands-on feel for how the tools in AI Photo HQ work in a real-world scenario.
https://www.youtube.com/embed/ArPgYW0P8Lk
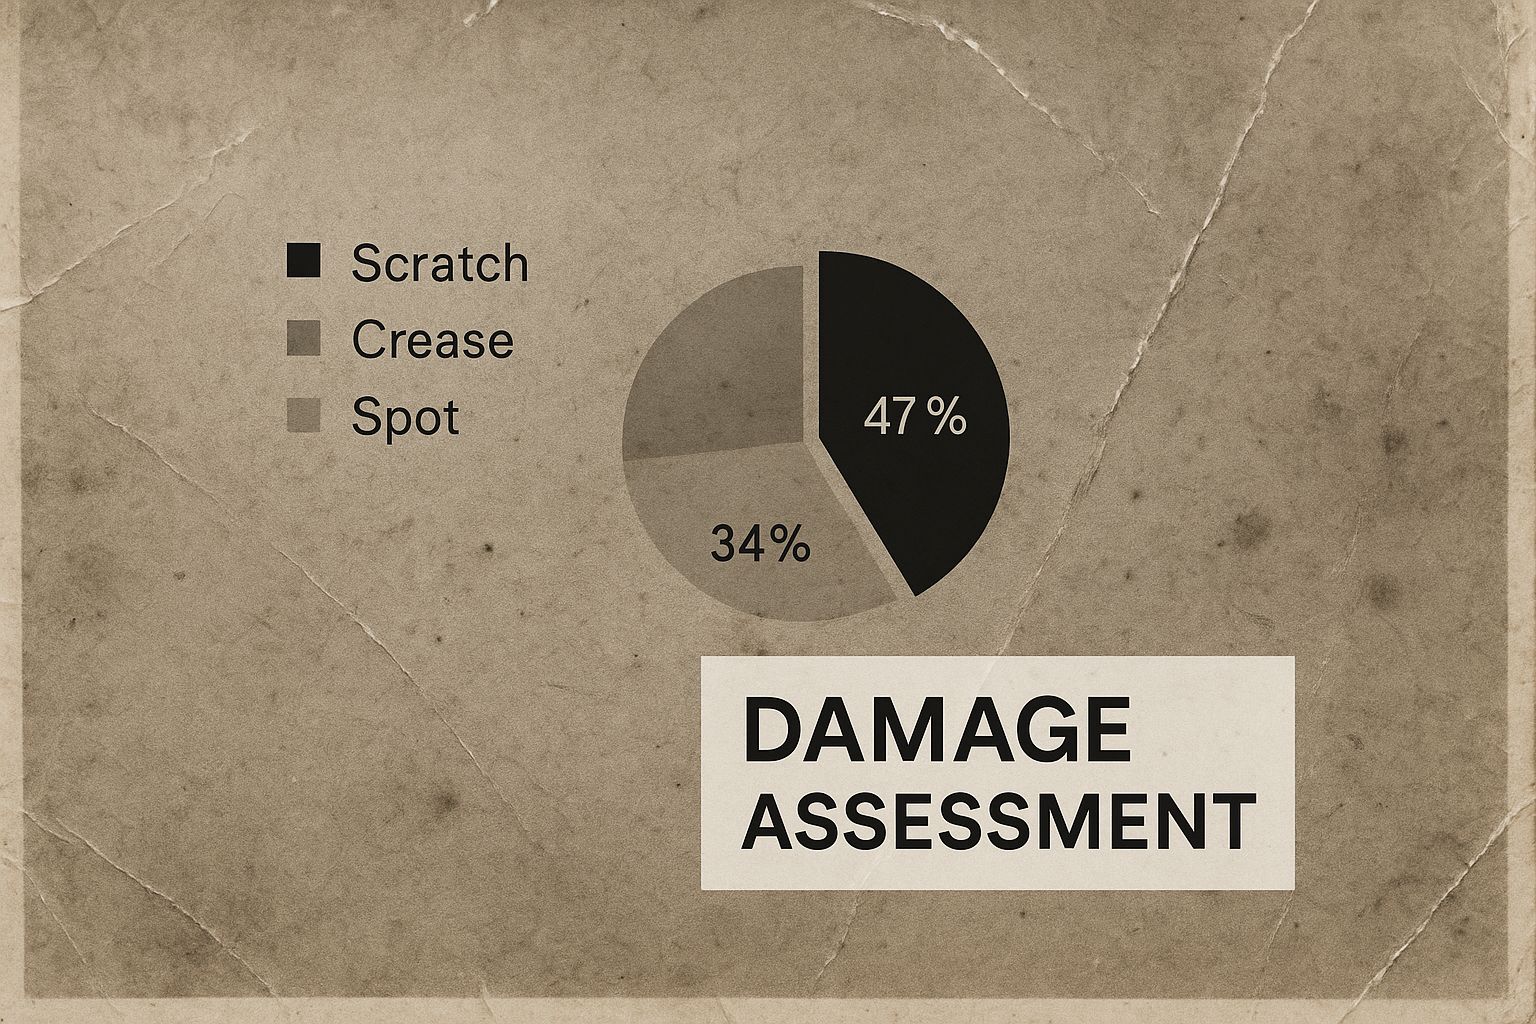
Step 1: Load Your Image and Assess the Damage
First, open AI Photo HQ and drag your scanned TIFF file directly into the window. The software will load the image, giving you a good look at what you're up against.
For our 1950s portrait, we can clearly see the main issues:
- A long, vertical crease that has torn the emulsion.
- The colors have faded to a dull, yellowish tint.
- The subject's facial features have lost their sharpness.
Taking a moment to assess the photo like this is a crucial first step. It helps you decide which tools to use and the best order to apply them.
Step 2: Use the Core AI Tools for Major Fixes
The magic of AI Photo HQ is how it handles the biggest problems with just a few clicks. The main controls are located in the side panel.
Here's a look at the main workspace.
For our example photo, follow these steps:
- Fix Scratches: Toggle the Scratch Removal feature on. The AI analyzes the image, identifies the long crease, and intelligently rebuilds the missing parts by referencing the surrounding pixels to fill the gap seamlessly.
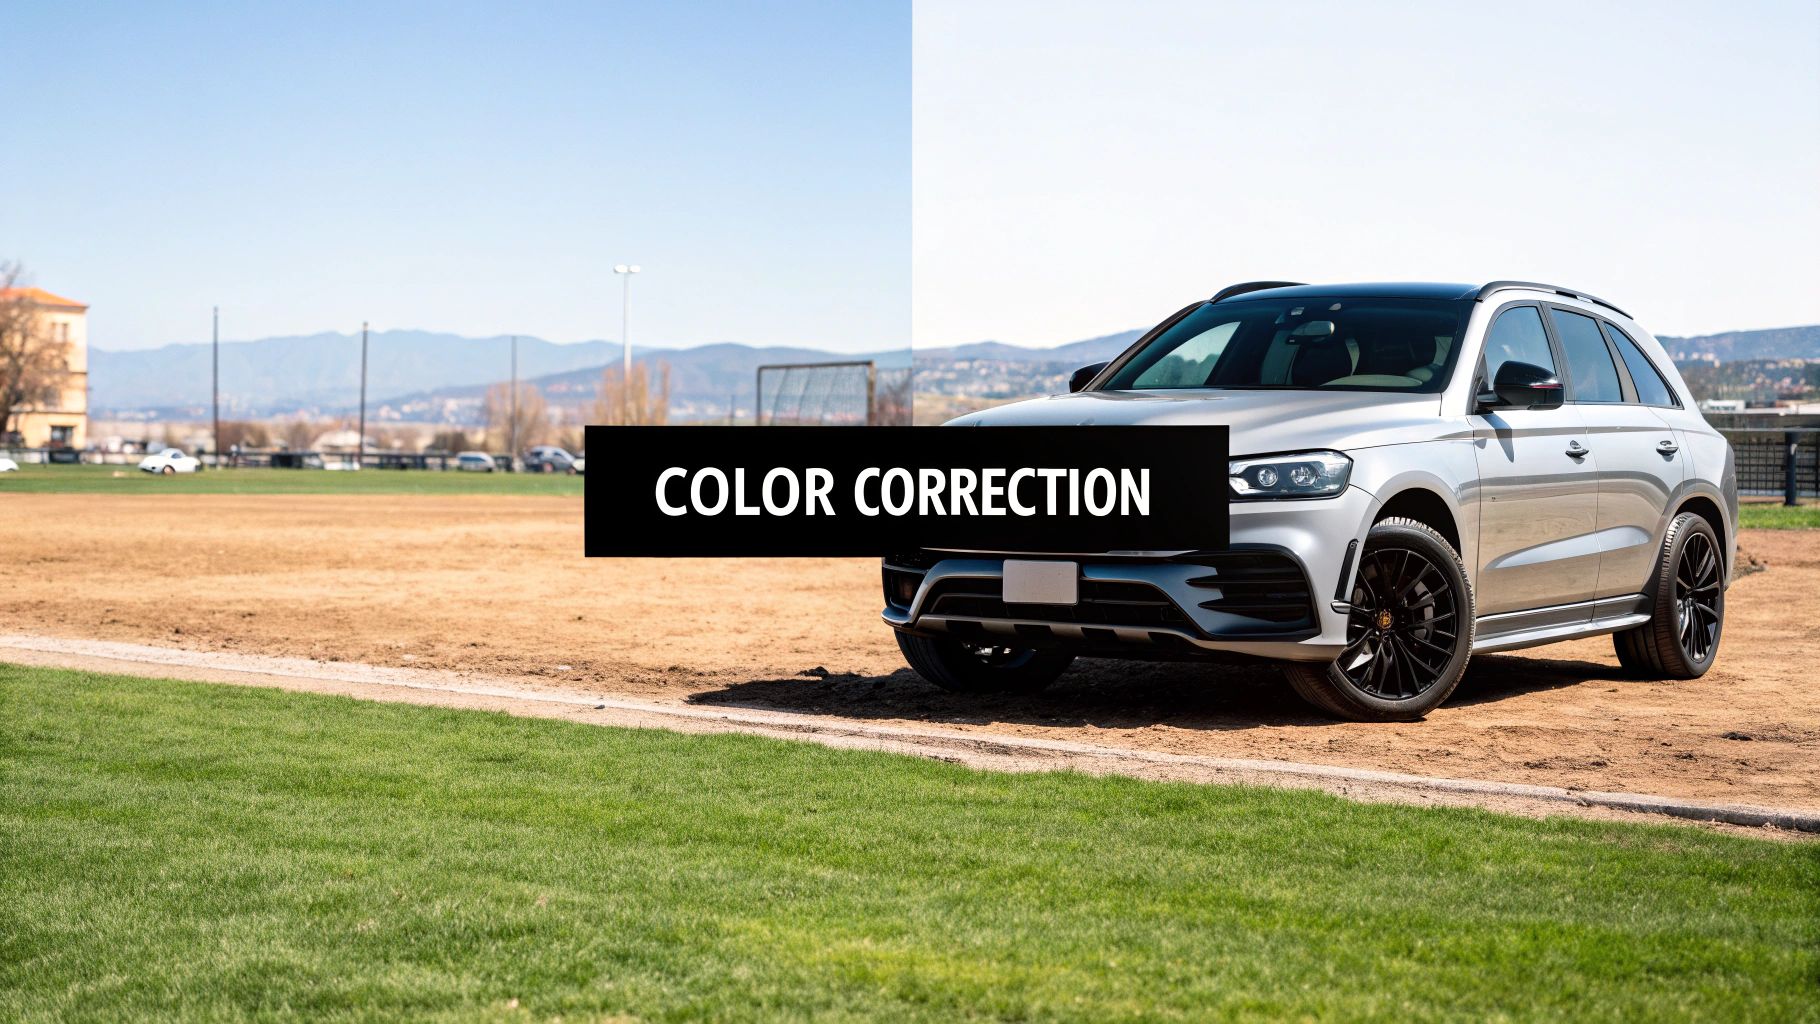
- Restore Color: Next, enable the Color Correction switch. The AI immediately analyzes the washed-out colors and corrects the balance. For our portrait, it removes the yellow cast, brings back natural skin tones, and restores the cool colors in the background.
- Enhance Faces: Finally, turn on Face Enhancement. This tool is specifically designed to bring out facial details. It sharpens the eyes, defines the nose and lips, and brings out the fine texture in the hair without looking over-processed.
Expert Tip: I always recommend applying these AI tools one at a time. This way, you can see exactly what each one is doing. It also helps you decide if you need to make any manual tweaks later on. It's a great way to learn what the software is capable of.
Step 3: Review the AI-Powered Result
With all three tools enabled, grab the before-and-after slider to see the full effect. The crease is gone, the colors look authentic again, and the woman's face is crisp and clear. In just a few seconds, the AI has handled all the major damage.
The power of these tools is a big reason why the digital image processing market is growing so fast. The industry was valued at around $8.34 billion in 2024 and is expected to hit $10.31 billion by 2025, largely because AI is becoming so accessible in visual media. You can find more details on this trend over at Research and Markets.
This initial automated pass gives you a fantastic starting point. For many photos, you might be done right here. But even if you're a perfectionist, the AI has taken care of the hardest parts—like rebuilding texture from a deep scratch—leaving you free to focus on the final, artistic touches.
Mastering Manual Adjustments and Advanced Settings
The AI gives your restoration a massive head start, but your personal touch is what really brings a photo back to life. After the automated tools have done the heavy lifting, it’s your turn to step in and fine-tune the results. This is where you shift from simple repair to true artistic restoration.

Think of the AI's output as a perfectly prepped canvas. Now you get to add the subtle shades and highlights that make the memory feel real again.
Tutorial: Fine-Tuning a Faded Portrait
Let’s continue with our 1950s portrait. The AI fixed the big issues, but the lighting could be better. Here’s a step-by-step tutorial for manual fine-tuning.
- Adjust Brightness: The photo is a bit dark overall. Gently move the Brightness slider to the right. Watch the subject's face as you adjust. Stop when her features are well-lit but not washed out.
- Boost Contrast: The image now feels a bit flat. Increase the Contrast slider slightly. This will make the darks richer and the lights brighter, adding a sense of depth and making the subject "pop" from the background.
- Correct Color Cast: If you still notice a slight color tint (like a lingering yellow hue), use the Saturation and Tint sliders. A small decrease in saturation or a tiny shift on the tint slider can neutralize unnatural colors and perfect the skin tones.
A common problem I run into is a photo where someone's face is half in shadow. After the AI has done its thing, I’ll gently increase the Brightness and pull the Contrast back just a bit. This lifts the shadows just enough to reveal those hidden details without blowing out the highlights in the rest of the image.
The key with these adjustments is subtlety. Small, incremental changes almost always work better than cranking a slider all the way to the end.
Tutorial: Applying Sharpening and Noise Reduction
Once the tones feel right, it's time to dig into the more advanced settings. Sharpening and noise reduction are incredibly powerful, but you must use a careful hand to avoid an artificial look.
- Sharpening: Zoom in on a key detail, like the eyes or fabric texture. Slowly increase the Sharpening slider until the edges look crisp, but stop before you see any harsh "halos" or artifacts. The goal is to enhance existing detail, not create new information.
- Noise Reduction: Old film photos often have a grainy texture. Apply a small amount of Noise Reduction to smooth this out. Be careful not to overdo it, as aggressive noise reduction can strip away fine details like skin texture, leaving subjects looking plastic and flat.
The research community is always pushing the envelope here. For instance, the NTIRE 2025 Challenge brought together 230 participants to tackle noise and blur in RAW images, which is the most data-rich format you can get. Their work, which you can read about in the NTIRE 2025 research findings, highlights just how crucial it is to get these fine details right from the very beginning.
Quick Reference Guide for Common Problems
When you're staring at a specific issue, knowing which tool to grab first saves a ton of time. Here’s a quick cheat sheet I use to match the problem to the right solution.
| Problem Description | Primary Tool to Use | Pro Tip for Best Results |
|---|---|---|
| Colors look washed out or have a yellow/magenta tint. | Saturation & Tint | Adjust saturation first, then use the tint slider to balance out the colors. |
| The subject's face is slightly soft or out of focus. | Sharpening | Apply just a small amount of sharpening and zoom way in to check the details. |
| The photo has a grainy texture throughout. | Noise Reduction | Use the lowest setting that gets the job done without losing important texture. |
| Details in dark clothing or shadows are lost. | Shadows & Brightness | Gently lift the shadows slider first, then make minor brightness tweaks if needed. |
By getting comfortable with these manual controls, you can elevate your restored images from simply "fixed" to beautifully and authentically preserved memories.
Saving And Archiving Your Restored Memories
You’ve done the hard work of breathing new life into an old photo. Now, the final and most important step is ensuring that restored memory is safe for the long haul. Here's a quick tutorial on how to save and back up your work properly.
Step 1: Save Your "Master File"
Think of this as your digital negative. It’s the highest-quality version of your restored photo, the one you’ll come back to anytime you want to make a new print or a different edit.
- Choose Format: Select TIFF. It's a lossless format, meaning it keeps every single bit of data from your restoration with zero quality loss.
- Save: Save this file in a clearly labeled folder for your restored images.
Step 2: Export a Copy for Sharing
You won’t email a massive TIFF file to family. For sharing, you need a smaller, web-friendly JPEG.
- Choose Format: Select JPEG.
- Set Quality: Choose a high-quality setting (e.g., 90% or higher).
- Set Color Profile: Make sure the color profile is set to sRGB. This is the universal standard for screens and ensures your colors look correct everywhere.
The export screen in AI Photo HQ keeps this simple.
As you can see, you can easily pick your format and quality before hitting that final export button.
Step 3: Build a Bulletproof Digital Archive
A single copy on your computer is a disaster waiting to happen. Follow the "3-2-1 rule" for a real backup plan.
Pro Tip: The gold standard for backups is the "3-2-1 rule." This means you should have three total copies of your important files, on two different types of media, with at least one of those copies living somewhere else (off-site).
Here’s how to set it up:
- Copy 1 (Your Computer): This is your main working copy on your local hard drive.
- Copy 2 (Local Backup): Keep a second copy on a separate external hard drive that you store at home.
- Copy 3 (Cloud Backup): The third copy lives off-site in the cloud. Services like Google Drive, Dropbox, or a dedicated photo backup service are perfect for this.
This simple system protects your precious photos from just about anything life can throw at them. For a deeper dive into managing your digital memories, check out our guide to photo restoration online.
Have Questions About AI Photo Restoration?
As you start digging into restoring your old photos with AI, you're bound to run into a few questions. Getting a handle on what's possible—and what isn't—is the key to getting results that feel authentic and not over-processed. Here are a few of the most common things people ask.
Can AI Really Fix Very Blurry Photos?
This is the big one. And the answer is yes... to a point. AI is incredible at sharpening up photos that are just a little soft. Tools like the Face Enhancement feature in AI Photo HQ can be shockingly good at bringing fuzzy portraits back into focus.
But the technology has its limits. If a photo is extremely blurry, the AI simply doesn't have enough data to work with to rebuild the details from scratch. Try to push it too hard on a hopelessly out-of-focus shot, and you'll often end up with something that looks waxy or has that weird "painted" effect.
My Two Cents: Your final result is only ever as good as your starting point. Always, always begin with the highest-resolution scan you can possibly get. Giving the AI more information to work with is the single best thing you can do for a natural-looking restoration.
Will AI Make My Old Photos Look Fake?
It's a totally fair question. Nobody wants to "restore" a precious memory only to have it look like a plastic, digital cartoon. The best tools are designed specifically to avoid this, but it really comes down to how you use them.
The secret is to use a light touch. Let the automated fixes do the initial heavy lifting, but then dial it back. Make small, incremental tweaks with the manual sliders for things like sharpening and color. I constantly find myself toggling the before-and-after view on and off to make sure I haven’t strayed too far from the original photo's spirit.
What Is the Best File Format for Saving?
When it comes to archiving your newly restored photos, one format stands head and shoulders above the rest: TIFF.
- TIFF (Tagged Image File Format): Think of this as your digital negative. Save your final master copy as a TIFF. It's a "lossless" format, meaning it keeps every last bit of image data without any compression. This is the file you'll want for high-quality prints or if you ever need to edit it again down the road.
- JPEG (Joint Photographic Experts Group): For everything else—sharing on Facebook, emailing to family, or posting on your blog—export a separate, high-quality JPEG. These files are much smaller and web-friendly, but they do shed a tiny bit of quality each time they're saved. That’s why having that original TIFF locked away is so important.
Ready to see what's possible with your own treasured memories? Give AI Photo HQ a try and discover just how simple it can be to bring your old photos back to life. Get started at https://aiphotohq.com.

